Do you have a question about the Graco Glider LX and is the answer not in the manual?
Keep the owner's manual for future reference.
Product requires adult assembly. Follow instructions carefully.
Secure infant, never leave unattended, do not carry with infant.
Avoid loose straps, cords, and items around child's neck.
Do not use the swing without the seat cover.
Stop using the swing if it becomes damaged or broken.
Head support is for use only with this product.
Do not place product near water or wet areas.
Do not use damaged or liquid-exposed AC adapter.
Protect power cord from being walked on or pinched.
Do not use an extension cord; use only the provided cord.
Philips screwdriver and included wrench are needed for assembly.
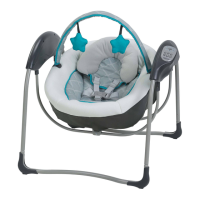
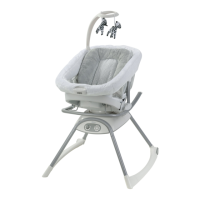
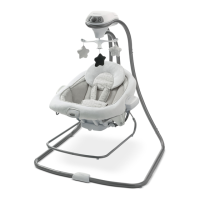
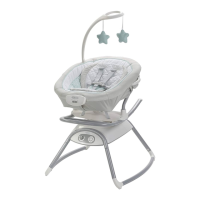
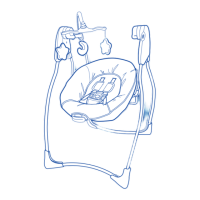
Diagram of parts common to all models.
Diagram of parts included on specific models.
Remove seat pad, attach vibration unit to curved seat tube with screws.
Illustration showing connection of seat components.
Turn seat over, insert seat wire into rear brackets.
Fasten two straps to the wire as shown.
Fasten two snaps on the back of the seat pad to the wire.
Fasten the center snap around the wire.
Fasten two snaps from the bottom flap to the wire.
Fasten two snaps on both sides of the seat pad.
Indicates that the seat assembly is finished.
Lay feet on floor, insert battery housing leg tubes into feet.
Insert the other leg tubes into both feet.
Insert single hinge swing arm into housing, aligning buttons.
Attach hanger tube with double hinge until buttons snap in.
Fasten the screw into the hanger mount.
Insert hangar tube with six-sided holes into swing arm bracket.
Insert hangar tube with oval-shaped holes into swing arm bracket.
Illustration showing connection of hanger tubes.
Insert bolt through bracket holes and tighten with wrench.
Attach plastic cover over tubes until it snaps into place.
Pull on the cover to ensure it is securely attached.
Insert hangar tube into seat tube sides until it clicks.
Pull on hangar tubes to confirm they are attached.
Instructions for attaching the toy bar.
Attach toy bar to the seat as shown.
Illustration of the fully attached toy bar.
Fasten toys onto the toy bar using hook and loop tape.
Only use this head support on this swing.
Only use this body support on this swing.
Use the most reclined position for newborns and young babies.
Use the more upright position for older, active infants.
Squeeze handle and push seat up to raise.
Squeeze handle at seat top and push down to recline.
Always use the seat belt to prevent falling hazards.
Illustration showing how to buckle the infant harness.
Illustration showing how to secure the infant harness.
Use slide adjuster for tighter fit; change slots if needed.
Unfasten snaps, pull straps out, re-insert into desired slots.
Ensure straps are even with or above shoulders; avoid twisting.
Open lid with key, insert four D (LR20 -1.5V) batteries.
Ensure batteries are inserted correctly for operation.
See page 28 for safe battery usage instructions.
Store batteries away from children's access.
Do not mix battery types, old/new, or alkaline/rechargeable.
Do not dispose in fire, never recharge non-rechargeable batteries.
Discard leaky batteries immediately; they can cause burns.
Remove batteries if product is unused for a month or more.
Use alkaline disposable D (LR20 - 1.5V) batteries.
Unauthorized modifications may void user authority.
Equipment complies with Class B digital device limits.
Measures to correct radio or TV reception interference.
Product does not recharge batteries when AC adapter is used.
Batteries automatically shut off when the AC adapter is in use.
Do not use product near water or wet areas.
Do not use AC adapter if exposed to liquids or damaged.
Protect power cord from damage by furniture or walking.
Do not use extension cord; use only provided cord.
Always use seat belt to avoid falling or sliding out.
Press On/Off or speed button to start swing.
Observe motion and change setting if needed.
Push swing to restart; push On/Off to turn off.
If motor stops, turn off, wait, then restart swing.
Press On/Off or speed buttons (1-6) to set speed.
Press to turn swing ON and OFF. Press to stop motion.
Push Music button to play; push again for next track (10 songs).
Press to turn off music and nature sounds.
Use plus (+) to raise, minus (-) to lower volume (5 settings).
Push Nature button to select sounds (5 options).
Set timer for swing/sounds (10, 20, 30 min).
Remove lid, insert 1-D (LR20-1.5V) battery in module.
Turn vibration control to one of two settings.
Check batteries, speed, connections, and child's position.
Check control setting, blanket interference, batteries, child's weight.
Check for loose screws, worn parts, torn material; use Graco parts.
Refer to care tag; use no bleach.
Use mild soap and warm water; no bleach or detergent.
Excessive exposure can cause fading or warping.
| Maximum Weight Recommendation | 30 pounds |
|---|---|
| Swing Speeds | 6 |
| Vibration Settings | 2 |
| Seat Recline Positions | 2 |
| Material Type | Polyester |
| Removable Seat | Yes |
| Machine Washable Seat Pad | Yes |
| Frame Material | Metal |
| Power Source | Battery |
| Batteries Required | Yes |
| Music | 5 nature sounds |
| Swing Directions | Front-to-back |