Do you have a question about the Graco Pack n Play Series and is the answer not in the manual?
Product requires assembly by an adult only.
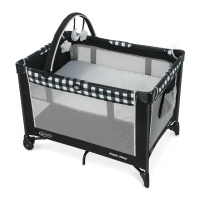
Ensure playard is fully set up, rails latched, floor down, and mattress flat before use.
Supervise children at all times, whether playing or sleeping. Keep child in view.
Position the playard away from potential hazards that could injure the child.
Remove toys or objects that can be used as steps to climb out.
Discontinue use when child exceeds 35 inches, 30 lbs, or can climb out.
Avoid modifying the playard or adding unapproved attachments like add-on bassinets.
Never use improvised netting or covers on playard, as they can cause entrapment and death.
Ensure the side is raised and locked whenever a child is in the product.
Use only non-toxic finishes suitable for children's products if refinishing.
Playard's flexible sides require specific mattress/pad to prevent suffocation. Use only Graco pad.
Infants can suffocate in gaps or on soft bedding. Never add extra padding.
Place healthy infants on their backs to sleep unless advised otherwise by a physician.
Avoid using plastic bags or film as mattress covers, as they can cause suffocation.
Never use a water mattress with the playard.
Keep all strings and cords away from the child.
Keep playard away from windows with blind/drape cords to prevent strangulation.
Do not hang any strings or cords on or over the playard.
Avoid placing items with strings (hood strings, pacifier cords) around a child's neck.
Do not attach strings to toys.
Crucial step in setup: do not push the center down at this stage.
Ensure top rails are locked and rigid before lowering the center of the playard.
Place the mattress/pad with the soft side facing upwards.
Secure the mattress/pad by fastening straps and tucking corners under stiffeners.
Ensure the center of the floor is halfway up before unlocking the top rails.
Follow steps to release tubes and push down; do not force if rails don't unlatch.
If unit won't fold, check for and release partially latched top rails by pressing the button.
Place the cover over the unit with the handle exposed, then zip it closed.
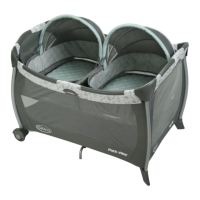
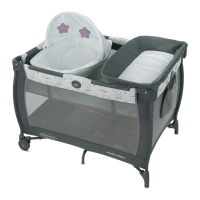
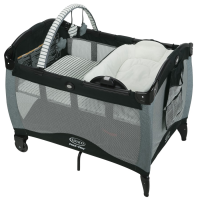
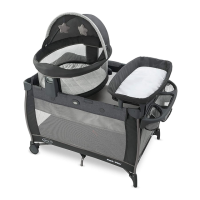
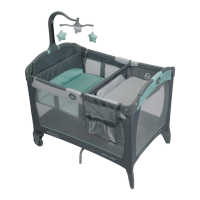
Safety warnings and usage instructions for the bassinet attachment.
Remove playard mattress, attach bassinet mounts, and assemble bassinet tubes correctly.
Insert battery into the electronics module and connect the cord to the bassinet.
Fasten vibration unit correctly and replace batteries in the electronics module as needed.
Securely attach the electronics module to the playard or bassinet using the provided snaps.
Store batteries safely away from children. Handle and dispose of batteries properly.
Use alkaline disposables, do not mix types, and follow troubleshooting for device issues.
Remove the vibration module from the unit once the child can pull up to a standing position.
Learn how to operate vibration, lights, and music functions using the buttons.
Instructions for controlling the top light, bottom light, and music playback.
Details on how to control volume, cycle through nature sounds, and set the timer.
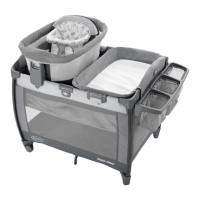
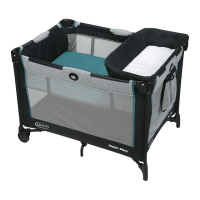
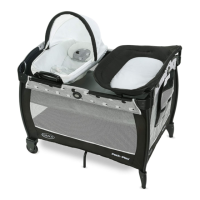
Key safety warnings for changing table use, including supervision and weight limits.
Ensure correct playard attachment, do not use as play area, and follow weight/usage restrictions.
Remove changing table when child is in playard to prevent strangulation risk.
Guide the assembly tube through the fabric as shown, repeating for the other tube.
Connect leg tubes and attach short tubes to the changing table mounts securely.
Snap the changing table onto the playard. Push button to remove, repeating for both sides.
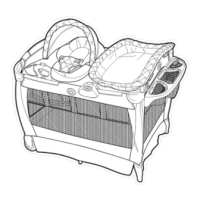
Critical safety warnings for seat use, including fall and suffocation hazards.
Do not use seat if infant rolls over, exceeds 15lb, or is over 3 months. Use restraint system.
Avoid soft surfaces, placing baby face down, or using seat with other items.
Ensure harness is secure, keep cords away from child, and avoid placing items around neck.
Do not use if damaged, ensure canopy is secure, do not remove foam, and do not use on other products.
Critical warning: do not remove foam. Discard the zip tie immediately after unpacking.
Take the mattress pad out of the bassinet to prepare for seat installation.
Unfasten and unplug the vibration unit, then place the mattress pad into the bassinet.
Select the correct handle, insert handle tubes into the rocker, and ensure secure attachment.
Connect seat tubes to the handle, ensuring buttons snap into place.
Insert handle tubes with the electronic switch into the rocker, ensuring secure attachment.
Connect the other seat tubes to the handle, checking that buttons are in place.
Place the foot end of the seat cover over the rocker, then pull it over the handle and tubes.
Secure the seat cover by fastening the snaps as shown.
Turn the seat upside down and fasten the remaining snaps as indicated.
Fasten the snaps to the seat handle and then fasten the snaps on the flaps together.
Open the pocket using hook and loop tape, then plug one end of the cord into the vibration unit.
Place the vibration unit into the pocket and close it by re-attaching the hook and loop tape.
Verify the short cord is sticking out after closing the pocket, then plug it into the electronic switch.
Secure the canopy to the headend using hook and loop tape, then attach canopy mounts to the sides.
Latch the seat onto the bassinet mounts, ensuring both sides are securely attached.
Secure the child using the harness and adjust the waist strap for a snug fit.
Learn to use the electronic switch for soothing vibration speeds (hi/lo).
Release the seat by pressing buttons on the handles and pulling the seat upwards.
Keep objects out of reach. Remove this accessory when the child can pull up in the playard.
Secure the parent organizer to the playard as shown in the illustrations.
Periodically check for wear, clean the playard, carry bag, bassinet, and seat according to instructions.
Details on FCC compliance, interference, and user guidelines for operation.
| Brand | Graco |
|---|---|
| Model | Pack n Play Series |
| Category | Baby & Toddler Furniture |
| Language | English |