~3~ ~4~
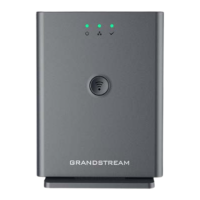
DP755 BASE STATION DESCRIPTION
Subscribe/
Page Button
Power LED
Indicator
Network LED
Indicator
Handset/Sub-
scription LED
Indicator
Front View Back View
Wall Mount Slots
Bracket Slots
Bottom View
Network
Socket
Power Input
Ceiling Mount
4 cm
4 cm
• Using a drill, make a hole on each marked dot. Put a plastic
expansion bolt (not provided) on each hole.
• Mount the DP755 bracket on the ceiling two screws (not pro-
vided).
• Plug the bracket to DP755 using its “Desktop Stand Slots”.
• Mark two dots on the ceiling with 4 cm in be-
tween where to mount DP755.
SETTING UP THE DP755 BASE STATION
Desktop Installation
Wall Mount
6 cm
6 cm
• Plug the bracket to DP755 using its Desktop stand slots.
• Mark two dots horizontally with 6 cm in between where to
wall mount DP755.
• Using a drill, make a hole on each marked dot. Put a plastic
expansion bolt and screw (not provided) on each hole. Let
enough space on the screws to mount DP755.
• Mount the DP755 on the screws using its “Wall Mount Slots”.
SUBSCRIBE HANDSETS TO DP755 BASE STATION
1. Open Subscription
• Access DP755 Web GUI and press subscribe button.
• Or, press Subscribe/Page button on DP755 base station.
2. Handset Registration
1. Access to DP730/DP722/DP720 menu → Registration →
Register.
2. Select “Base 1” and press “Subscribe” softkey.
3. DP730/DP722/DP720 will search for nearby base stations
and will display RFPI code and base station name of the
discovered DP755.
4. Press “Subscribe” to pair with displayed DP755.
POWERING UP/CONNECTING DP755
Connect the network socket on the back of the unit to the
RJ-45 socket of a PoE Network Switch using the network cable
provided or 3
rd
party network cable.
Power using PoE
Power using PSU
• Connect the network socket on the back of the unit to the
network connection socket using the network cable provided
or 3
rd
party network cable.
• Plug the power supply plug into a power source socket. Plug
the microUSB connector into related socket at the back of the
unit.
 Loading...