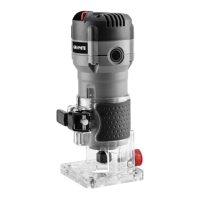
8. Bearing guide
a) You could operate the tool conveniently with for home
furniture like desk, bed, seat etc with the bearing guide. The
tool could move with the bearing guide agilely to assure
precise cutting (Fig 16).
b) Use the fixing nut (A) to assemble the bearing guide to
the base plate. Loose the fixing nut (B) to adjust the
distance between cutting bits and the bearing guide seat.
When you achieve proper distance, screw the fixing nut (B)
tightly (Fig 17).
c) When operating the tool, please keep the bearing guide
tightly to the edge of the work piece (Fig 18).
ELEMENT LIST
* Right to introduce changes is reserved.
“Grupa Topex Spółka z ograniczoną odpowiedzialnością” Spółka
komandytowa with seat in Warsaw at ul. Pograniczna 2/4 (hereinafter
Grupa Topex) informs, that all copyrights to this instruction (hereinafter
Instruction), including, but not limited to, text, photographies, schemes,
drawings and layout of the instruction, belong to Grupa Topex
exclusively and are protected by laws accordingly to Copyright and
Related Rights Act of 4 February 2004 (ustawa o prawie autorskim i
prawach pokrewnych, Dz. U. 2006 No 90 item 631 with later
ammendments). Copying, processing, publishing, modifications for
commercial purposes of the entire Instruction or its parts without written
permission of Grupa Topex are strictly forbidden and may cause civil
and legal liability.
DE
Kantenschneider
Übersetzung des Benutzerhandbuchs
59G718
VORSICHT: BEVOR SIE DAS ELEKTROWERKZEUG
VERWENDEN, LESEN SIE DIESES HANDBUCH
SORGFÄLTIG DURCH UND BEWAHREN SIE ES ZUM
ZUKÜNFTIGEN NACHSCHLAGEN AUF.
DETAILLIERTE SICHERHEITSVORSCHRIFTEN
• Fassen Sie das Elektrowerkzeug nur an der isolierten
Grifffläche an, da die Schneidevorrichtung
möglicherweise mit dem eigenen Kabel in Berührung
kommt. Durch das Durchtrennen eines „stromführenden“
Drahts können freiliegende Metallteile des
Elektrowerkzeugs „stromführend“ werden und dem
Bediener einen elektrischen Schlag versetzen.
• Verwenden Sie Klemmen oder eine andere praktische
Methode, um das Werkstück auf einer stabilen
Plattform zu befestigen und abzustützen . Wenn Sie das
Werkstück mit der Hand oder gegen den Körper halten,
wird es instabil und kann zum Kontrollverlust führen.
• Fräserbits müssen genau zum Halter des
Elektrowerkzeugs passen. Eine Fehlanpassung von
Arbeitswerkzeug und Elektrowerkzeughalter verursacht
eine ungleichmäßige Rotation, starke Vibrationen und kann
zum Verlust der Kontrolle über das Elektrowerkzeug
führen.
• Die Drehzahl der Arbeitsgeräte darf die für das
Elektrowerkzeug angegebene maximale Drehzahl nicht
unterschreiten. Geräte, die einer höheren Drehzahl
ausgesetzt sind, können beschädigt werden.
• Halten Sie die Tauchfräse während des Betriebs an
beiden Griffen fest, halten Sie die Körperhaltung stabil.
Das Elektrowerkzeug ist sicherer, wenn es mit zwei Händen
gehalten wird.
• Berühren Sie den rotierenden Fräser nicht und
bringen Sie die Hände nicht in den Arbeitsbereich des
Fräsers. Halten Sie Ihre zweite Hand am Zusatzhandgriff.
Das Führen des Geräts mit beiden Händen verringert die
Gefahr von Schnittverletzungen mit dem Arbeitswerkzeug.
• Tragen Sie persönliche Schutzausrüstung. Tragen Sie
je nach Art der Arbeit Schutzmaske, Schutzbrille,
Schutzbrille und Gehörschutz. Augen vor Partikeln
schützen, die bei der Arbeit entstehen und in der Luft
schweben. Die Staubschutzmaske schützt die Atemwege
und muss den bei der Arbeit entstehenden Staub
herausfiltern. Längere Lärmbelastung kann zu Hörverlust
führen.
 Loading...