Do you have a question about the Great Lakes MINISTAR S and is the answer not in the manual?
| Brand | Great Lakes |
|---|---|
| Model | MINISTAR S |
| Category | Dental equipment |
| Language | English |
Specifications including voltage, power, pressure, dimensions, and weight.
Instructions for unpacking, setting up, and preparing the MiniSTAR S unit for operation.
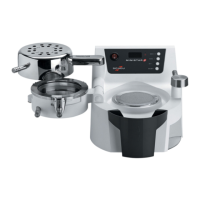
Identifies and describes the main parts of the MiniSTAR S unit, including front view elements.
Details on the ON/OFF Switch, Digital Panel, Duo LED Light, Time Input Button, and Code/Scan Button.
Describes the Compressed Air Supply, Pressure Regulator, Fuse Holders, and Plug.
Connects electrical and air sources, secures clamping frame for operation.
Fills pellet cup, places platform and model according to instructions.
Guide to confirm or adjust the MiniSTAR S air pressure using the regulator dial.
Warnings about material thickness, safety glasses, and fabrication procedures.
Instructions for cleaning, drying, and replacing pellets in the MiniSTAR S.
Monthly check to ensure air escape holes in the pellet cup remain open.
Cleaning and inspecting the Adjusting Ring gasket and components.
Procedures for checking the air filter and aligning the heating surface.
Outlines the three main functions: Model preparation, Heating cycle, Pressure molding process.
Guidelines for preparing models and using the platform for thermal forming.
Proper use of pellets for supporting models and preventing material thinning.
How to place work models in cylindrical pellets for optimal forming.
Instructions on filling the pellet cup and using a brush to level pellets.
How to remove and replace the pellet drawer for filling and storage.
Steps to manually program heating and cooling times using the keypad.
Cautionary note regarding the hot lamp during long heating cycles or continuous use.
How to use the barcode scanner to automatically enter material processing information.
Instructions for positioning Great Lakes and Scheu material under the scanner.
Swinging the heating element over the material and managing heating times.
Securing the chamber, initiating cool-down, and releasing pressure.
Steps to unlock the chamber and remove the formed plastic model.

