Q. SECOND FLOOR STAIRCASE
1. Remove and prepare both STAIR SIDES, all RISERS
(put in one pile) and all TREADS (in another pile) from
Sheets 20a and b.
2. Put one STAIR SIDE face down on the table. Take two
RISERS and glue one to each end of the STAIR SIDE,
as indicated, straight up from table.
3. Then take the other STAIR SIDE and glue It in position to
the other ends of the two STAIR RISERS. The two STAIR
SIDES are now parallel to each other. Insert another
RISER (DO NOT GLUE) in between the solid area of the
STAIR SIDES to keep them apart while glue dries. Then
remove this extra RISER (support) and discard.
4. Glue the rest of the RISERS in place between the STAIR
SIDES as Illustrated.
5. Set and glue TREADS in place on RISERS and STAIR
SIDES, as shown.
6. This completed staircase may now be set or glued in
place on the SECOND FLOOR over the stair well.
R. FIRST FLOOR STAIRCASE
1. Remove and prepare STAIR SIDES, RISERS and
TREADS from remaining Sheets 20c and 20 d.
2. Follow directions for SECOND FLOOR STAIRCASE,
STEPS 2-5.
3. You may use the completed staircase this way for the
FIRST FLOOR, or may wish to complete it with a closet
and partitions, as follows.
4. Remove and prepare CLOSET DOOR and FRAME and
TWO STAIRCASE BACKING pieces from Sheet 19.
5. Turn the STAIRCASE so the STAIRS face away from
you. Glue CLOSET FRAME in place between STAIR
SIDES. DOOR can be sanded and glued or hinged in
place on FRAME.
6. Directly above CLOSET FRAME, glue larger
STAIRCASE BACKING piece between STAIR SIDES to
close off opening. Glue smaller BACKING strip above it
at top of stairs to completely cover opening.
7. Remove and prepare three STAIRCASE PARTITIONS
(A. B. C) and two GUSSETS from Sheet 15. If you don’t
wish to add these partitions, you may use the staircase
as is and Ignore the following steps.
8. Hold the STAIRCASE so CLOSET faces you. Glue
STAIRCASE PARTITION A to the left STAIR SIDE so
angles correspond to those on STAIRCASE.
9. Glue PARTITION B to A on a right angle to the left Glue
one GUSSET inside top corner where sides meet (do
not glue on top of partitions; glue between them.)
10. With CLOSET still facing you. glue PARTITION C to B on
a right angle, coming toward you. Glue remaining
GUSSET In place between sides.
11. Slide this completed STAIRCASE In place on the FIRST
FLOOR with closet facing you. Glue, If desired.
S. STAIRWELL RAILINGS
1. Remove and prepare two STAIRWELL RAILINGS and
HAND RAILS from Sheet 19.
2. With the back of house facing you, glue the short
STAIRWELL RAILING along the rear edge of THIRD
FLOOR stairwell.
3. Glue other RAILING to left edge of stairwell and to other
RAILING.
4. Glue corresponding HAND RAILS in place along top of
RAILINGS.
T. WINDOW BOXES
1. Remove and prepare all WINDOW BOX pieces from
Sheet 22.
2. Lay one WINDOW BOX FRONT face down and glue two
ENDS In place as shown.
3. Glue BASE between ENDS as shown to complete
WINDOW BOX.
4. Repeat steps 2 and 3 for all WINDOW BOXES.
5. Place a line of glue along edges of BASE and ENDS.
Press in place (BASE down) just under BAY WINDOW
EXTERIOR TRIM BOTTOMS and SMALL WINDOW.
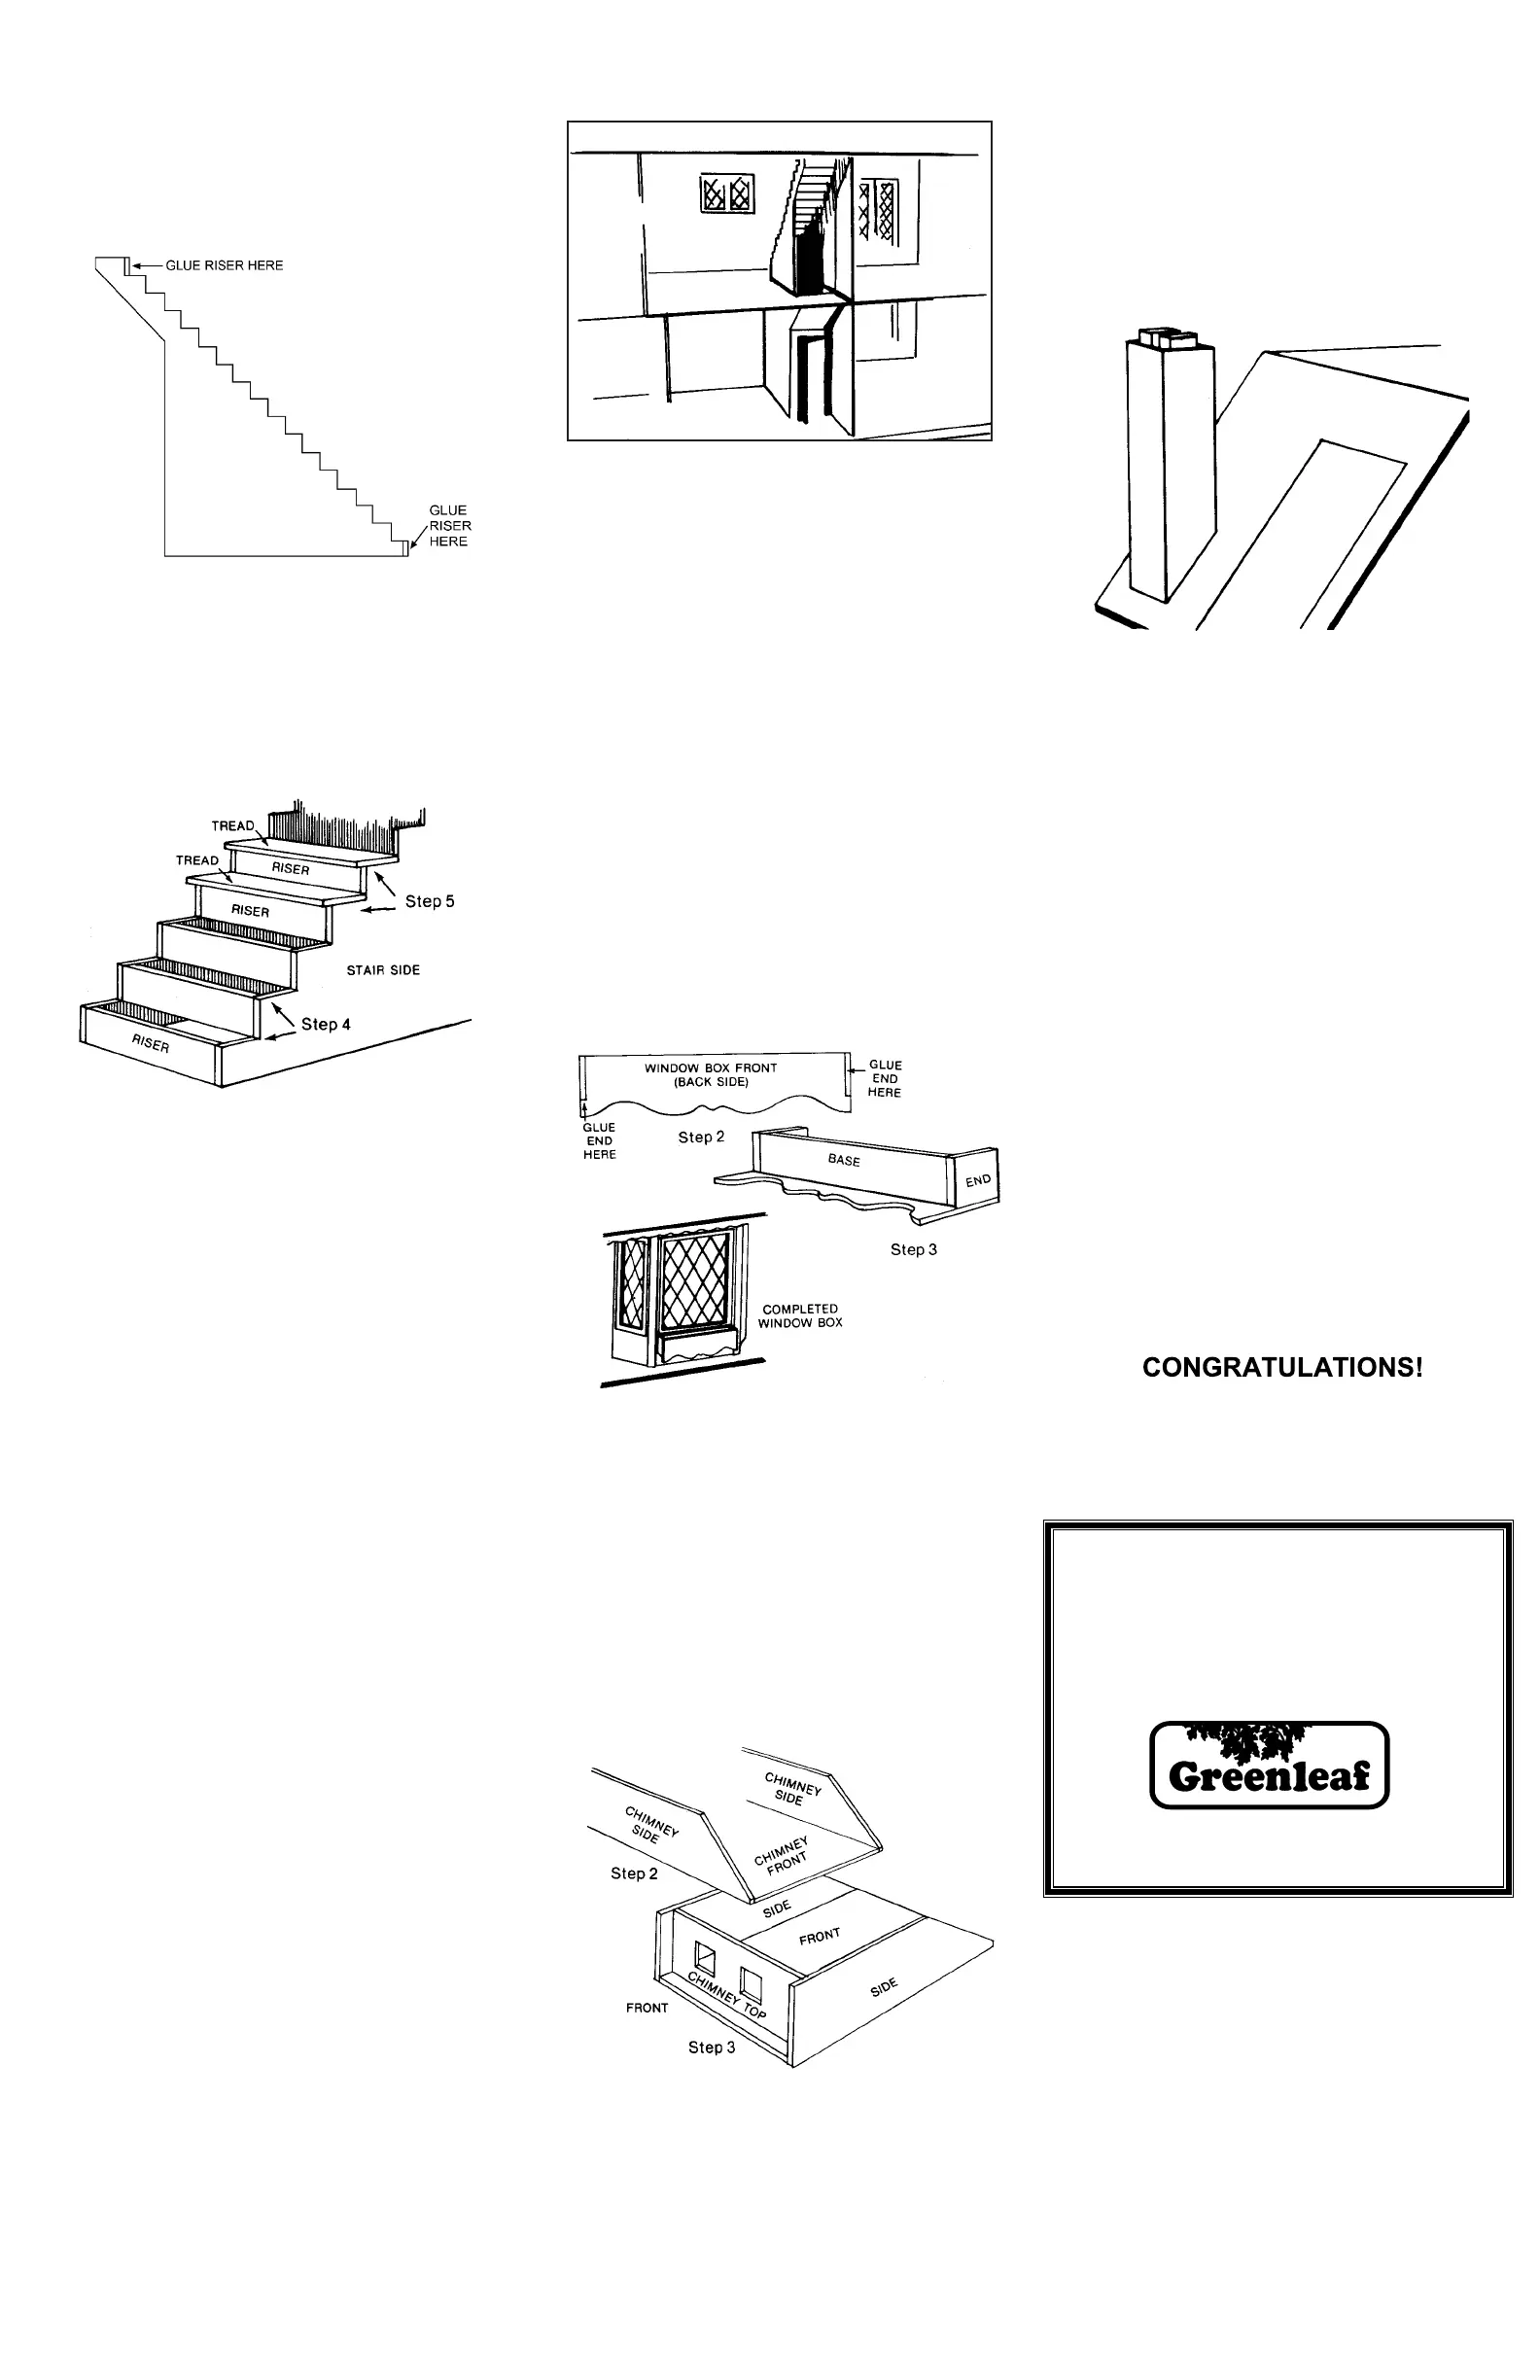
U. CHIMNEY
1. Remove and prepare all CHIMNEY pieces from Sheet
21.
2. Place CHIMNEY FRONT face down. Glue two SIDES to
the side edges of FRONT, with angled ends both facing
you.
3. Turn angled ends away from you Glue CHIMNEY TOP
1/4 inch in from ends of FRONT and SIDES.
V. MOVEABLE PARTITIONS
1. Remove MOVEABLE PARTITIONS from Sheets 3a and
b. These can be inserted, as desired, on the FIRST or
SECOND FLOOR. You may also prefer not to use them
at all.
2. If you wish to place them permanently in the dollhouse,
prepare them so they are appropriate for the room you
wish to create. Glue in place, making sure they are
perpendicular to the floor and ceiling.
W. FINISHING
If you have been painting the house and preparing the
pieces along the way with the directions, you’ll find that
some of the edges, tabs and slots need touching up at
this point.
X. SHINGLES
Greenleaf shingles (available at your craft store) are the
perfect touch to completing your Harrison Dollhouse.
They will cover the slots which show on the house roof.
Bright flowers look nice in the window boxes.
Y. WHY aren’t there any more pieces left in the Kit?
Z.
Because...
© 2019 Greenleaf Dollhouses
Schenevus, NY 12155
shop.greenleafdollhouses.com
Looking for a little help or some decorating ideas?
Visit the Greenleaf Online Community
for thousands of pictures and tips at
www.greenleafdollhouses.com/forum
or email us at
customerservice@greenleafdollhouses.com
or you can call us at
800-235-7150
E S T A B L I S H E D 1 9 4 7
see what's new and find accessories to go with your dollhouse... visit us at shop.greenleafdollhouses.com
5. Glue FLUE SIDES around each flue opening In TOP
and glue completed CHIMNEY to ROOF as shown lining
up lab in slot.
You have just completed the assembly of your
Harrison Dollhouse! We hope you have enjoyed
creating it, will receive satisfaction from it for many
years to come, and will be treated to many rave
reviews from family and friends!
4. Place a line of glue along edge of CHIMNEY TOP and
to both long edges of CHIMNEY BACK Glue BACK In
place between SIDES with tab pointing toward angled
end. and straight ego lining up with SIDES.
 Loading...