MDS86850E (
PIC-00311)
Revised: 02/03/16
Assembly Instructions
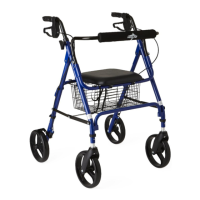
1. Carefullyremovetherollatorcomponentsfromtheshippingcarton.Refertodiagram
(Figure 1) as needed.
2.
Examine
allpartsforshippingdamage.
DO NOT use the rollator if there is apparent
damage or if any parts (other than the bag) are missing. If there are missing or
damaged
parts,pleasecallMedlineCustomerCaretollfreeat1-800-MEDLINE.
3.
Remove plastic cover from wheels.
Check all of the wheels to see that they are in good
working order and roll freely.
4.
Unfold
therollatorbypushingdownontheFoldingBracket(I) until the Frame is in full
extension.
5.
Insert
thepaddedbackrest(D) so that the padded portion faces the front of the unit.
Push down on the backrest while depressing the the round plastic push button until it
snaps into place.
6.
Insert the handlebars
(B) so that the handgrips (A) are aligned with the rear wheels.
The
brakecablesshouldbeontheoutsideofthehandlebarsandframe.Ensureexcess
brake cable loops towards the front of the rollator.
7.
Adjust the height of the handlebars
(B) for proper fit. To determine proper height, stand
upright behind the rollator with shoulders relaxed, arms hanging at your side and eyes
looking straight ahead. Standing in this position, the handgrips (A) of the rollator should
be adjusted to a height even with the wrists. This will position the arms at an approximate
20º
to30ºbendwhenusingtherollator.Securethehandlebarsattheclosestholetothe
desired height. Insert the screw from the inside of the rollator through the frame. Attach
the washer so it fits snuggly against the frame. Secure the star knob to the screw. See
Figure 2. (Important: Hand Tighten Only!)
8.
Placethebagundertheseat.
4