(Figure 2)
G-MDS89664 (GPI074)
Revision B: 5/17/2010
G-MDS89664 (GPI074)
Revision B: 5/17/2010
GENERAL WARNINGS
DO NOT install this product without first reading and understanding this instruction
manual.
If you are unable to understand these warnings, cautions, and instructions, contact a
healthcare professional or dealer before attempting to install this equipment.
• Toiletseatmustbeindownpositionbeforeuse.Failuretodosomayresultinbreakage
of unit and possible injury to user.
• Inspectallpartsforshippingdamage.Incaseofshippingdamage,donotuse.
Contact dealer/carrier for further instructions.
• Makecertainthatthesnapbuttonsfullyprotrudethroughthesamerespective
adjustment hole of each leg extension. This ensures that the leg extensions are securely
locked in position and an even height adjustment is achieved.
• Ensureallscrews,nutsand/orboltsaretightatalltimes.
• Checktherubbertipsonthelegextensionsforrips,wearoriftheyaremissing.Replace
them immediately if any of these conditions exist.
•Allfourlegextensionswithrubbertipsmusttouchtheooratalltimes.
• Userswithlimitedphysicalcapabilitiesshouldbesupervisedorassistedwhenusing
a commode.
• DONOTexceedthemaximumWeightCapacityorseriousinjurycouldresult:Maximum
weight capacity: MDS89664 - 350 lbs (159 kg), MDS89664A - 300 lbs (136 kg).
NOTE: Tips on This Product Contain Dry Natural Rubber.
FAILURE TO FOLLOW INSTRUCTIONS MAY RESULT IN SERIOUS INJURIES.
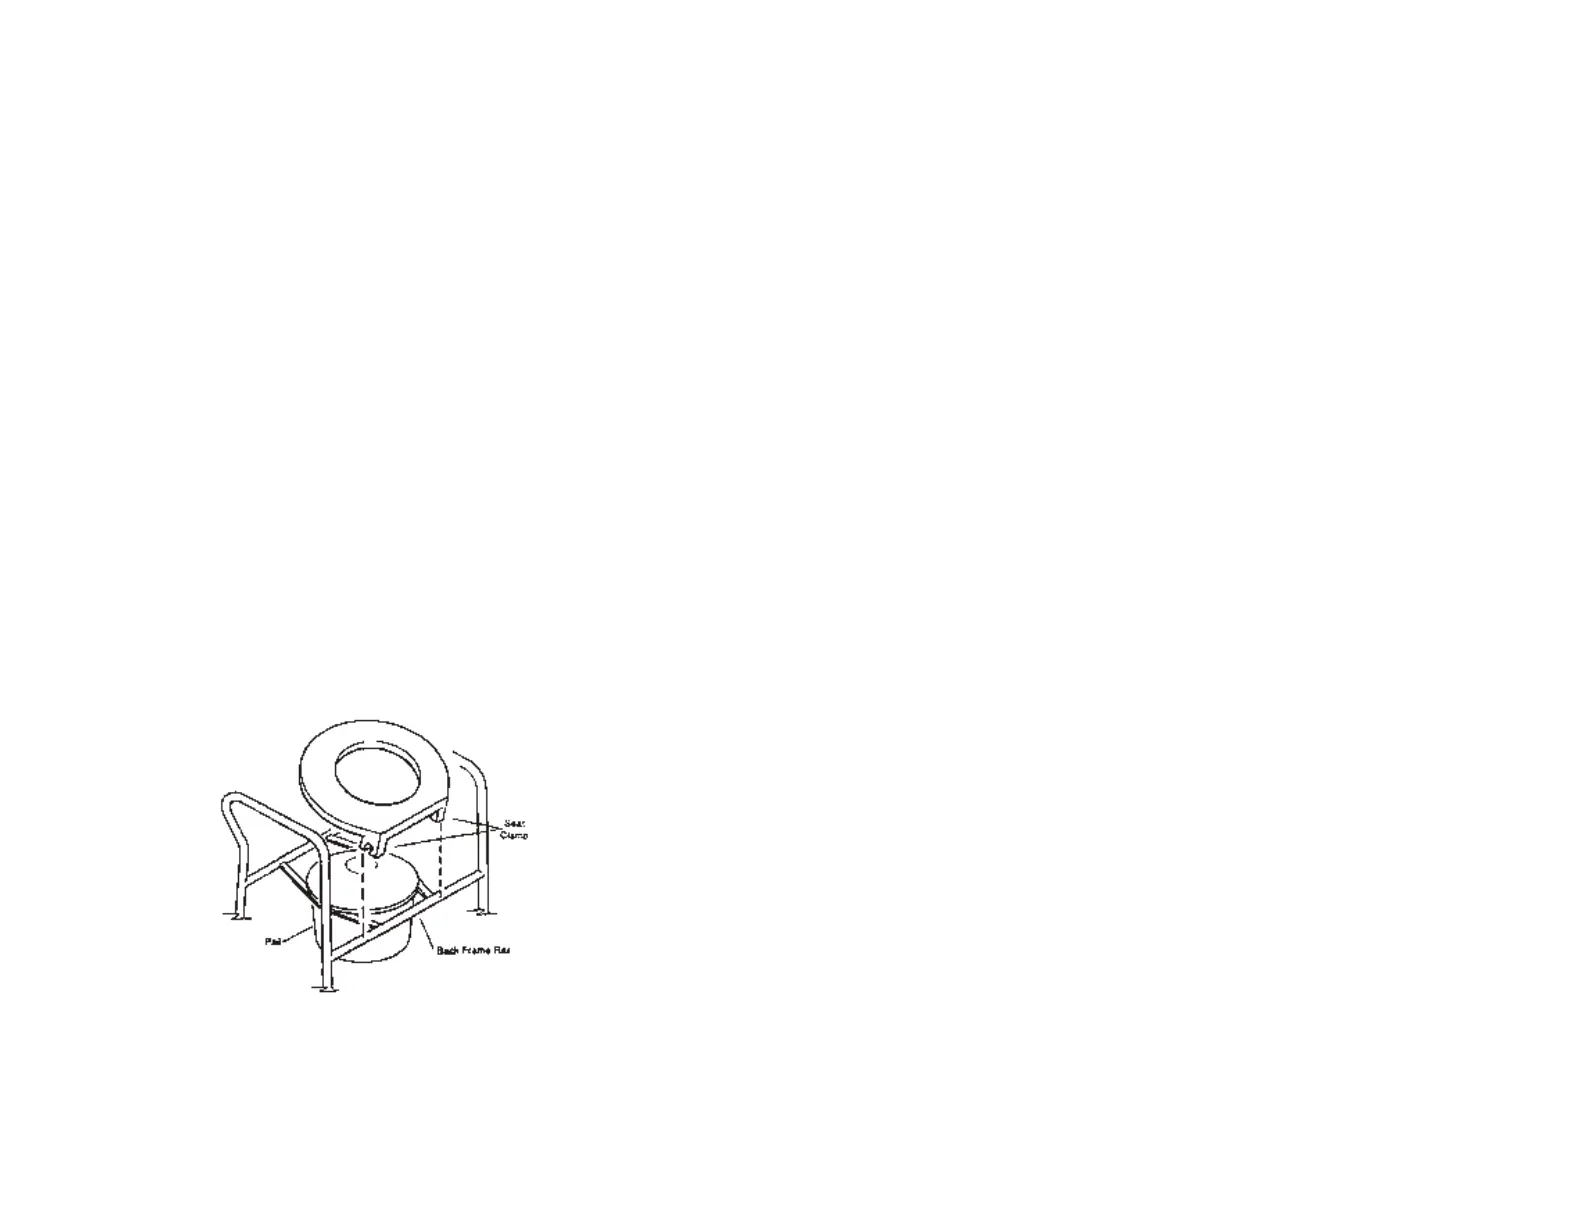
Installing and removing the commode seat and lid (Figure 2)
CAUTION:
1. Before removing/installing seat and lid, allow seat/ring to reach room temperature.
This will help prevent the seat clamps from breaking when being removed/installed onto
commode back frame rail.
2. Align the clamps of the toilet seat onto the back frame rail. (Each clamp should sit outside
the pail holders.) Push down on seat until it clamps firmly into place.
3. Repeat the same process for the lid.
4. When removing the seat or lid, remove the lid first and then the seat. To remove, grasp
the back of the lid and/or seat and lift up.
HEIGHT ADJUSTMENT
Commode’s height is adjustable for use in an elevated position.
1. Depress detent button on leg piece and move up or down to the desired position.
2. Ensure that the detent button is fully engaged and leg does not move.
3. Repeat steps 1 and 2 for the remaining three legs.
4. Make sure the commode sits level and all of the legs are at the same height.
USER INSTRUCTIONS
Use only as instructed by your healthcare professional.
SITTING AND STANDING
1. Back up to the commode until you feel the back of your knees touching it.
2. Reach back for the armrests. Place both hands firmly on the armrests before sitting on
the commode.
3. Slowly lower yourself onto the commode by bending your elbows and, if possible, your
hips and knees.
4. Reverse steps 2 through 4 for getting up. Push on the armrests as much as comfortably
possible. Make sure you have your balance before releasing your grasp from the
commode armrests.
OVER THE TOILET USE
1. Lift seat of commode and remove bucket.
2. Replace with splash guard.
3. Lift lid of toilet. Position commode over toilet with splash guard in bowl and lower
commode seat.
NOTE: Check to ensure that commode is level and stable before sitting.
CLEANING
Your commode can be easily cleaned with regular household cleaning products.
DO NOT use abrasive powders or scouring pads.
1 2
 Loading...