+
R
ZR
、 、 、 、 、
+
+
+
+
+
+
G1 G2 G3 G4
、
、
、
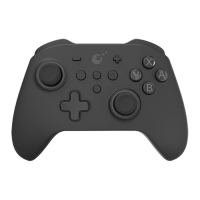
NS39
Controller Mode LED
USB-C Port
Used for charging
& wired connection
Player Number LED
Mode Button
Double clicks to change mode.
Long press for power off,
short press for power on.
SYNC Button
Long press 2 seconds
above to start scrolling
LEDs to pair.
Calibration on joysticks, ZL & ZR triggers
To enter the calibration mode, simultaneously press the "L, R, D-pad Left, A" buttons
on the controller for 6 seconds while it is in the power-on state.
During calibration, fully move the left and right joysticks in complete circles for 2-3
times. Once the calibrated joystick's light ring turns green, its calibration is complete.
The controller will automatically exit the calibration mode when both joysticks' light
rings turn green.
Calibration on Gyroscope
In the power-on state, with the controller placed on a flat surface, simultaneously
press the "+, -, D-pad Left, and A" buttons. This will initiate an automatic calibration
of the gyroscope.
Once the calibration is complete, the controller will vibrate once as a notification.
*When the gyroscope is functioning normally, there is no need for calibration.
( +L: Set motion assist to activate when the L button is holded in-game.
ZL
、
+
L
Set Motion Aim
Assist for use in
PC FPS games
One vibration: Low sensitivity aim assist.
Two vibrations: Medium sensitivity aim assist.
Three vibrations: High sensitivity aim assist.
Long vibration: Disable motion aim assist.(default mode)
+ZL: Set motion assist to activate when the ZL trigger is holded in-game.)
L3
+
R3
、
Adjust Joystick
Sensitivity
One vibration: Sensitivity 50%, joystick ring in red.
Two vibrations: Sensitivity 100%, joystick ring in blue.
(default setting)
Three vibrations: Sensitivity 150%, joystick ring in green.
*R3 and L3 refer to the buttons when pressing down on the joysticks.
Each joystick can be individually configured.
+
Adjust the light
brightness
There are three levels of brightness adjustment
available: Off, Low brightness, and High brightness.
The settings cycle through these three options.
+
Set 4-direction
on D-pad
One vibration: The D-pad switches to 4-direction mode.
Long vibration: Restores the default 8-direction mode.
(default setting)
Pairing Methods with PC
Bluetooth Pairing Method (requires a computer with Bluetooth capability With 125Hz
Polling Rate.):
1.Switch the controller to mode.By long-pressing the pairing button for 2 seconds,
the indicator light will start scrolling, indicating the pairing process has started.
2.Add and search for devices in your computer's Bluetooth settings and add the
"GuliKit Controller" device.
3.The interface displays "Connected" to the new controller,indicating that the pairing
process is complete.
Wired Connection Methods With 1000Hz Polling Rate:
Set the controller to mode. Connect one end of the provided data cable to the
controller.
Insert the other end into a USB A port on your computer.
If you are using a desktop computer, it is recommended to plug the cable into one of
the USB ports on the back of the computer case for a more stable connection.
Pairing Methods by Using PC Exclusive KK3 "Hyperlink" Adapter With 1000Hz Polling Rate:
1.Set the controller to mode, by holding the pairing button,the indicator light will
start scrolling, indicating the pairing process has started.
2.Simply plug the adapter into a USB port on your computer, no further action is required.
3.Both the controller and adapter indicator lights will remain solid, indicating that
pairing is complete.
Pairing Methods with Switch
Method 1:
1.Enter the controller settings page on Switch, as shown in the above images.
2.Set the controller to mode, by holding the pairing button for 2 seconds.
The indicator light will start scrolling, indicating the pairing process has started.
3.The interface will display connection to the new controller,indicating that the
pairing process is complete.
Method 2:
1.Set the controller to mode. Connect one end of the provided data cable to
the controller.Plug the other end into the USB A port on the Switch dock.
2.Place Switch console on the dock. The controller will automatically pair with the console.
3.Once the pairing is successful, you can unplug the data cable and use the controller
wirelessly.
Alternatively, you can leave the data cable plugged in for wired mode usage.
All special function settings mentioned below require holding down the Setting button
(Gear icon button) while pressing the corresponding buttons for configuration.
All special settings will be automatically saved. When there are special settings
configured, the logo light will be blue. When there are no special settings
configured, the logo light will be white.During charging, the charging indicator
light will be orange, and when fully charged, it will be green.
When the battery is low, the logo light will flash, and the vibration function will
automatically turn off. When the battery level is restored, the vibration will
automatically turn back on.
The controller will automatically power off after 10 minutes of inactivity. Alternatively, you can also power off
the controller by long-pressing the mode button.
However, please note that the controller will not power off automatically when using the full-auto rapid fire or
replay function(Auto Pilot Gaming).
To power on the controller, you can press any of the following buttons: A, B, X, Y, Home, or the mode button.
Pairing Methods with Android, iOS, and macOS devices
1.Double-click the mode button on the controller to switch to ,iOS mode.
2.Hold the pairing button for 2 seconds. The indicator light will start scrolling,
indicating the pairing process has started.
3.On your devices, go to the Bluetooth settings menu. Enable Bluetooth if it's not
already turned on.
Tap on "Add New Device" or "Scan for Devices" to search for available Bluetooth
devices. Select the "Xbox Wireless Controller" device from the list.
4.The interface will display "Connected," indicating that the pairing process is complete.
Use Method of Auto Pilot Gaming Function(APG)
APG function is a recording & repeat playback function for custom commands or
macros using the APG button (Double-Square icon button).
Recording process:
Hold the APG button for 3 seconds. You will feel a short vibration, indicating that the
recording has started.
From this point, all subsequent button presses and joystick movements will be recorded.
To stop the recording, either press the APG button again or wait for the recording to
automatically stop after 10 minutes.
You will feel a long vibration, indicating that the recording is complete. The maximum
recording time is 10 minutes.
Replay the recorded actions:
Press the APG button once briefly to automatically repeat the recorded actions once.
Double-click the APG button to continuously repeat the recorded actions until interrupted.
During the replay, you can use the joystick for movement, allowing you to perform
actions while moving.
To cancel the replay midway, press any other button except the joysticks.
Back Button Configuration Method
Back Button Mapping:Hold the Setting button (Gear icon button) along with the back
button you want to map. You will feel a short vibration, indicating that the mapping
process has started.Press the desired button that you want to assign to the back button.
You will feel a long vibration, indicating that the mapping configuration is complete.
Back Button Mapping Cancellation: Hold the Setting button (Gear icon button) along
with the back button you want to cancel mapping. You will feel a long vibration,
indicating that its mapping is cancelled.
Trigger Mode Setting Method
By toggling the switch on the back, you can
easily switch respectively for ZL and ZR triggers
between the digital tactile switch trigger mode
and Hall effect analog trigger mode.
Rapid Fire (Turbo)
One Vibration: Normal rapid fire. It is active when the
button is held down and stops when released.
Two Vibrations: Auto rapid fire. Press the button once
to initiate continuous rapid fire. Press the button again
to stop.
Long vibration: Cancel rapid fire. (Default mode)
A-B X-Y Swap
One vibration: Swaps input values of the A-B and
X-Y buttons.
Long vibration: Restores the default button assignments.
Adjust Vibration
Intensity
One vibration: Weak vibration.
Two vibrations: Strong vibration. (Default mode)
Long vibration: Turn off vibration.
Adjust Vibration
Mode
One vibration: Rotary motor mode.
Two vibrations: GuliKit Maglev haptic mode.(Default mode)
Three vibrations: HD vibration mode.
APG Recording
File Share
The setting lets you enter APG read/write mode first,
next insert the USB data cable into your computer and
you should see a USB drive named "GuliKit dat" on
your computer.
Open the USB drive and you will see a file named "Auto.
apg" which is the APG recording file that you can freely
copy for backup or share.
If you want to overwrite the existing APG file, you can
replace it with a new APG file by copying the desired
APG file into the USB drive.
*Once the writing process is complete, the controller will automatically power
off. Alternatively, you can hold the Mode button to power off the controller.
*Please avoid changing the file name to ensure proper functionality.
For more questions & answers, you can visit the website and navigate to the "Support" section and look for the "Frequently Asked Questions" (FAQ) related to the controller.
Hall effect
analog trigger
Digital microswitch
trigger
Joystick Dead Zone
Mode
1.One vibration: Dead Zone mode enabled for the
joystick center area.
2.Long vibration: Cancel and restore to default for
No Dead Zone mode.
+
A long vibration indicates that
the reset process is complete,
and the controller has been
restored to its factory settings.
Clear all
settings
(Reset)