HABCO® TECHNICAL DOCUMENT - C098791 • 10310209
© HABCO Manufacturing Inc. “HABCO, Cassette, Cold Space Merchandiser” are registered trademarks of HABCO Manufacturing Inc. Domestic and International Patents. Page 9
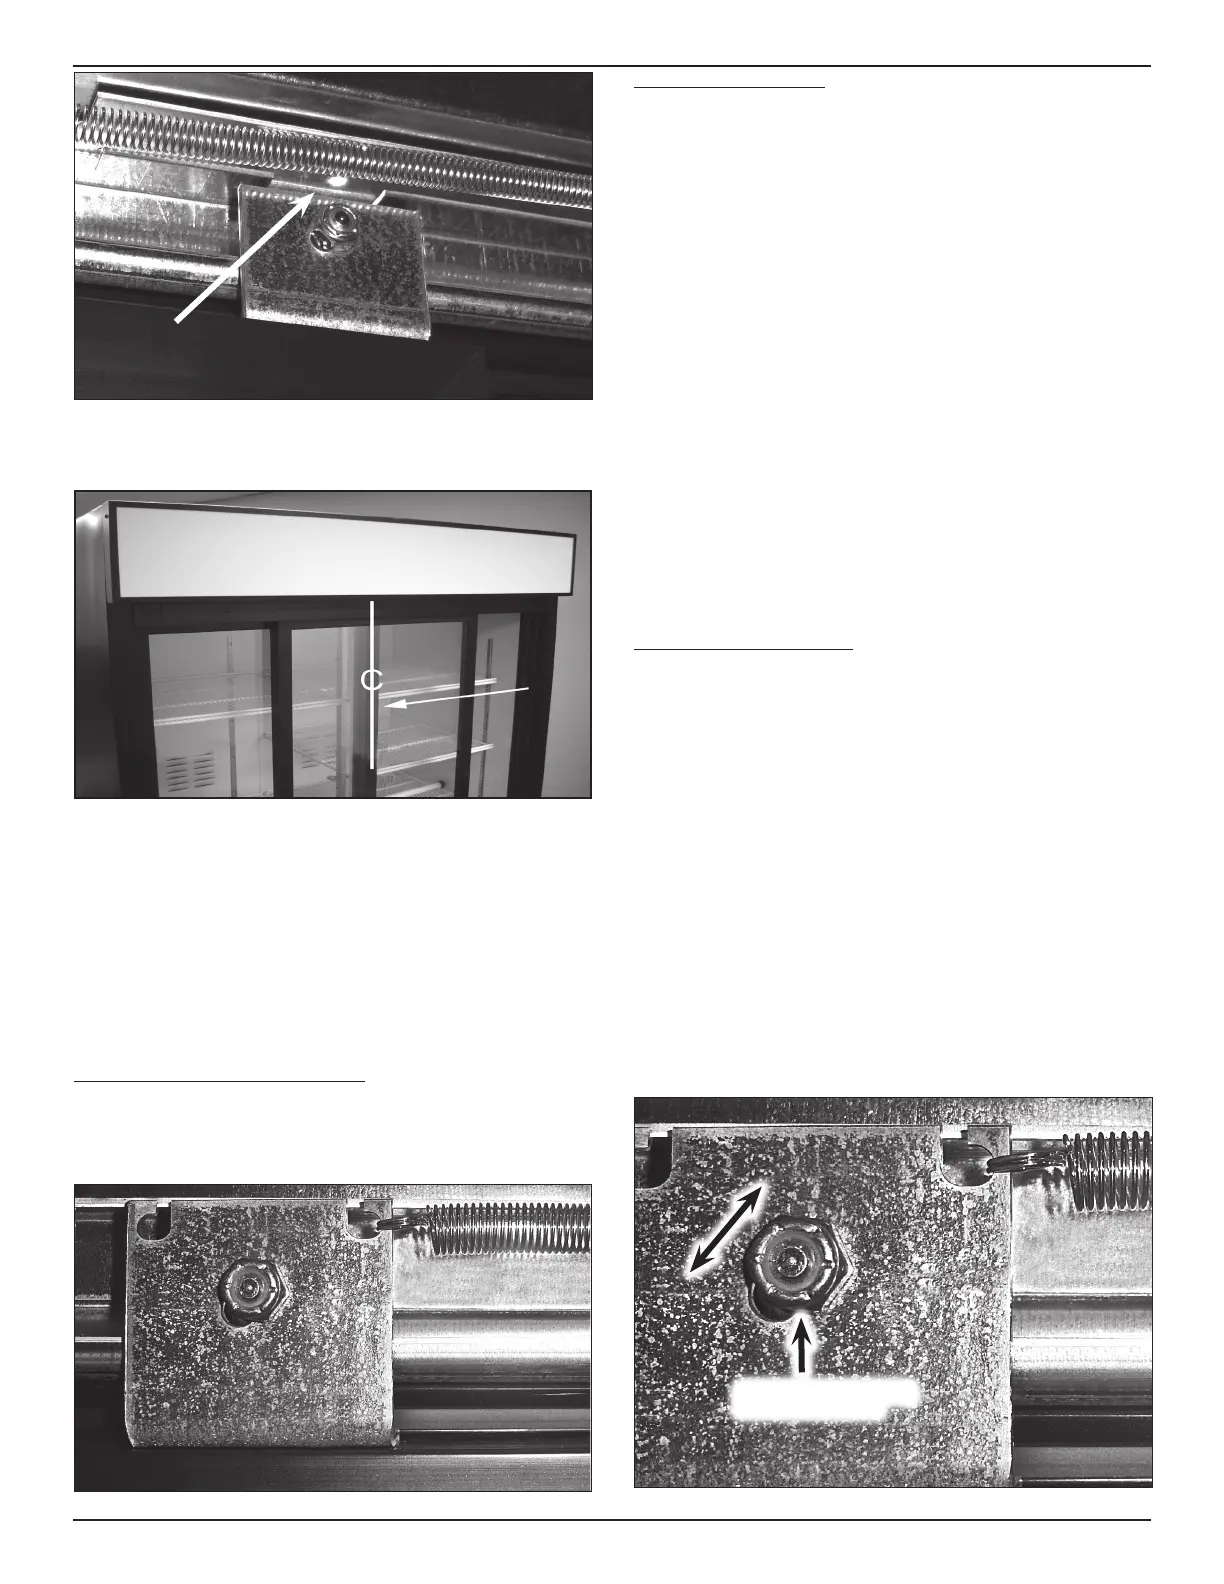
DOOR REMOVAL SLOT(S)
FIG. H9FIG. H9
3. Move right hand door to center posion within cabinet door open-
ing (Fig H10).
FIG. H10FIG. H10
4. Grasping right hand door rmly, one third from top, li door up-
ward and out o top track, then swing the door boom up and
away from boom track.
5. Remove door from cabinet, down and away, resng against right
front wall.
6. Remove inner, le door, in the same manner except rather than
liing up and out o track, li door rollers up and swing boom
of door into cabinet. Tilt door, liing and resng against le front
wall.
Correct Door Closure Spring Orientaon:
Right hand door closure spring must be installed on the right hook of
the le roller bracket (as shown Fig. H11). Conversely, the le hand
door closure spring must be installed on the le hook of the right roller
bracket.
FIG. H11FIG. H11
Sliding Door Reinstallaon:
1. Review door removal steps.
2. Grasping right hand door rmly, one third from top, li door into
center posion within cabinet opening.
3. Tilng the top of door inward, li it upward onto upper track using
roller slots for adequate clearance. Sll grasping the door rmly,
swing the boom into the lower track.
4. Ensure that both rollers are seated into the door track at top, and
door boom is contained within boom track.
5. Inspect upper horizontal top door track “V” shaped sealer strip to
ensure that it is not binding, but freely resng atop inner and outer
door frame edges to create a seal (Fig 4).
6. Test both inner and outer doors to ensure they do not bind. If there
is resistance on opening or closure, then check:
a. rollers are seated into upper door track;
b. upper horizontal top door track “V” shaped sealer strip is
freely resng on inner and outer door frame edges (should
move le and right, up and down slightly when shaken);
c. door frame(s) is posioned within boom “W” track.
Sliding Door Skew Adjustment:
HABCO® sliding doors have a skew adjustment feature.
Tools Required: Adjustable Wrench 3/16” Allen Key
1. Locate roller track cover at top of appliance above doors. Remove
screws located on both walls and ceiling behind roller track cover.
2. Remove doors, following instrucons within this secon.
3. Adjustable mounng brackets are pre-installed at the lowest set-
ng and tested for uid moon prior to packaging. At the lowest
seng, the door hangs at the lowest point relave to the boom
track of the cabinet (Fig H12).
4. Using wrench and Allen key reposion rollers, on one door rst, to
the mid-point seng. Reinstall door with spring and check that
there is no interference between the boom of door and boom
“W” track. If the door rides freely above the boom of the track,
adjust the second door similarly, and reinstall.
Note: Adjustment of door roller should only be made to mid-point
seng or mounng screw heads will interfere with reinstallaon.
5. Reinstall the roller panel cover with exisng screws.
SHOWN AT TOP OF OBLONG HOLE,
DOOR IN LOWEST POSITION
FIG. H12FIG. H12


 To Next Page