EasyManuals Logo

Haier HMV1472BHS Installation Instructions

Haier HMV1472BHS
84 pages
To Next Page IconTo Next Page
To Previous Page IconTo Previous Page
Page #65 background imageLoading...
Page #65 background image
16½"
(41.9 cm)
a
A
Línea
central
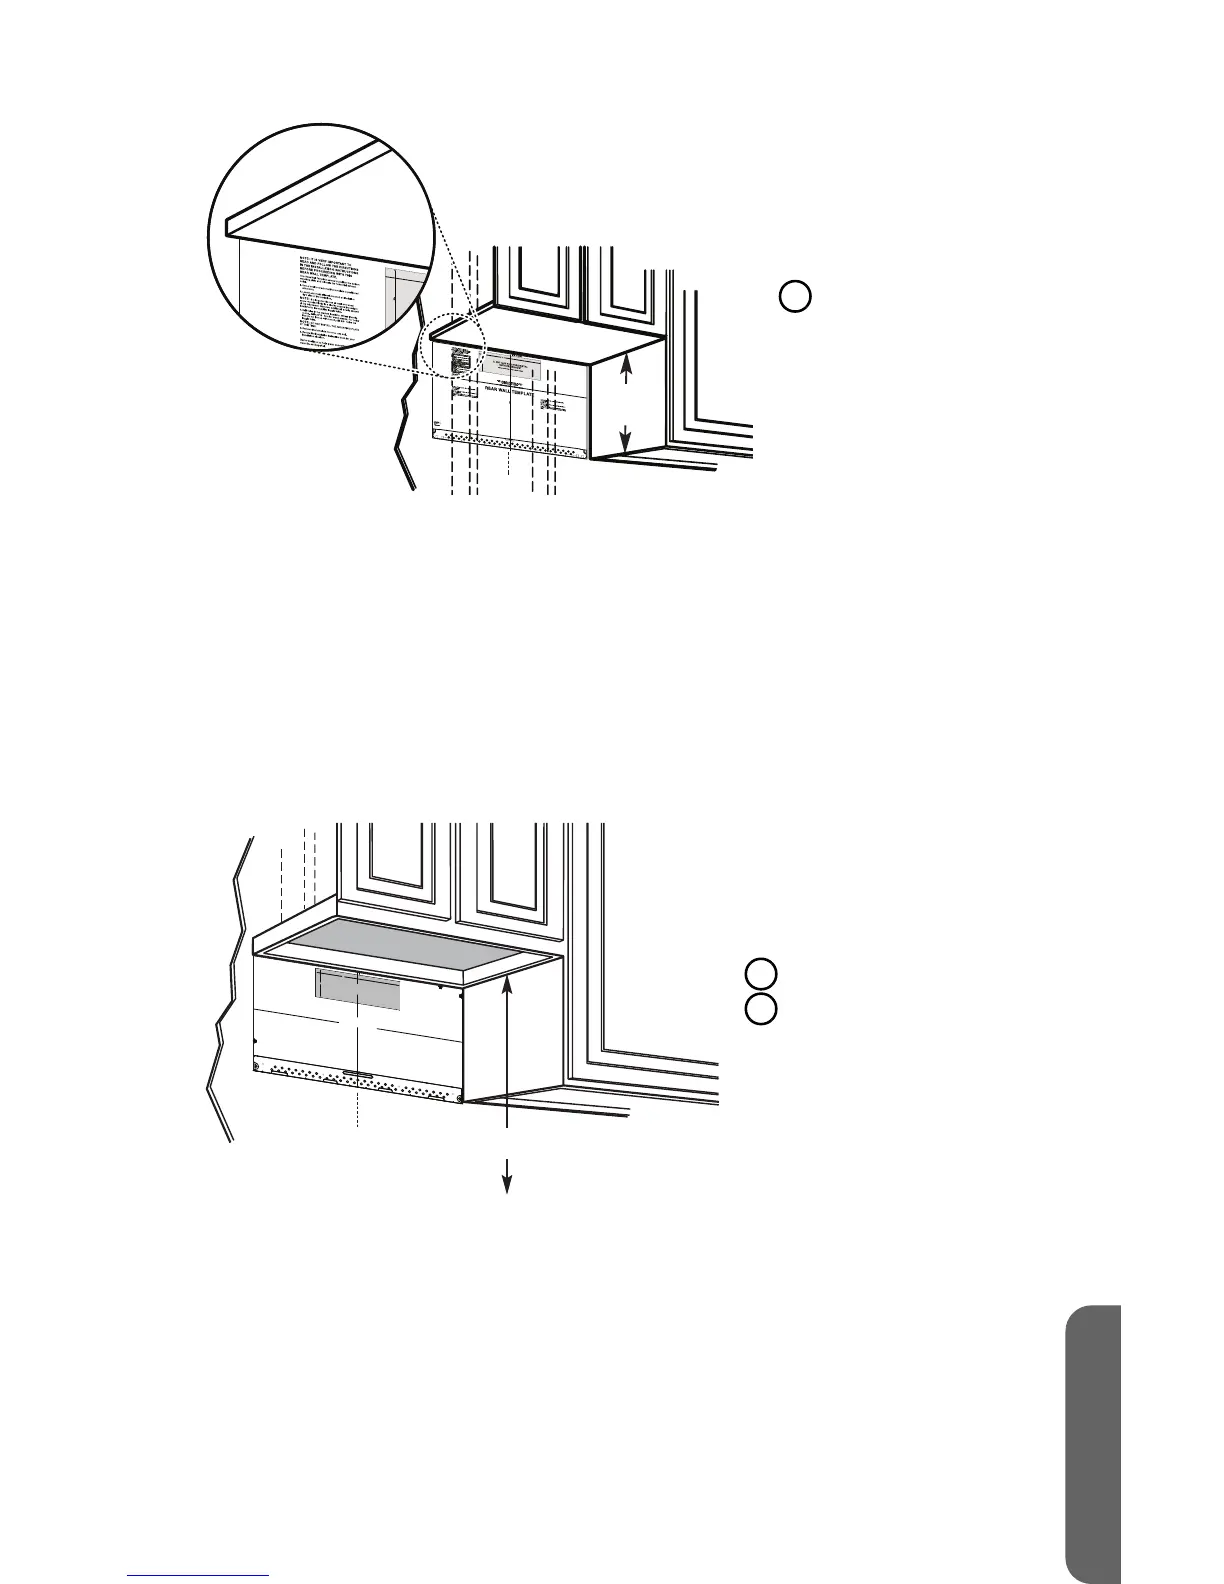
ESTILO 2 - DEBAJO DEL ARMARIO EMPOTRADO, CON MARCO
IMPORTANTE: El horno de microondas debe estar nivelado. Utilice un nivel de
carpintero para asegurarse de que la parte inferior del armario esté nivelada.
1. Trace una línea vertical sobre la pared en el centro del espacio cuyo ancho es de
24" (61 cm).
2. Coloque en la pared la plantilla de la placa de montaje/pared trasera de manera
que la línea central de la plantilla quede alineada con la línea central, y la parte
superior de la plantilla esté en contacto con la parte inferior del armario. Pegue
la plantilla en esta posición.
a
3/
8
"
TO
E
D
GE

 

 
 








 
 



 





  








NO
T
E: IT IS VERY I
MP
O
RTANT
T
O
RE
AD AND
FO
LLOW
T
HE DI
RECTIONS
I
N
THE
INSTAL
LA
TION I
NSTRUCT
IONS
BE
F
ORE
PROCE
EDING
WIT
H THIS
REAR WAL
L TE
MPLATE.
This Rear Wa
l
l Temp
l
a
te serves to positio
n
the bot
tom
mountin
g plate and to locate t
h
e
ho
rizon
tal exh
aust
ou
tl
e
t
.
1. U
se a
level
to
che
ck t
hat th
e
templ
ate is positioned
a
cc
urately.
2. L
ocate a
nd ma
rk
a
t
least one stud on t
h
e l
eft
o
r
right s
ide
of t
h
e cen
te
rl
i
ne.
 
It
is
i
mportant
to use a
t least
o
ne w
o
od
scr
e
w
m
ounte
d
f
irmly i
n
a stud to sup
port the w
e
ight
of the mi
cr
ow
ave
. M
a
rk two additi
onal
, e
ve
nl
y sp
a
ced
l
o
ca
tio
ns for
th
e
suppli
e
d
t
oggle
b
ol
ts
.
3
.
D
rill
h
oles
in
th
e
mar
ked lo
cat
ions. Wh
e
r
e there is
a stud, d
ri
ll a 3/
1
6"
ho
le
for
w
oo
d scr
ews.
For
hole
s
t
hat d
o n
ot l
ine up with
a st
u
d, d
rill 5/8
" hol
es f
or
to
ggle
b
o
l
ts.

DO
N
OT I
N
STALL TH
E M
OUN
T
IN
G PLAT
E
AT TH
IS TIME
.
4
.
Remo
ve
the template
from the re
ar wal
l.
5. Re
view
the Installa
tion Instruction
book for your
installatio
n si
t
uati
on.
Loc
ate
and mark holes to al
i
gn wi
t
h h
ole
s i
n
the
mou
nt
i
ng plate.
I
MPORTANT:
LOCATE AT LEAST
ONE S
T
UD
ON EITHE
R
S
IDE
OF
T
HE CENTER
LINE.
MARK
T
HE LOC
A
T
ION FOR
2 A
D
DITIONAL,
E
VENLY
SPA
CE
D
TOGGLE
BOLTS
IN
TH
E MOU
NT
ING
PL
ATE
AREA.
Locate
and
ma
rk
holes to ali
gn with hole
s in
the
moun
t
ing pl
at
e.
IMP
O
RTA
NT:
LOCA
TE
A
T LE
AST
ONE
STUD ON EI
THER S
IDE OF
THE
CE
NTERLI
NE.
MA
RK
THE LOC
ATI
O
N
F
O
R 2
ADDIT
I
ONAL,
EV
ENL
Y
SPACE
D
TO
GG
LE
BOLT
S
I
N
THE MOUNT
ING PLATE
ARE
A.
Trim
the re
ar
w
a
ll temp
late al
ong the do
tted lin
e.
T
rim th
e
rea
r wall temp
l
ate al
on
g t
he
dotted
l
ine.




 


 

 
12"
4"
Da
rl
e
v
uelta a la hoja pa
r
a
co
nsulta
r
la
versn
en Es
pa
ñ
ol.
b
A
Línea central
B
30" (76,2 cm) hasta la
supercie de cocción
63
ESPAÑOL

Table of Contents

Other manuals for Haier HMV1472BHS

Questions and Answers:

Question and Answer IconNeed help?

Do you have a question about the Haier HMV1472BHS and is the answer not in the manual?

Haier HMV1472BHS Specifications

General IconGeneral
BrandHaier
ModelHMV1472BHS
CategoryMicrowave Oven
LanguageEnglish

Related product manuals