3
17 AUG 2015 • 15-H1-044-0-00 • Folded size: 8”x10”
Instructions for Use
Rx Only: Federal Law (USA) restricts this device to sale by or on the order of a
physician.
Description
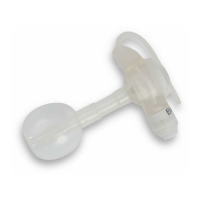
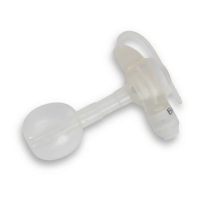
The HALYARD* MICKEY* Gastric-Jejunal Feeding Tube (Fig 1) provides for
simultaneous gastric decompression / drainage and delivery of enteral nutrition
into the distal duodenum or proximal jejunum.
Indications For Use
The HALYARD* MICKEY* Gastric-Jejunal Feeding Tube is indicated for use
in patients who cannot absorb adequate nutrition through the stomach,
who have intestinal motility problems, gastric outlet obstruction, severe
gastroesophageal reux, are at risk of aspiration, or in those who have had
previous esophagectomy or gastrectomy.
Contraindications
Contraindications for placement of a Gastric-Jejunal Feeding Tube include, but
are not limited to ascites, colonic interposition, portal hypertension, peritonitis
and morbid obesity.
Warning
Do not reuse, reprocess, or resterilize this medical device. Reuse,
reprocessing, or resterilization may 1) adversely aect the known
biocompatibility characteristics of the device, 2) compromise the
structural integrity of the device, 3) lead to the device not performing
as intended, or 4) create a risk of contamination and cause the
transmission of infectious diseases resulting in patient injury, illness,
or death.
Complications
The following complications may be associated with any Gastric-Jejunal Feeding
Tube:
• Skin Breakdown • Infection
• Hypergranulation Tissue • Stomach or Duodenal Ulcers
• Intraperitoneal Leakage • Pressure Necrosis
Note: Verify package integrity. Do not use if package is damaged or sterile
barrier compromised.
Placement
The HALYARD* MICKEY* Gastric-Jejunal Feeding Tube may be placed
percutaneously under uoroscopic or endoscopic guidance or as a replacement
to an existing device using an established stoma tract.
Caution: A gastropexy must be performed to ax the stomach to the
anterior abdominal wall, the feeding tube insertion site identied, stoma tract
dilated and measured prior to initial tube insertion to ensure patient safety and
comfort. The length of the tube should be sucient to be placed 10–15 cm
beyond the ligament of treitz.
Caution: Do not use the retention balloon of the feeding tube as a
gastropexy device. The balloon may burst and fail to attach the stomach to the
anterior abdominal wall.
Tube Preparation
1. Select the appropriate size MICKEY* Gastric-Jejunal Feeding Tube, remove
from the package and inspect for damage.
2. Using the 6 ml Luer slip syringe contained in the kit, inate the balloon with
5 ml sterile or distilled water through the balloon port. (Fig 1-A)
3. Remove the syringe and verify balloon integrity by gently squeezing the
balloon to check for leaks. Visually inspect the balloon to verify symmetry.
Symmetry may be achieved by gently rolling the balloon between the
ngers. Reinsert the syringe and remove all the water from the balloon.
4. Using a 6 ml Luer slip syringe, ush water through both the gastric and
jejunal ports (Fig 1-A & B) to verify patency.
5. Lubricate the distal end of the tube with water-soluble lubricant.
Do not use mineral oil or petroleum jelly.
6. Generously lubricate the jejunal lumen with water-soluble lubricant.
Do not use mineral oil or petroleum jelly.
7. Insert the introducer cannula (Fig 5) into the Jejunal port until the hub is in
contact with the Jejunal feeding port and the introducer cannula is clearly
visible inside the tube. The introducer cannula opens the one-way valve
and protects it from damage by the guidewire.
Suggested Radiologic Placement Procedure
1. Place the patient in the supine position.
2. Prep and sedate the patient according to clinical protocol.
3. Insure that the left lobe of the liver is not over the fundus or the body of the
stomach.
4. Identify the medial edge of the liver by CT scan or ultrasound.
5. Glucagon 0.5 to 1.0 mg IV may be administered to diminish gastric
peristalsis.
Caution: Consult Glucagon instructions for use for rate of IV injection
and recommendations for use with insulin dependent patients.
6. Insuate the stomach with air using a nasogastric catheter, usually 500
to 1,000 ml or until adequate distention is achieved. It is often necessary
to continue air insuation during the procedure, especially at the time of
needle puncture and tract dilation, to keep the stomach distended so as to
oppose the gastric wall against the anterior abdominal wall.
7. Choose a catheter insertion site in the left sub-costal region, preferably
over the lateral aspect or lateral to the rectus abdominis muscle (N.B. the
superior epigastric artery courses along the medial aspect of the rectus)
and directly over the body of the stomach toward the greater curvature.
Using uoroscopy, choose a location that allows as direct a vertical needle
path as possible. Obtain a cross table lateral view prior to placement of
gastrostomy when interposed colon or small bowel anterior to the stomach
is suspected.
Note: PO/NG contrast may be administered the night prior or an enema
administered prior to placement to opacify the transverse colon.
8. Prep and drape according to facility protocol.
Gastropexy Placement
Caution: It is recommended to perform a three point gastropexy in a
triangle conguration to ensure attachment of the gastric wall to the anterior
abdominal wall.
1. Place a skin mark at the tube insertion site. Dene the gastropexy pattern
by placing three skin marks equidistant from the tube insertion site and in a
triangle conguration.
Warning: Allow adequate distance between the insertion
site and gastropexy placement to prevent interference of the
T-Fastener and inated balloon.
2. Localize the puncture sites with 1% lidocaine and administer local
anesthesia to the skin and peritoneum.
3. Place the rst T-Fastener and conrm Intragastric position. Repeat the
procedure until all three T-Fasteners are inserted at the corners of the
triangle.
4. Secure the stomach to the anterior abdominal wall and complete the
procedure.
Create the Stoma Tract
1. Create the stoma tract with the stomach still insuated and in apposition
to the abdominal wall. Identify the puncture site at the center of the
gastropexy pattern. With uoroscopic guidance conrm that the site
overlies the distal body of the stomach below the costal margin and above
the transverse colon.
Caution: Avoid the epigastric artery that courses at the junction of the
medial two-thirds and lateral one-third of the rectus muscle.
Warning: Take care not to advance the puncture needle too
deeply in order to avoid puncturing the posterior gastric wall,
pancreas, left kidney, aorta or spleen.
2. Anesthetize the puncture site with local injection of 1% lidocaine down to
the peritoneal surface.
3. Insert a .038” compatible introducer needle at the center of the gastropexy
pattern into the gastric lumen directed toward the pylorus.
Note: The best angle of insertion is a 45 degree angle to the surface of the
skin.
4. Use uoroscopic visualization to verify correct needle placement.
Additionally, to aid in verication, a water lled syringe may be attached to
the needle hub and air aspirated from the gastric lumen.
Note: Contrast may be injected upon return of air to visualize gastric folds
and conrm position.
5. Advance a guidewire, up to .038”, through the needle and coil in the fundus
of the stomach. Conrm position.
6. Remove the introducer needle, leaving the guidewire in place and dispose
of according to facility protocol.
7. Advance a .038” compatible exible catheter over the guidewire and using
uoroscopic guidance, manipulate the guidewire into the antrum of the
stomach.
8. Advance the guidewire and exible catheter until the catheter tip is at the
pylorus.
9. Negotiate through the pylorus and advance the guidewire and catheter into
the duodenum and 10–15 cm beyond the Ligament of Treitz.
10. Remove the catheter and leave the guidewire in place.
Dilation
1. Use a #11 scalpel blade to create a small skin incision that extends
alongside the guidewire, downward through the subcutaneous tissue and
fascia of the abdominal musculature. After the incision is made, dispose of
according to facility protocol.
2. Advance a dilator over the guidewire and dilate the stoma tract to the
desired size.
3. Remove the dilator over the guidewire, leaving the guidewire in place.
4. Measure the Stoma Length with the HALYARD* Stoma Measuring Device.
Measuring the Stoma Length
Caution: Selection of the correct size MICKEY* is critical for the safety
and comfort of the patient. Measure the length of the patient’s stoma with the
Stoma Measuring Device. The shaft length of the MICKEY* selected should be
the same as the length of the stoma. An inappropriately sized MICKEY* can
cause necrosis, buried bumper syndrome and/or hypergranulation tissue.
1. Moisten the tip of the Stoma Measuring Device with water soluble
lubricant. Do not us mineral oil. Do not use petroleum jelly.
2. Advance the Stoma Measuring Device over the guidewire, through the
stoma and into the stomach. DO NOT USE FORCE.
3. Fill the Luer slip syringe with 5ml of water and attach to the balloon port.
Depress the syringe plunger and inate the balloon.
4. Gently pull the device toward the abdomen until the balloon rests against
the inside of the stomach wall.
5. Slide the plastic disc down to the abdomen and record the measurement
above the disc.
6. Add 4–5 mm to the recorded measurement to ensure the proper stoma
length and t in any position. Record the measurement.
7. Using a Luer slip syringe, remove the water in the balloon.
8. Remove the stoma measuring device.
9. Document the date, lot number and measured centimeter shaft length.
Tube Placement
Note: A peel-away sheath may be used to facilitate advancement of the tube
through the stoma tract.
1. Select the appropriate MICKEY* Gastric-Jejunal Feeding Tube and prepare
according to the directions in the Tube Preparation section listed above.
2. Advance the distal end of the tube over the guidewire until the proximal
end of the guidewire exits the introducer cannula.
Note: Direct visualization and manipulation of the introducer and guidewire
may be required to pass the guidewire through the end of the introducer.
3. Hold the introducer hub and jejunal feeding port while advancing the tube
over the guidewire and into the stomach.
4. Rotate the HALYARD* MICKEY* Gastric-Jejunal Feeding Tube while
advancing to facilitate passage of the tube through the pylorus and into the
jejunum.
5. Advance the tube until the tip of the tube is 10–15 cm beyond the
Ligament of Treitz and the balloon is in the stomach.
6. Ensure the external bolster is ush with the skin.
7. Using a Luer slip syringe, inate the balloon.
• Inate the balloon with 3–5 ml of sterile or distilled water for pediatric
sized tubes (REF numbers ending in -15 -22 or -30)
Caution: Do not exceed 5 ml total balloon volume. Do not use air. Do
not inject contrast into the balloon.
• Inate the balloon with 7–10 ml of sterile or distilled water for adult
sized tubes (REF numbers ending in -45).
Caution: Do not exceed 10 ml total balloon volume. Do not use air. Do
not inject contrast into the balloon.
8. Remove the guidewire through the introducer cannula while holding the
cannula in position. Remove the introducer cannula.
Verify Tube Position
1. Verify proper tube placement radiographically to avoid potential
complication (e.g. bowel irritation or perforation) and ensure the tube is
not looped within the stomach or small bowel.
Note: The jejunal portion of the tube contains tungsten which is radiopaque
and can be used to radiographically conrm position. Do not inject contrast
into the balloon.
2. Flush the lumen to verify patency.
3. Check for moisture around the stoma. If there are signs of gastric leakage,
check the tube position and external bolster placement. Add uid as need
in 1–2 ml increments.
Caution: Do not exceed total balloon volume indicated above.
4. Check to assure that the external bolster is not placed too tightly against
the skin and rests 2–3 mm above the abdomen.
5. Document the date, the type, the size and lot number of the tube, the
ll volume of the balloon, skin condition and patient tolerance to the
procedure. Start feeding and medication administration per physician
orders and after conrmation of proper tube placement and patency.
Radiologic Placement Through An Established
Gastrostomy Tract
1. Under uoroscopic guidance, insert a oppy-tipped guidewire, up to .038”,
through the indwelling gastrostomy tube.
2. Remove the gastrostomy tube over the guidewire.
3. Direct the guidewire through the stoma and coil in the stomach.
4. Advance a .038” guidewire compatible exible catheter over the guidewire
until the catheter tip is at the pylorus.
HALYARD*
MIC
KEY
*
Gastric-Jejunal Feeding Tube (Low-Prole GJ-Tube)
Endoscopic / Radiologic Placement
 Loading...