2
G Operating instruction
Thank you for choosing aHama product.
Take your time and read the following instructions and information completely.Please keep
these instructions in asafe place for futurereference. If you sell the device, please pass
these operating instructions on to the new owner.
1. Explanation of Warning Symbols and Notes
Warning
This symbol is used to indicate safety instructions or to draw your attention to specic
hazards and risks.
Note
This symbol is used to indicate additional information or important notes.
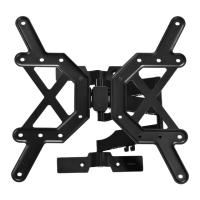
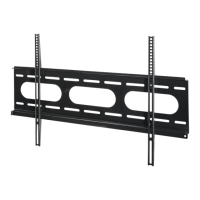
2. Package Contents
• TV wall bracket
• Wall plate cover (2x)
• Drilling template
Note
Please check that the installation kit is complete beforeinstalling the bracket and
ensurethat none of the parts arefaulty or damaged.
3. Safety Notes
Warning
• Given the multitude of terminal devices and wall structures available on the
market, the supplied mounting kit is unable to cover every option.
• It occasionally happens that the screws for attaching the terminal device to the
wall bracket aretoo long.
• Please note that the supplied wall plugs arefor use with concrete brick and solid
brick walls only.
• Read the operating instructions for your terminal device beforeattempting to
mount it. The instructions provide information about the type and measurements
of suitable fastening materials.
• If the supplied mounting kit does not contain suitable fastening materials for
mounting the terminal device, purchase these from aspecialised dealer.
• If the wall on which the bracket is to be mounted is made of different material
types and construction types to those specied, purchase suitable mounting
materials from aspecialised dealer.
• Never apply force during mounting. This can damage your end device or wall
bracket.
• If in doubt, have this product mounted by aqualied technician -donot attempt
to mount it yourself!
Note –Commercial use
• If the device is used commercially,increased duty of carerequirements apply.
• Therefore, please observe the accident prevention regulations of the German
employer’sliability insurance association for electrical systems and equipment.
Please also observe all accident prevention regulations from other applicable
employer’sliability insurance associations and accident insurance companies, as
well as any legal regulations applicable to the particular industry and/or location.
• The wall bracket must be installed by trained personnel or by aspecial technician,
especially when installed in schools, educational institutions, hobby/self-service
workshops or other publicly accessible institutions.
• Securethe product and the attached load against falling using suitable equipment
(e.g. an arresting cable) and in accordance with locally applicable regulations.
• We strongly recommend these additional safeguards even if they arenot legally
required.
• Have trained personnel carry out regular inspections to ensurethat the product
is securely installed, properly functioning and in acceptable condition (we
recommend inspections at least every 6months, or morefrequently if required for
the particular location) and then document these inspections.
• Do not mount the product above locations wherepersons might linger.
• Once you have mounted the product and the attached load, check that they are
suciently secureand safe to use.
• Youshould repeat this check at regular intervals
(at least every three months).
• When doing so, ensurethat the product does not exceed its maximum permitted
carrying capacity and that no load exceeding the maximum permitted dimensions is
attached.
• Make surethat the product is loaded symmetrically.
• During adjustment, ensurethat the product is loaded symmetrically and that the
maximum permitted carrying capacity is not exceeded.
• Maintain thenecessarysafety clearance around theattachedload(depending on themodel).
• In the event of damage to the product, remove the attached load and stop using the
product.
4. Intended use and specifications
• The bracket is only intended for use within buildings.
• Use the bracket only for the intended purpose.
Maximum load bearing capacity: 25 kg
Screen size: 48.0 -117.0 cm (US: 19" -46")
Depth: 5.0 cm -23.1 cm
Angle: up to -15°/+5° (depends on the device)
Pivoting range:
up to 180° on 2joints and 1carrier arms
(depends on the device)
Wall mounting plate dimensions: 5.5 x21.9 cm
Mounting holes: according to the VESA standard200x200
5. Installation requirements and installation
Note
• Only mount the TV wall bracket with the help of asecond person. Get the support
and help you need.
• Different end devices have different options for connecting cables and other
devices. Beforeinstallation, ensurethat the necessary connections will stillbe
accessible after installation.
• The same mounting kit is included with all of our TV wallbrackets. Depending on
the product and mounting type, you may not need to use the entiremounting kit.
Unneeded screws and other small parts may be left over,even if the wall bracket
is properly mounted. Keep these leftover parts with the operating instructions in a
safe place, just in case you might need them later on (e.g. should you move, sell
the product, mount the wall bracket in adifferent location, buy anew TV,etc).
Warning
• Beforeinstalling the bracket, ensurethat the wall on which the television is to be
mounted is suitable for the weight and make surethat no electrical wires, water,
gas or other lines arelocated at the installation location.
• Please note that the provided wallanchors areonly approved for concrete and
solid brick walls.
• Observe the other warnings and safety instructions.
• Proceed step-for-step in accordance with the illustrated installation instructions (Fig. 1ff.).
• D
uring installation, the hingesare to be adjusted so that theTVcan be movedside-to-side.
• Check whether your television is level using the included spirit level. If necessary,adjust
the wall plate.
6. Setting and maintenance
Note
Only adjust the TV wall bracket with the help of asecond person. Get the support and
help you need.
• To adjust the tilt, loosen the lever xing screws slightly,set the desired tilt and retighten
the screws securely.Ifthe xing screw is turned as far as it will go, you can pull on it
gently while turning it to position it for other settings. (Fig. 3a)
• Screws do not have to be loosened for side-to-side movement.
• Check that the bracket is secureand safe to use at regular intervals (at least every three
months). Only use water or standardhousehold cleaners for cleaning.
7. Warranty Disclaimer
Hama GmbH &CoKG assumes no liability and provides no warranty for damage resulting
from improper installation/mounting, improper use of the product or from failureto
observe the operating instructions and/or safety notes.
8. Service and Support
Please contact Hama Product Consulting if you have any questions about this product.
Hotline: +49 9091 502-115 (German/English)
Further support information can be found here: www.hama.com
• Cable ties
• Installation kit (see contents, Fig. 1)
• These operating instructions
 Loading...