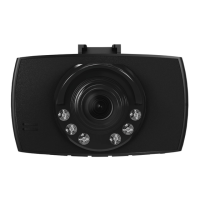
9.2.1 Resolution
Select the desired resolution (VGA -12megapixels)ofthe recorded photo material.
• Navigate to the Resolution menu item and conrm your selection by pressing [OK](7). Anew
overview window opens.
• Use the navigation buttons [◄](9) /[►](5) to select the desired setting.
• Conrm your selection by pressing [OK](7).
9.2.2 Image display
When the picturedisplay is activated, the picturetaken is shown on the display for ashort time (2/5
seconds). Anew picturecan only be taken after this time has elapsed.
Select Off to deactivate this function.
• Navigate to the Image display menu item and conrm your selection by pressing [OK](7). Anew
overview window opens.
• Use the navigation buttons [◄](9) /[►](5) to select the desired setting.
• Conrm your selection by pressing [OK](7).
9.2.3 Watermark
With the mode activated, atime and date stamp is added to every photo le.
• Navigate to the Watermark menu item and conrm your selection by pressing [OK](7). Anew
overview window opens.
• Use the navigation buttons [◄](9) /[►](5) to select the desired setting.
• Conrm your selection by pressing [OK](7).
9.2.4 Contrast
Improve the quality of the photo through contrast adjustment (-2 to +2).
• Navigate to the Contrast menu item and conrm your selection by pressing [OK](7). Anew
overview window opens.
• Use the navigation buttons [◄](9) /[►](5) to select the desired setting.
• Conrm your selection by pressing [OK](7).
9.3 General settings
• Press [MENU](8) twice to go to the camera’ssettings menu.
• Alternatively,press [MENU](8) once if you arealready in the Video/Photo menu.
• is shown at the upper-left edge of the screen.
• Use the navigation buttons [◄](9) /[►](5) to navigate through the menu.
• Conrm your selection by pressing [OK](7).
11