GB
INSTRUCTIONS FOR USE
Congratulations on purchasing the Hamax cy-
cle seat.You now have a comfortable and safe
child seat which your children can grow with.
The seat is approved for children from about 9
months to 6 years or maximum 22 kg weight.
You should check from time to time that your
child's weight has not gone above 22 kg.
· Please read the instructions carefully before
assembling or using the seat.
· Keep these instructions in a safe place as
they will be useful if you later buy extra
equipment for your seat.
TECHNICAL POINTS
Range of application:
· Can be mounted on bicycles with down tube
diameters from 28-40 mm.
· Cannot be mounted on bicycles with oval or
square down tubes.
· Cannot be mounted where the luggage carri-
er is wider than 155 mm.
(but the luggage carrier could be removed be-
fore fitting the child seat).
· Cannot be mounted on cycles fitted with
shock absorbers.
· Can be used on cycles fitted with carrier
racks. If you are in any doubt that the seat will
fit, we recommend you seek information from
the bicycle's supplier.
SAFETY PRECAUTIONS
· Make sure the bracket screws are well tighte-
ned and check them at regular intervals.
· Be aware that the load of a child in the seat
may alter the cycle's stability and handling
characteristics, particularly when steering and
braking.
· When a child is in the seat, the cycle MUST
ALWAYS be supported by an adult.
· Make it a rule always to check the safety belt
is properly fastened, even when cycling wit-
hout a child in the seat.
· In the event that the seat is involved in an ac-
cident or damage, contact your dealer to
check that it can still be used. Damaged parts
must always be replaced.
· Do not attach extra luggage or equipment to
the seat, as this could lead to the total load ex-
ceeding 22 kg and harm stability. We recom-
mend that extra luggage is attached at the
front of the bicycle.
· Never make your own changes or modificati-
ons to seat parts or the mounted seat.
This will automatically invalidate the guarantee
and the manufacturer's product
liability will lapse.
·
To prevent children trapping their fingers in
the saddle springs we recommend you fit a
spring guard, available from cycle dealers.
· To take a child on a bicycle, the rider must
normally be over 16 years. Check your
national laws and regulations.
· The seat gives good side protection.
However
, you are recommended to buy and fit
a good-quality closed wheel guard. You can
obtain this from your cycle dealer.
Check there are no sharp objects on the bicy
-
cle to harm the child.
· When cleaning the seat use only warm soapy
water.
· The child seat is fitted on the frame tube of
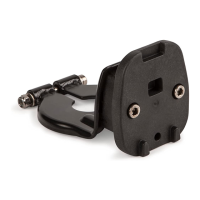
the bike with the bracket (7).
See picture E. The screws must be tightened
hard enough to fix the seat securely and pre-
vent it from sliding. Make a rule of checking
this before starting a tour on the bike.
· Always make sure that the child’s clothes or
body parts do not touch the moving parts on
the bike. This must be checked continuously
as the child grows. Moving parts that must be
checked include wheels, wires and seat
springs.
· Check that there are no sharp objects such
as split wires that may injure the child.
· Always remove the child seat when transpor-
ting the bike on a car.
· Always replace faulty parts. Contact your de-
aler if you are not sure how to fit the parts.
· Make a rule of always checking the brakes of
the bike, gears and other functional parts befo-
re starting the bike tour.
- Remember to put the child's helmet on
before starting your trip.
KEEPING YOUR CHILD HAPPY!
· Remember that the seat can get very hot
standing out in the sunshine. Check for this
before placing your child in the seat.
· A child sitting in a child seat should be dres-
sed more warmly than the rider. Always take
waterproofs for both of you. remember to put
the child's helmet on before starting your trip.
Tip! If you want to use the seat on two different
cycles, you can get extra fixings from your cy-
cle dealer.
We wish you many enjoyable trips! Regards
from us at Hamax
SLEEPY KISS
N
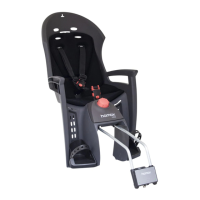
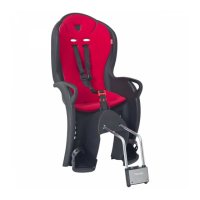
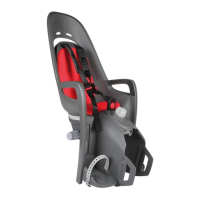
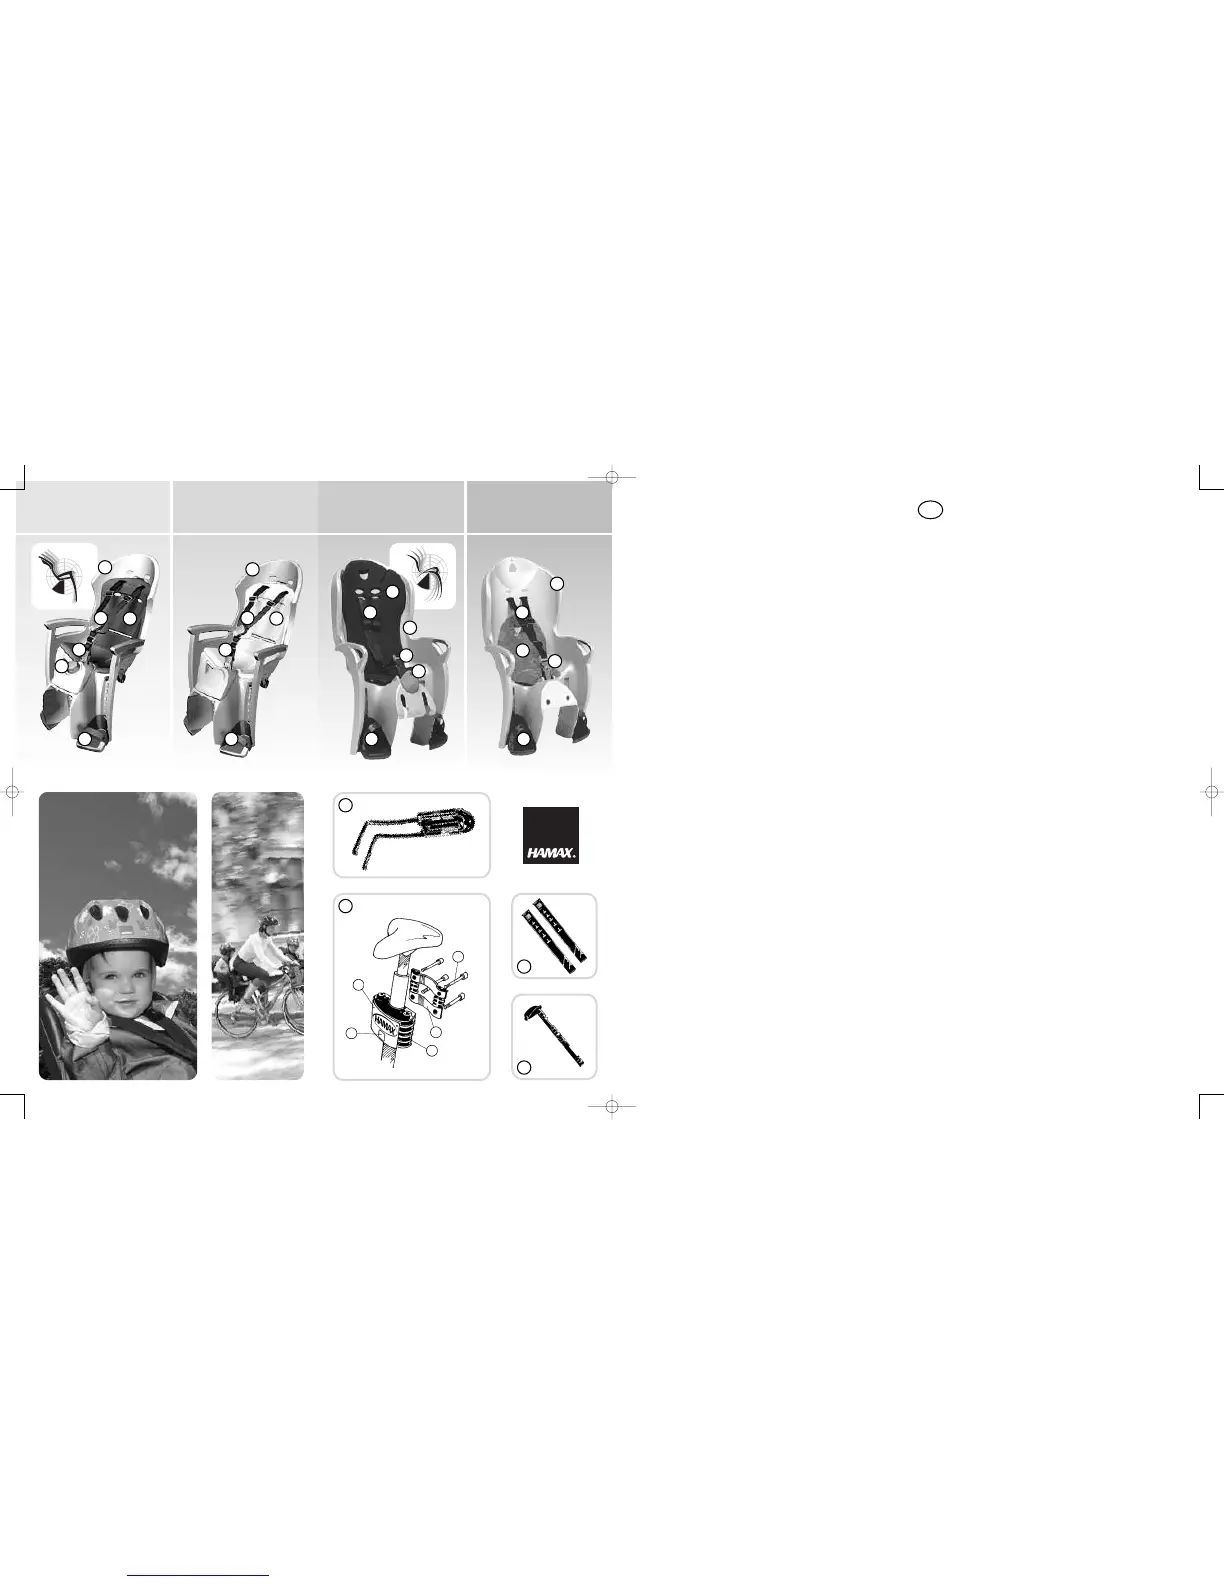
1. Hovedsete
2. Sikkerhetssele
3. Polstring
4. Beltelås
5. Fotstøtter
6. Bærebøyle
7. Festebeslag komplett
A) Brakett
B) Metallbånd
C) Festeskruer
D) Lås indikator
E) Lås
8. Fotstropper
9. Låsepinne
10.Justeringsratt for
soveposisjon
GB
1. Main seat
2. Safety belt
3. Seat padding
4. Belt lock
5. Foot rests
6. Carrier rack
7. Fastening bracket complete
A) Bracket
B) Metal strips
C) Fastening screws
D) Lock indicator
E) Lock
8. Foot straps
9. Locking pin
10.Adjuster knob for sleeping
position
D
1. Sitz
2. Sicherheitsgurt
3. Sitzpolster
4. Gurtverschluß
5. Fußstützen
6. Befestigungsbügel
7. Komplette
Befestigungsklammer
A) Klammer
B) Metallstreifen
C) Befestigungsschrauben
D) Sperrenanzeige
E) Sperre
8. Halteriemen für Fußstützen
9. Arretierstange
10.Einstellknopf für die
Schlafposition
F
1. Corps du siège
2. Ceintures de sécurité
3. Capitonnage
4. Boucle de ceinture de
sécurité
5. Repose-pied
6. Etrier
7. Kit de fixation complète
A) Support
B) Lames de métal
C) Vis de fixation
D) Indicateur de blocage
E) Dispositif de blocage
8. Attache-pieds
9. Tige excentrique
1
0
.
Bouton de réglage de
l'angle d'inclinaison
SF
1. Istuin
2. Turvavyö
3. Pehmuste
4. Turvavyön solki
5. Jalkatuet
6. Kannatinkaari (putki)
7. Kiinnityspidinkokoonpano
A) Pidin
B) Metalliliuskat
C) Kiinnitysruuvit
D) Lukitusilmaisin
E) Lukko
8. Jalkaremmit
9. Lukitustappi
10.Säätönuppi makuuasennon
säätöä varten
I
1. Seggiolino principale
2. Cintura di sicurezza
3. Imbottitura
4. Fibbia
5. Poggiapiedi
6. Staffa di sostegno
7. Staffa di fissagio completa
A) Staffa
B) Nastro metallico
C) Viti di fissaggio
D) Indicatore di bloccaggio
E) Bloccaggio
8. Cinghiette ferma-piedi
9. Perno di fermo
10.Manopola di regolazione
per la posizione di sonno
PL
1. Siedzisko
2. Pasy bezpieczeństwa
3. Wyściółka siedziska
4. Klamra pasów
bezpieczeństwa
5. Podpórki na stopy
6. Pałąk mocujący
7. Uchwyt mocujący
A) Klamra
B) Tylna płyta uchwytu
mocującego
C) 4 śruby mocujące
D) Wskaźnik blokady
E) Blokada
8. Paski przytrzymujące stopy
9. Bolec blokujący
10. Mechanizm ustawiania
fotelika do pozycji leżącej
E
1. Asiento principal
2. Cinturón de seguridad
3. Acolchado
4. Hebilla
5. Posapies
6. Abrazadera sustentadora
7. Garra de fijación completa
A) Garra
B) Tiras metálicas
C) Tornillos de fijación
D) Indicación de bloqueo
E) Bloqueo
8. Correa de sujeción de los
pies
9.
Cerradura
10.Volante regulador de posici
ón de dormir
CZ
1. Sedacka
2. Bezpecnostní pás
3. Vypln a potah
4. Bezpecnostní prezka
5. Podpory pro nohy
6. Pripevnovací rám
7. Kompletní upevńovací tŕmen
A) Tŕmen
B) Kovové pásy
C) Upevńovací šrouby
D) Indikátor zajištení
E) Zajišténí
8. Pásky na nohy
9. Uzavírací pácka
10. Nastavení sedacky do
polohy na spaní
HU
1. Ülés
2. Biztonsági öv
3. Párnázat
4. Biztonsági öv zárja
5. Lábtámasz
6. Tartóvilla
7. Komplett rögzítő kapocs
A) Kapocs
B) Fémlemezek
C) Rögzítő csavarok
D) Reteszelés kijelző
E) Reteszelő
8. Lábszíj
9. Zárpálca
10.Alvóhelyzetbe állító váltó
NL
1. Kinderstoel
2. Veiligheidsgordel
3. Beklede zitting
4. Gordelslot
5. Voetsteunen
6. Bevestigingsbeugel
7. Volledig bevestigings-
systeem
A) Klem
B) Metaalstroken
C) Bevestigingsschroeven
D) Indicators voor vastzitten
E) Blokkering
8. Voetriempjes
9. Grendel
10. Regelknop voor de
slaappositie
SIESTA SMILEY
1
2
3
4
5
1
2
3
4
5
10
1
2
3
4
5
1
2
3
4
5
10
D
E
A
B
C
6
8
9
7
Carpe
Diem!
Hmx monteringsanvisning_ny 06-01-06 10:49 Side 4
 Loading...