Do you have a question about the Hamilton Beach One Press 47600 and is the answer not in the manual?
Read all instructions before operating the appliance.
Appliance not for unsupervised use by persons with reduced physical, sensory, or mental capabilities.
Supervise children closely when appliance is used by or near them.
Avoid touching hot surfaces and be careful of spills.
Do not immerse cord, plug, or coffee maker in water or other liquid.
Unplug when not in use and allow to cool before cleaning.
Operate coffee maker on a flat surface to prevent tipping.
Do not operate with damaged cords or plugs; seek qualified repair.
Use only manufacturer-recommended accessory attachments.
Use only provided reservoir; do not use outdoors.
Do not let cord hang over edges or touch hot surfaces.
Reservoir is for this maker only; do not use on range top or microwave.
Do not place hot reservoir on wet or cold surfaces.
Do not use a cracked or damaged coffee reservoir.
Do not clean reservoir with abrasive materials.
Ensure reservoir lid is secure during brewing; do not force it.
Do not place maker on or near heat sources or in heated ovens.
Turn off functions, unplug by grasping plug, not cord.
Do not remove bottom cover; no user-serviceable parts inside.
Use appliance only for its intended purpose.
Warming plate may remain hot after use.
Do not place coffee maker in a cabinet when in use.
Scalding may occur if the coffee maker lid is lifted during the brewing cycle.
Safety precautions specific to the coffee reservoir and its use.
Product has polarized plug; do not defeat safety purpose.
Use approved extension cord equal to or greater than appliance rating.
Do not use other high-wattage appliances on the same circuit.
Do not use a cracked or loose-handled coffee reservoir.
Reservoir is for warming plate only; not for rangetop or microwave.
Handle reservoir with care to avoid breakage; avoid impact.
Do not place hot reservoir on cool/wet surfaces; allow to cool.
Do not set empty reservoir on a hot heating surface.
Do not clean with abrasive materials that may scratch.
Be careful with jewelry when handling reservoir; it can scratch glass.
Do not bump, scratch, or boil dry the coffee reservoir.
Discard reservoir if cracked, scratched, or heated empty.
Dispense coffee only from assembled unit; do not pour directly.
Use wooden, plastic, or rubber utensils for stirring in reservoir.
Follow safety precautions to avoid burn injuries from hot liquids.
Basket for coffee grounds; may be included with select models.
Basket for brewing coffee.
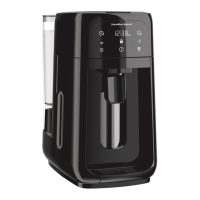
Interface for operating and viewing coffee maker status and settings.
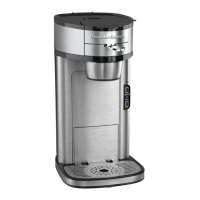
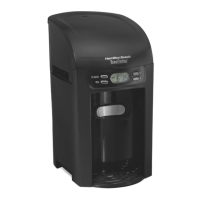
The exterior front part of the coffee maker.
Window to view the coffee level.
Lid for the water filter compartment.
Component to filter water for brewing.
Base component for the water filter.
Tray to catch drips, includes a cover.
Handles for carrying or moving the coffee maker.
The bottom support of the coffee maker.
The main lid of the coffee maker.
Lid for the water reservoir.
Container for holding water for brewing.
System for dispensing brewed coffee, includes straw and lever.
Diagram and labels for the coffee maker's control interface.
Button to turn the coffee maker on and off.
Button to set the current time on the display.
Keeps brewed coffee warm for up to 4 hours.
Button to select brew strength (cups, regular, bold).
Indicates coffee is brewing; dispensing waits until brewing is complete.
Allows programming the coffee maker to brew at a later time.
Indicates coffee is finished brewing and ready for consumption.
Counts time since brew or keep warm to indicate coffee freshness.
Prompts to add water and restart brew cycle.
Reminds user to clean the coffee maker every 30 brew cycles.
Reminds user to change the water filter every 60 brew cycles.
Arabica beans are more costly but yield better-tasting coffee.
Ground coffee stales faster; purchase fresh or smaller quantities.
Grind whole beans to medium for best taste; use within one week of grinding.
Fine grinds slow filtration, risking overflow; increase grind size if necessary.
Purchase only enough coarse ground coffee for one week to ensure freshness.
Avoid storing coffee grounds in the freezer; air and moisture degrade flavor.
Using filtered, bottled, or purified water yields better-tasting coffee than tap water.
Use 1 tbsp (5g) per cup; less for decaf/flavored; fine grinds may cause overflow.
Grind coffee beans just before brewing for optimal flavor.
Slide the front housing towards you to remove it from the base.
Lift reservoir, turn lid counterclockwise from lock to unlock position.
Push up on the straw's bottom while holding the lid to lift it out.
Push the long end of the straw through the center opening of the lid.
Insert lid onto reservoir, then turn clockwise to secure into place.
Lift reservoir, align dispensing lever with front housing opening, handles to sides.
Slide the front housing onto the base while holding the coffee maker handles.
Perform an initial brew cycle with water and discard it before brewing coffee.
Insert water filter into water reservoir according to care and cleaning instructions.
Plug in; '0:00' flashes and 'set clock' icon appears on display.
Press set clock button to select the correct hour, including AM or PM.
Press set clock button until the correct minutes are selected.
Wait 3 seconds; the display will then illuminate the set time.
Lift reservoir, add water to at least the 2-cup line, up to the 12/14-cup line.
Lift the coffee maker lid, remove the filter basket and brew basket.
Add grounds to filter basket or paper filter; observe maximum quantity noted.
Align filter basket with the maker's top opening and add the brew basket.
Close the main lid of the coffee maker.
Press brew strength button to select 1-4 cups, regular, or bold.
Press keep warm button to select 0-4 hours; setting to 0 turns it off.
Press the brew ON/OFF button to initiate the brewing process.
Display shows time since brew or keep warm duration.
Press cup or mug against the dispensing lever to dispense brewed coffee.
Unplug the coffee maker from the wall outlet after use.
Use a minimum of 4 tablespoons (20g) ground coffee when brewing 1-4 cups.
Use 1 level tablespoon (5g) ground coffee per cup; use less for decaf/flavored.
Press brew later button; indicator illuminates with '19:99 AM' on display.
Press brew later button to select the correct brew hour (AM/PM).
Press brew later button to select the correct minutes for the brew time.
Press brew later button at any time to turn off the programmed brew.
Avoid abrasive pads or powders that may scratch surfaces or cause breakage.
Unplug, cool completely, disassemble, and wash parts in hot, soapy water.
Reservoir lid, brew basket, water reservoir, and its lid are dishwasher safe.
Do not immerse the cord, plug, or coffee maker in any liquid.
Do not use SANITIZE setting in dishwasher; temperatures may damage product.
Wipe maker with a damp cloth or sponge; dry. Avoid abrasive cleansers.
Replace water filter every 3 months or 60 brew cycles for best taste.
Soak new water filter in cold water for 15 minutes before use.
Snap the top half of the water filter holder onto the bottom half with the filter inside.
Place filter holder, filter side down, into the opening at the bottom of the water reservoir.
Fill water reservoir with cold water to the minimum 2 cup line.
Reminds user to clean the coffee maker monthly or as prompted after 30 brew cycles.
Remove filter assembly, fill reservoir with 1 pint (2 cups) of plain white vinegar.
Press and hold both set clock and brew strength buttons for 5 seconds to start.
Maker heats, pumps vinegar, rests 30 mins for descaling, then pumps remainder.
Run 2-3 full brew cycles with fresh water to flush the system.
Check grounds quantity, grind size, filter type, or dispensing during brew for overflow.
Rinse filter basket/reservoir, dry, reinstall; use bold strength for fine grinds.
Check reservoir lid seating, grounds near seals, or ensure seals are warm.
Flush dispensing straw with warm soapy water to clear any obstructions.
Gurgling may occur when dispensing coffee and the reservoir level is low.
Error code indicates need to clean maker; refer to Care and Cleaning section.
Error code indicates need to replace the water filter as per instructions.
FIL H20 error code indicates that cold water should be added to the reservoir.
Covers defects in material/workmanship for 5 years in Canada, 1 year in US.
Exclusive remedy is replacement; user pays for return costs of product or component.
Excludes glass, filters, normal wear, use not in conformity, accident, alteration, misuse.
Excludes incidental/consequential damages; liability limited to purchase price.
Contact Customer Service Dept. or visit website; keep sales receipt for claims.
| Brand | Hamilton Beach |
|---|---|
| Model | One Press 47600 |
| Category | Coffee Maker |
| Language | English |