EasyManua.ls Logo

Hantech RD-40B - User Manual

Hantech RD-40B
52 pages
Print Icon
To Next Page IconTo Next Page
Loading...
@HANTECH
INSTRUCTION MANUAL
BEDIEN U NGSAN LEITUNG
Artikelnummer: RD-40B(DE)
RD-40B(CH)
.J
 
 

 
 

 
 
 
 
  
 
 


 

 




Question and Answer IconNeed help?

Do you have a question about the Hantech RD-40B and is the answer not in the manual?

Overview

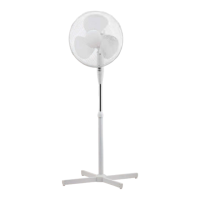
This document describes the Hantech RD-40B(DE) / RD-40B(CH) 40 cm Pedestal Fan, providing instructions for its assembly, operation, and maintenance.

Function Description

The Hantech Pedestal Fan is designed to provide air circulation in domestic/household environments. It features a fan head that can be adjusted for tilt angle and can be set to oscillate for wider air distribution. The fan offers multiple speed settings to suit different cooling needs.

Important Technical Specifications

  • Model Number: RD-40B
  • Voltage: 220-240V~
  • Frequency: 50Hz
  • Wattage: 50W
  • Size: 40 cm (pedestal fan)

Usage Features

Before First Use: It is crucial to read, understand, and follow all instructions in this manual, especially the "IMPORTANT SAFEGUARDS" section, even if you are familiar with similar products. Keep the manual handy for future reference.

Safety Precautions:

  • Always operate the fan from a power source with the same voltage, frequency, and rating as indicated on the product identification plate.
  • Do not use this fan with any solid-state speed control device to reduce the risk of electric shock.
  • The appliance is not intended for use by persons (including children) with reduced physical, sensory, or mental capabilities, or lack of experience and knowledge, unless they have been given supervision or instructions concerning safe use by a responsible person.
  • Children should be supervised to ensure they do not play with the appliance.
  • Do not leave the fan running unattended.
  • Do not operate the product if it has been dropped, damaged, or shows signs of malfunction. Do not use it with a damaged plug or cord. Return the complete product to the place of purchase for inspection, refund, or replacement.
  • If the fan is not working properly, contact a qualified electrician or service center for examination and repair; never attempt to dismantle it yourself.
  • Do not immerse or expose the product or its flexible cord to rain, moisture, or any other liquid.
  • This product should not be used in the immediate vicinity of water (e.g., bathtubs, washbowls, swimming pools) where immersion or splashing could occur.
  • Never install the unit where it could be subject to heat sources (radiators, heat registers, stoves, etc.), direct sunlight, mechanical vibration or shock, excessive dust, lack of ventilation (cabinets, bookcases), or an uneven surface.
  • Always switch off and unplug the fan from the outlet when not in use, before assembling or disassembling parts, and before cleaning. Ensure the fan is fully assembled before switching it on.
  • Avoid contact with moving parts. Do not insert any body parts (e.g., fingers) or objects through the grille when the fan is operating.
  • Do not cover the grille or operate the fan in close proximity to curtains, etc.
  • This product is intended for normal domestic/household use only.
  • Always disconnect the fan when moving it from one location to another.
  • The use of attachments or accessories not recommended or sold by the product distributor may cause personal or property hazards or injuries.
  • Ensure the fan is on a stable surface when operating to avoid overturning.
  • If the supply cord is damaged, it must be replaced by the manufacturer, its service agent, or a similarly qualified person to avoid a hazard.

Product Assembly: The assembly process involves several steps for the base, fan blade, and grilles.

  • Assemble the Base: Loosen and remove four screws from the crossbars (A and B), then interlock them. Align the holes in the crossbars with the flange of the outer tube and secure with the four screws. Loosen and remove the height adjustment collar from the inner tube, slide the base decorative cap down. Replace the height adjustment collar, pull the inner tube out to the desired height, and tighten the collar. If necessary, slightly loosen the set screw, slide the switch box down over the inner tube, and tighten the set screw securely.
  • Assemble the Blade and Grille: Unscrew the plastic mounting nut from the front of the motor housing (anticlockwise). Position the rear grille against the front of the motor housing with the handle uppermost, ensuring the locating pegs engage correctly in the holes of the rear grille. Tighten the rear grille mounting nut clockwise, but do not overtighten. Push the fan blade onto the motor shaft, aligning the slot at the back of the blade with the drive pin. Tighten the blade cap (anticlockwise). Position the front grille against the rear grille, aligning the holes for the small nut and bolt. Insert the bolt and screw on the nut, but do not fully tighten yet. Push the grille retaining clips into position, ensuring they engage correctly. Finally, fully tighten the small nut and bolt.

Operation of the Product:

  • Place the fan on a level and dry surface.
  • Plug the fan into a mains socket.
  • Select the desired speed setting using the controls. There are four settings: 0 (off), 1 (low), 2 (medium), and 3 (high).
  • To activate oscillation, push the oscillating knob downwards. To stop oscillation, pull the knob upwards.
  • To adjust the tilt angle of the fan head, loosen the neck screw, swivel the fan to the desired angle, and then re-tighten the screw. Caution: The fan should always be switched off when making this adjustment.

Maintenance Features

Cleaning:

  • Always switch off and unplug the fan from the power supply before assembling, disassembling, or cleaning.
  • Keep the air vents at the rear of the main body free from dust or fluff. Use a vacuum cleaner to remove these if necessary.
  • Fan components should be cleaned using mild soap and a damp cloth or sponge.
  • Do not allow any water or other liquid to enter the motor housing.
  • Thoroughly remove soap film with clean water.
  • Caution: Do not use harsh detergents, chemical cleaners, or solvents, as they may damage the surface finish of the fan components.

Hantech RD-40B Specifications

General IconGeneral
BrandHantech
ModelRD-40B
CategoryFan
LanguageEnglish

Related product manuals