Do you have a question about the Harken Tensioner CT0 and is the answer not in the manual?
Defines intended use, improper use, operator, user, and MWL.
Explains warning and note symbols for potential danger and important information.
Covers manual's integral role, qualified operators, proper installation, and avoiding modifications.
Specific advice for hydraulic motor operation and oil contact.
Advises on suitable clothing and periodic maintenance.
Notes manual availability in English and contact points for support.
Defines the intended use of Harken devices on sailing boats.
Lists uses to avoid, such as hauling or weighing anchor.
Refers to the Harken Limited Worldwide Warranty details.
Avoids slack and keeps tension on the captive drum rope.
Mentions max dynamic load and motor assembly options.
States use with both Hydraulic and Electric Captive Winches.
Covers identification basis and codes for rope diameter/motorization.
Details key load specifications and warns against exceeding them.
Notes that weights include the motorization.
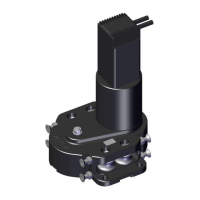
Lists main components: Carter, Hubs, Motor, Pulleys, etc.
Advises using quality ropes and specifies diameter limits.
Details the Ø10-12mm and Ø14-16mm configurations.
Provides outline and space requirements for electric tensioners.
Clarifies that dimensions are for electric models.
Provides outline dimensions and drawing for the hydraulic tensioner.
Details mounting surface tolerance and alignment with winch.
Specifies bolts and highlights risks of incorrect fastener use.
Advises on using anti-corrosive lubricants for mounting bolts.
Covers placing the template and marking drill points.
Details drilling holes and sealing them with sealant.
Advises checking drainage holes are clear of sealant.
Instruction to remove excess marine sealant.
Details hydraulic motor, manifold, and their performance specs.
Covers hose connection, contamination prevention, and pressure settings.
Outlines PLC requirements for solenoid valve control.
Shows a diagram of the tensioner manifold components.
Lists manifold components, part numbers, and setup values.
Shows connections for pay-out direction.
Shows connections for pay-in direction.
Lists port IDs, descriptions, and sizes.
Lists hydraulic device IDs and their functions.
Suggests maximum pressures for first activation of components.
Graph showing pressure vs. pulling load for Tensioner CT0 HY.
Graph showing flow rate vs. line speed.
Notes on graph interpretation and oil conditions.
Mentions Harken provides the electric unit assembled or as spare parts.
Lists connectors for parallel connection with winches.
Shows wiring for command and power cables.
Lists motor data and directs to wiring chapter.
Illustrates connections and explains potentiometer range effects.
Details setting potentiometer, reverse control, and connectors.
Lists operating tension and max current absorption for electric motors.
Graphs show line load vs. speed and load vs. current.
Covers general cleaning and maintenance frequency.
Warns against specific agents, recommends soft cloths, and part replacement.
Details cleaning parts after disassembly.
Lists and describes threadlockers, grease, and warnings.
Details anti-corrosive, anti-seize agents, light oil, and Vaseline oil warnings.
Lists allen wrenches, hammer, and rags for disassembly.
Shows removing base plate screws with medium threadlocker.
Illustrates separating the upper assembly.
Shows removing pulleys and applying Vaseline oil.
Shows removal using allen wrench and strong threadlocker.
Illustrates another step in the disassembly process.
Shows final component removal with allen wrench and strong threadlocker.
Shows separation of gears.
Details disassembling gears and hubs with medium threadlocker.
Illustrates applying grease to gears and bearings.
Shows handling of rings and hubs.
Illustrates assembly of hubs.
Shows final reassembly step using allen wrench.
Outlines the general assembly process after maintenance.
Lists aspects: lipped rings, torques, and marking.
Details proper insertion of lipped rings into pulley slots.
Emphasizes applying correct torque to screw bolts as indicated in maintenance steps.
Details marking screwed bolts with a colored sign after maintenance steps.
Refers to disassembly figures for component identification.
Explains how to request spare parts via the Harken website.
Provides contact details for manufacturer, tech service, and customer service.
| Brand | Harken |
|---|---|
| Model | Tensioner CT0 |
| Category | Bicycle Accessories |
| Language | English |