6
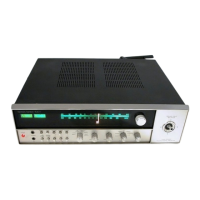
Rear
Panel
-
Audio
and
System
Connections
~~rn
~•
co~~w
~w
8
FM
Antenna: Connect
an
indoor
or external
FM
antenna to these
terminals.
©
AM
Antenna: Connect the AM
loop antenna supplied with the
receiver to these terminals. If an
external AM antenna is used, make
connections to the
AM
and
GND
terminals
in
accordance with the
instructions supplied with the
antenna.
@
Tape
1
Out:
Connect these jacks
to the RECORD/INPUT jacks
of
an
audio recorder.
@ Tape 1 In: Connect these jacks to
the PLAY/OUT jacks of an audio
recorder.
@
Tape
2
Out:
Connect these jacks
to the RECORD/INPUT jacks of a
second audio recorder.
O
Tape
2
In:
Connect these jacks to
the PLAY/OUT jacks of a second
audio recorder.
@
CD
IN:
Connect these jacks to
the output of a compact disc player
or CD changer.
CD
Front
R:
Connect these terminals
to the front right speaker.
O Front
L:
Connect these terminals
to the front left speaker.
8 Center: Connect these terminals
to the center speaker.
(3
Surround
R:
Connect these ter-
minals to the right surround speaker.
8 Surround
L:
Connect these ter-
minals to the left surround speaker.
e Pre-Outs: If external power
amplifiers are used for any channels,
connect these jacks to
the
inputs of
the amplifier.
G)
Subwoofer Pre-Out: Connect
this jack to the line level input of a
powered subwooter. It
an
external
subwoofer amplifier is used, connect
this jack to the subwoofer amplifier
input.
@ Remote
IR
Out:
This connection
permits the
IR
sensor
in
the receiver
to serve other remote controlled
devices. Connect this jack to
the
"IR
IN" jack
on
Harman Kardon or other
compatible equipment.
(»
Remote IR In: If the AVR70's
front panel
IR
sensor
is
blocked due
to cabinet doors or other obstruc-
tions, an external
IR
sensor may be
used. Connect the output of the sen-
sor
to
this jack.
OONLY
® Unswitched
AC
Outlet: This out-
let may
be
used to power any AC
device. The power will remain on at
this outlet regardless
of
whether the
AVR70
is
on or off.
4i}
Switched
AC
Outlet: This outlet
may
be
used to power any device
that you wish to have on when the
unit is turned on.
NOTE: The power consumption of
the device plugged into each
of
these outlets should not exceed
120
watts.
@)
Power Cable: Connect the
AC
plug to a non-switched AC wall
output.
Rear
Panel
-
Video
Connections
r.::,
VCR
1 Audio
In:
Connect these
jacks to the audio PLAY/OUT jacks
of
a VCR.
(D
VCR
1 Audio
Out:
Connect
these jacks to the RECORD/IN audio
jacks of a
VCR.
[ii
VCR
1 Video In: Connect this
jack to the composite video
PLAY/OUT jacks
of a
VCR.
Ii]
VCR
1 Video
Out:
Connect this
jack to the composite video
RECORD/IN jacks of a
VCR.
(I
VCR
1 S Video
Out:
Connect this
jack to the "S" video RECORD/IN
jacks of a
VCR.
Cl
VCR
1 S
Video
In: Connect this
jack to the "S" video RECORD/IN
jacks of a
VCR.
Infonnation
Display
l@(Q)
...
e(Q)'
..
,
(Q)@
0
...
' '
[!I
VCR
2 Audio
In:
Connect these
jacks to the audio jacks PLAY/OUT
of a second VCR.
G]
VCR
2 Audio Out: Connect
these jacks to the audio RECORD/IN
jacks
of
a second
VCR.
D
VCR
2
Video
In: Connect this
jack to the composite video
PLAY/OUT
Jacks
of a second
VCR
I!)
VCR
2
Video
Out:
Connect this
jack to the composite video
RECORD/IN jacks of a second
VCR.
[3
TV
Audio
In:
Connect the audio
outputs of a
TV,
cable converter or
satellite
receiver to these jacks.
1J1
TV
Video
In:
Connect the com-
posite video output of a
TV,
cable
converter or satellite receiver to this
jack. The signals received at this
jack are also used to trigger the
"TV Auto-On" feature.
~
:AIJOUlLr15111N«lW
IS
~
LO
Audio
In:
Connect the audio
output of a laser disc player
to
these
jacks.
ID
LD
Video In: Connect the com-
posite video
output
of a laser disc
player to this jack.
[E
LO
S Video
In:
Connect the "S"
video output
of
a laser disc player to
this jack.
BJ
TV Monitor
Video
Out:
Connect
this jack to the composite video
input of a
TV
monitor or video pro-
jector to view the on screen control
menus and output of the receiver's
video switcher.
[!I
TV Monitor S Video
Out:
Connect this jack to the S video
input
of
a
TV
monitor or video pro-
jector to view S video sources
selected by the receiver's video
switcher.
0 "Visual" Indicator: These indica-
tors display which input source is
being
led
to the video monitor output.
@
Test:
This indicator flashes when
the output levels are being set using
the built
in test signal generator.
0 Stereo: This indicator lights
when an
FM
station is broadcasting
in stereo.
@
Volume
Indication: The last two
indicators on the information display
indicate the volume level. Note that
OdB
is the reference level, not an
indication that there is no
output
0 Main Information
Display:
This
ten digit display shows messages
relating to the status, input source,
surround mode,
tuner,
volume level or
other aspects of the unit's operation.
@ Auto
Memo:
This indicator flash-
es when the tuner is automatically
scanning for stations
and
entering
them into the preset memory,
@)
Memo: This indicator flashes
when the
Memo
button
is
pressed
when entering presets and other
information into the tuner's memory.
E) Auto: This indicator signifies that
the Automatic Tuning mode is in use
for
FM
broadcasts.
0 Tuned: This indicator lights when
an AM
or
FM
station is properly
tuned and locked.
(;)
Tuner Frequency Indication:
When the tuner is
in
use, the main
Information Display will show the
preset channel number, if
any,
the
frequency band
and
the station fre-
quency. Indicators at the right side
of the display show
kHz
when
an
LW
or MW station
is
tuned or
MHz
when
an
FM
station is tuned.
@
DISP:
This indicator lights when
the
FL
display has been turned
off using the
Display button
ml
to
remind you that the unit is still
turned
on.
G) P•Scan: This indicator flashes
when the stations programmed into
the tuner memory are being
auto-
matically reviewed.
@ Mode Status: These indicators
display the currently selected
surround mode.
G,
Signal Level Indication: This is
a visual indication of the strength of
a radio station signal. The more bars
visible, the stronger the station.
(
 Loading...