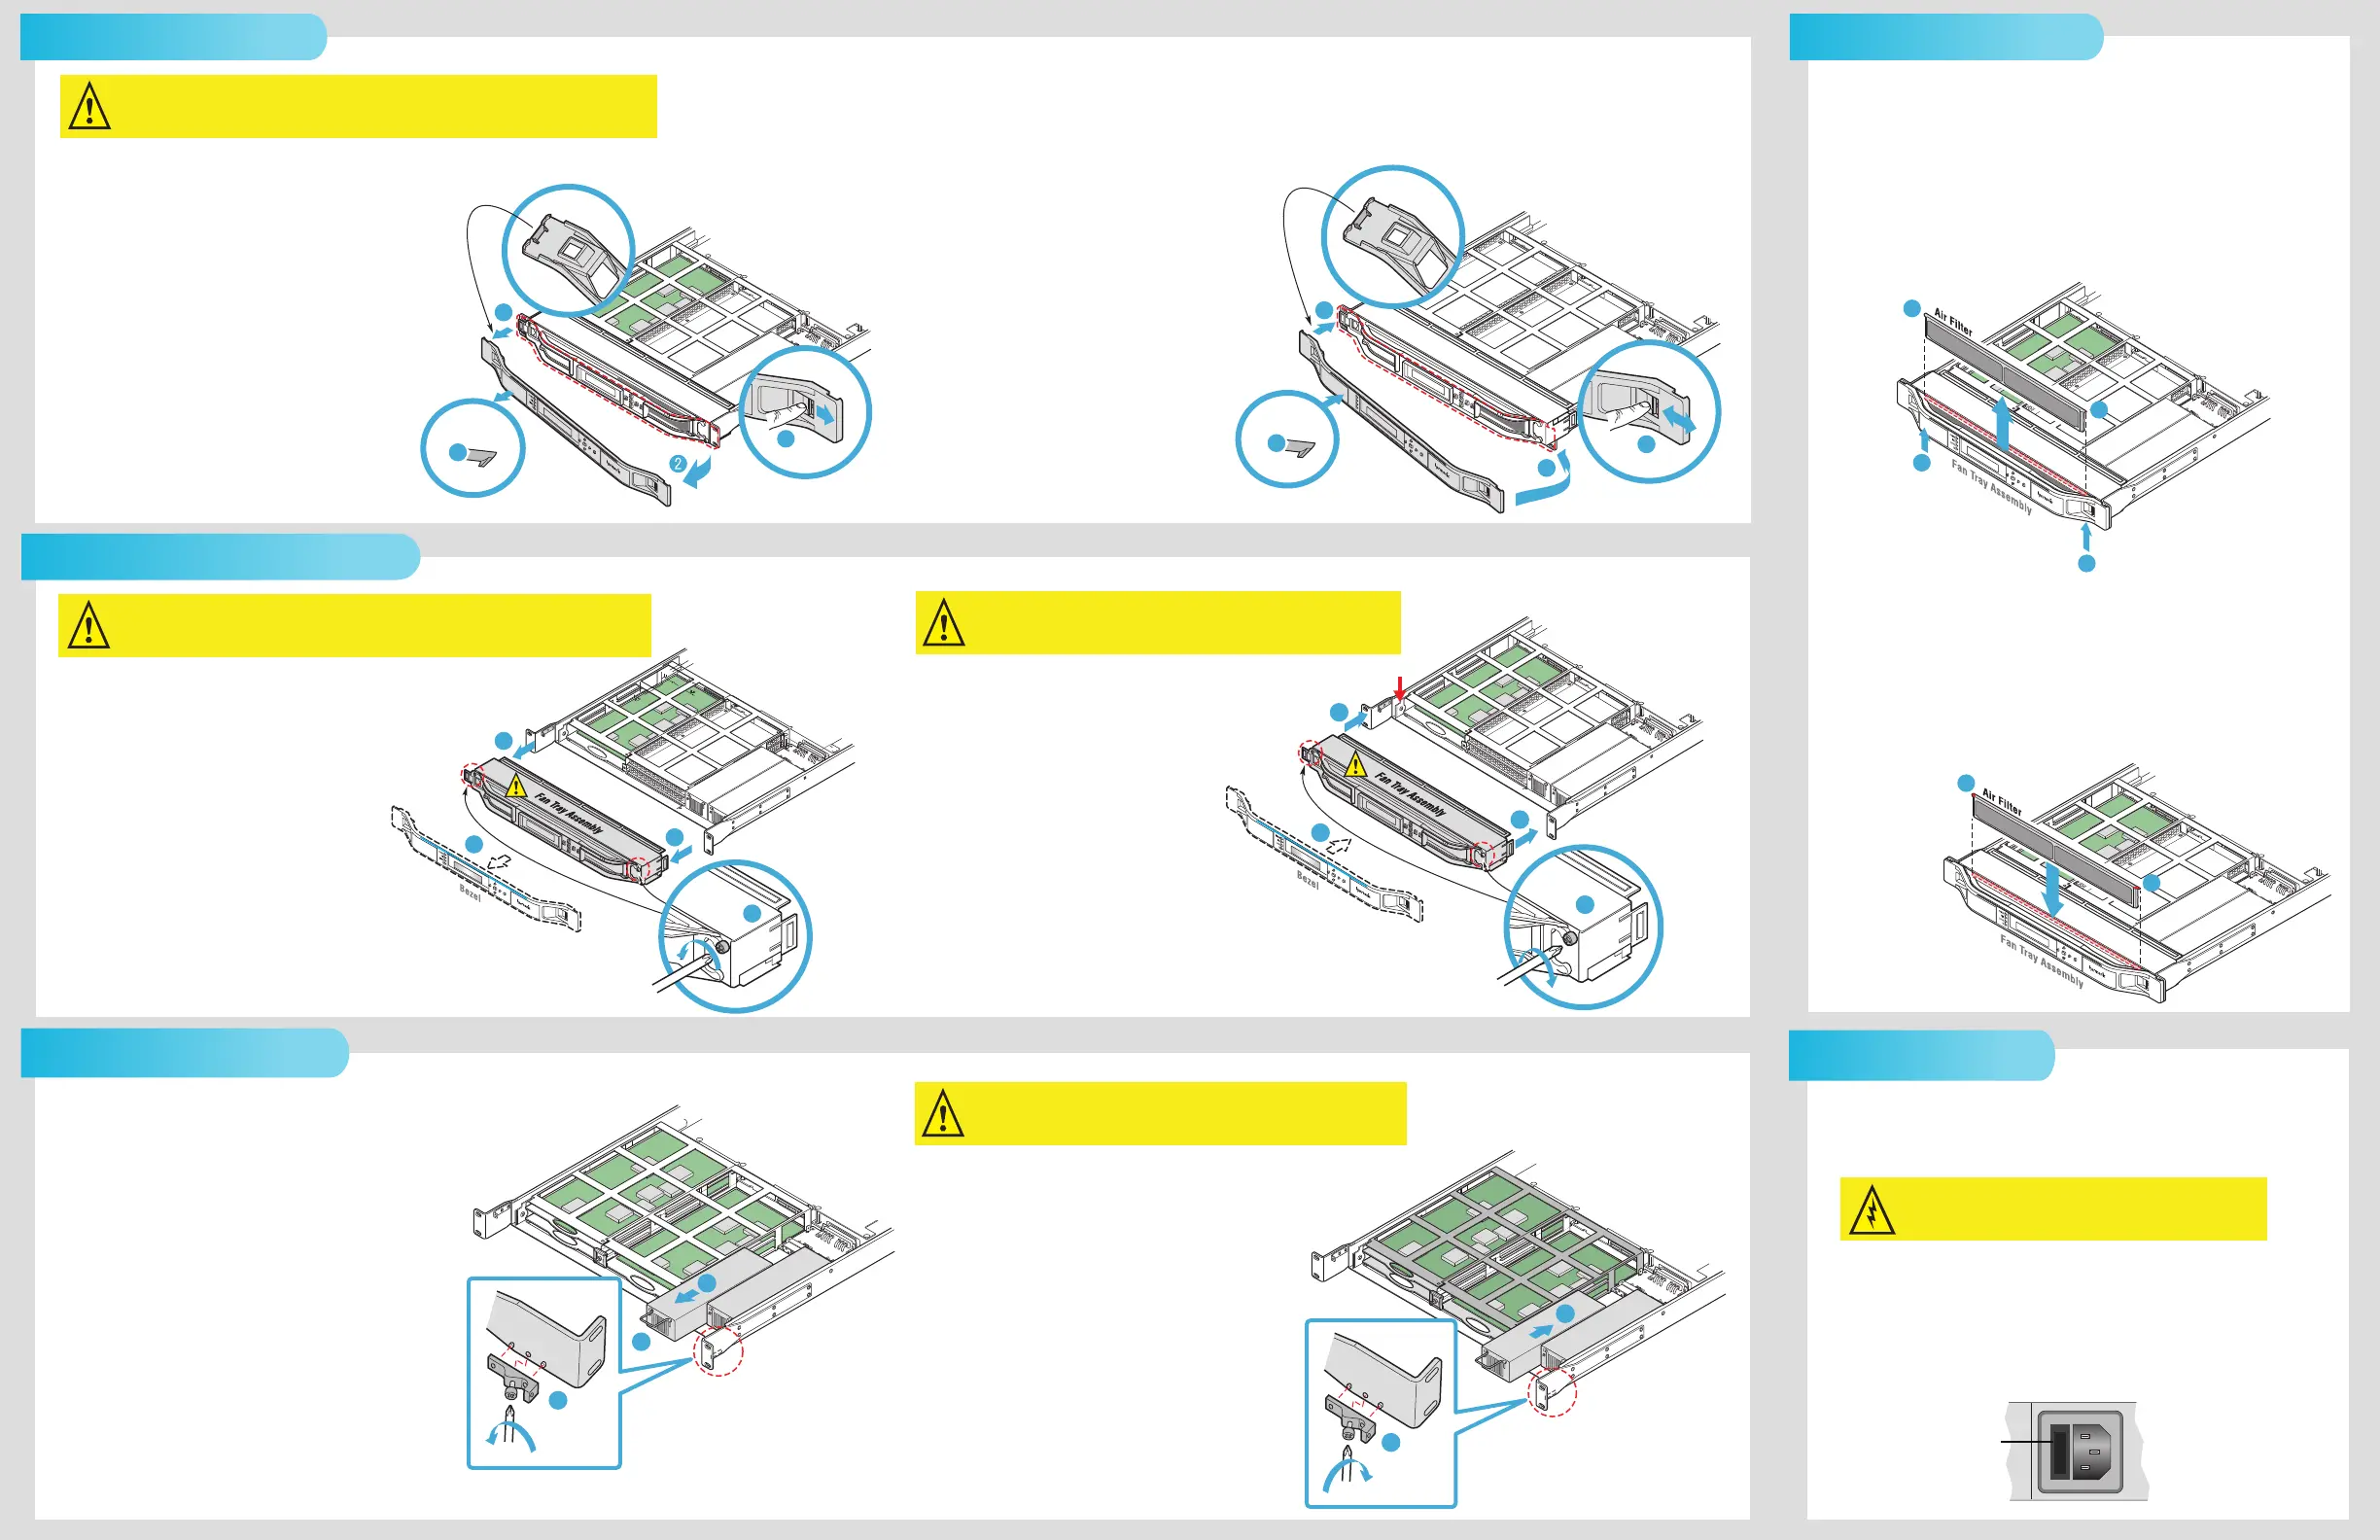
Note: You do not need to turn off the device when removing and replacing the bezel.
To remove the bezel:
1. Locate the lever on the front of the bezel, and push
to the right to disengage the right side of the bezel,
as shown in step 1.
2. Pull the right side of the bezel toward you, as shown
in step 2.
3. Ease the bezel away from the fan tray. The bezel
is secured to the fan tray by a clip, as shown
in step 3.
4. Ease the left side of the bezel away
from the unit, as shown in step 4.
To replace the bezel:
1. Replace the bezel by inserting the plastic
catch at the back of the of the left side of
the bezel into the slot in the metal frame,
as shown in step 1.
2. Ease the right side of the bezel onto the
device, as shown in step 2.
3. Push the front of the bezel flush with the
fan tray to secure the clip that holds the
bezel to the fan tray, as shown in step 3.
4. Locate the lever on the front of the bezel
and push to the right to snap the bezel
into place, as shown in step 4.
Warning: The front panel display on the device is susceptible to electrostatic discharge (ESD) when
the bezel is removed. Wear the appropriate ESD protection when the bezel is removed.
Note: Electra 9200D or ProStream 9100: If you are replacing
only one power supply on a dual power supply device,
you do not need to turn off the device.
Electra 9200: If you are replacing a power supply
on a single power supply device, turn off the device.
To remove a power supply:
1. Remove the bezel.
2. Remove the fan tray unit.
3. If the power supply on the right is being replaced,
use a Phillips-head screwdriver to remove the bracket
attached to the inside of the chassis on the right side,
as shown in step 4.
4. Grasp the metal handle on the front of the power
supply, and pull firmly to disengage the power
supply from the connector, as shown in step 5.
5. Slide the power supply away from the device, as shown
in step 6.
To replace a power supply:
1. With the bezel and fan tray assembly removed,
insert the power supply into the chassis until it
engages with the connector, as shown in step 1.
2. If necessary, use a Phillips-head screwdriver to
attach the bracket to the right inside of the chassis,
as shown in step 2.
3. Reinstall the fan tray assembly.
4. Reinstall the bezel.
5. Connect power to the power supply.
To remove the fan tray:
1. Remove the bezel.
2. Using a Phillips-head screwdriver, remove the
two screws that attach the fan tray assembly
to the chassis, as shown in step 2.
3. Grasp the front of the fan tray assembly, and
pull the tray firmly but smoothly toward you
to disengage it from the PC connector inside
the device, as shown in step 3.
4. Slide the fan tray assembly away from the chassis.
To replace the fan tray:
1. Replace the fan tray assembly by sliding
the tray into the chassis, engaging the
PC connector identified by the red arrow.
2. Using a Phillips-head screwdriver, secure
the fan tray assembly to the chassis,
as shown in step 2.
3. Reinstall the bezel.
Note: You may need to slide the chassis forward to enable this
procedure. You do not need to turn the device off to
remove and replace the air filter.
To remove the air filter:
1. Using your fingers, push up on the air filter unit from the bottom
of the chassis until the filter is displaced, as shown in step 1.
2. Remove the filter from the chassis.
3. Inspect the air filter for dirt, and clean it if necessary.
To replace the air filter:
1. With your fingers on the corners of the filter (indicated in red),
push down on the filter until it is secure in the chassis, as shown
in step 1.
Note: When the filter is new, its color is medium charcoal. As dust
and dirt collect in the porous filter material, the color of the filter
gradually changes to brown, then to an ash color.
Note: For single power supply models of the Electra 9200, a spare
fuse is located in the fuse cover. No fuse is available on dual
power supply models of the Electra 9200D or the ProStream 9100.
To replace the power supply fuse:
1. Unplug the power cord.
2. Pull down the fuse cover, and remove the old fuse.
3. Install the new fuse.
Replacing the Power Supply Fuse
Removing and Replacing the Air FilterRemoving and Replacing the Bezel
4
3
Back Side of Bezel
1
Back Side of Bezel
Front Side of Bezel
1
2
4
POWER
TX
FAIL
LOCAL
3
Back Side of Bezel
Back Side of Bezel
Front Side of Bezel
Removing and Replacing the Fan Tray Assembly
Warning: The front panel display unit attaches to the front of the fan tray unit. The front panel display
should never be removed.
Warning: If the fan tray unit is removed for more than two minutes, the device
may shut down.
2
3
3
1
1
1
3
2
6
5
4
Removing and Replacing a Power Supply
1
1
2
2
1
1
Caution: Disconnect the power cord before removing the fuse.
Fuse Cover
Warning: If the power supply is removed for more than two minutes, the device
may shut down.
2
1
3
 Loading...