locking collar is then peened into a groove in
the ball housing on early models, or retained
by a grooved pin on later types.
6 On early models punch or prise up the
peening and then unlock the ball housing and
collar using Rover special tool No 18G1278.
Alternatively, use two small Stilson wrenches,
but take care not to damage the housing and
collar faces.
7 On later models, it is first necessary to drill
out the grooved pin. To do this use a 3.97 mm
diameter drill, and drill to a depth of 4 mm. Now
unlock the ball housing and collar using the
procedure described in the previous paragraph.
8 Unscrew the ball housing and then lift off
the tie-rod, ball seat and spring from the end
of the rack. The locking collar can now be
removed.
9 Repeat this procedure for the other tie-rod,
noting that if these components are to be re-
used they must be refitted to the same side of
the rack from which they were removed.
10 At the base of the pinion housing, undo
and remove the two rack damper cover bolts
and spring washers. Lift off the damper cover
together with its shims, and then withdraw the
thrust spring, yoke, and O-ring seal from the
rack housing.
11 Undo and remove the two bolts and lift off
the pinion end cover together with its gasket
and shims.
12 Carefully push out the pinion and lower
bearing.
13 Withdraw the rack from the pinion end of
the housing. Note: If the rack is withdrawn
from the plain end of the housing the rack
teeth will damage the support bush.
14 Extract the pinion upper bearing from the
rack housing, followed by the oil seal.
15 From the plain end of the rack housing,
undo and remove the small retaining screw
and then withdraw the rack support bush.
Note: On some models a rivet is used instead
of a screw and this must be carefully drilled
out.
Inspection
16 Thoroughly clean all the parts with
paraffin or a suitable solvent and dry with a
lint-free cloth. Carefully inspect the teeth on
the rack and the pinion for chipping,
roughness, uneven wear, hollows, or
fractures. Renew both components if either is
badly worn.
17 Carefully inspect the component parts of
the inner balljoints for wear or ridging, and
renew as necessary.
18 The outer tie-rod balljoints cannot be
dismantled, and if worn must be renewed as
complete assemblies. Examine the
component parts of the damper and renew
any that show signs of wear. Pay particular
attention to the oil seals; as a precautionary
measure it is always best to renew them.
19 The rubber gaiters are particularly prone
to damage and it is advisable to renew them
as a matter of course.
Reassembly
20 Begin reassembly by refitting the rack
support bush to the plain end of the rack
housing. If the original bush is being refitted,
align the screw holes in the bush and rack
housing.
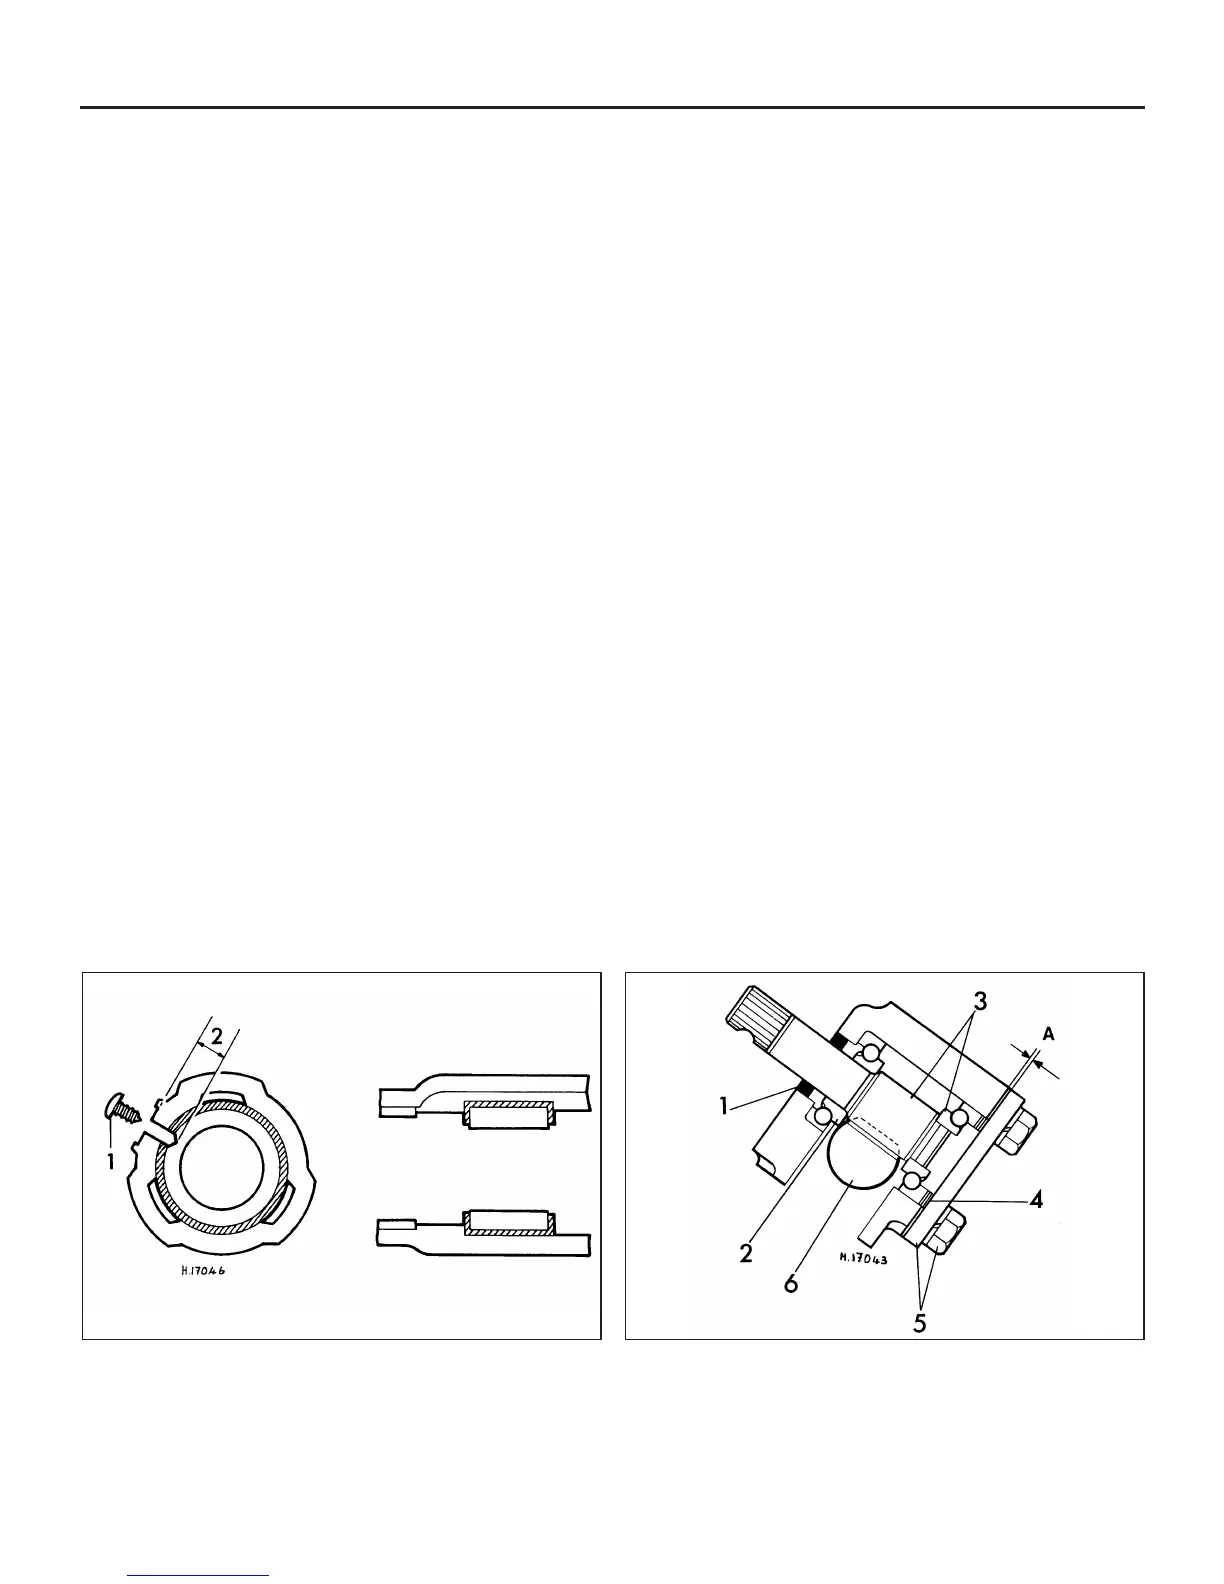
21 If a new rack support bush is being fitted,
drill a 2.7 mm diameter hole into the bush,
through the retaining screw hole, to a depth
of 10.5 mm (see illustration).
22 Apply jointing compound to the threads of
the support bush retaining screw. Refit and
tighten the screw, then check that the bush
bore has not distorted. Make sure that the
screw does not break right through the bush
into the bore.
23 Lubricate the upper pinion bearing and fit it
into place in the housing (see illustration). Use
the pinion to push the bearing fully into position.
24 Insert the rack into the housing from the
pinion end and then refit the pinion, splined
end first.
25 Lubricate the lower pinion bearing and
place it in position on the lower end of the
pinion shaft.
26 Refit the preload shims, using additional
shims if necessary, until the shim pack stands
proud of the pinion housing.
27 Refit the end cover and retaining bolts
and tighten the bolts lightly and evenly until all
pinion endfloat is taken up.
28 Using feeler blades, measure the gap
between the end cover and the pinion
housing. Now take off the end cover and
remove the appropriate number of shims until
a gap of 0.28 to 0.33 mm still remains.
29 With the correct shims in position, refit the
end cover using a new gasket, and with the
bolt threads lightly coated in jointing
compound, tighten them fully.
30 Place a new oil seal over the pinion and
insert it into the housing. The seal must be
fitted with the seal lips toward the pinion
bearing and with its top face flush with the
end of the housing.
31 Lubricate the rack damper yoke and slide
it into the housing. Refit the cover plate and
retaining bolts, but do not fit the spring at this
stage.
32 Tighten the cover plate bolts evenly until
the rack is lightly clamped by the yoke. Turn
the pinion two or three turns in either direction
and check that the rack is not binding in any
position. If necessary, slacken the cover plate
bolts slightly to achieve this.
33 Take a feeler blade measurement of the
gap between the damper cover plate and the
housing and then remove the cover plate.
10•18 Suspension and steering
28.21 Refitting the rack support bush
1 Retaining screw 2 Drill to a depth of 10.5 mm
28.23 Reassembly of the pinion housing
1 Oil seal
2 Upper pinion bearing
3 Pinion and lower bearing
4 Preload shims
5 End cover and retaining
bolt
6 Rack
A = 0.28 to 0.33 mm
 Loading...