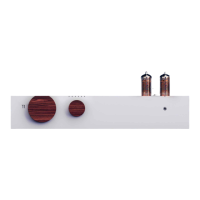
The Heaven 11 Billie Amp is a hybrid integrated amplifier designed to deliver high-quality audio by combining modern technology with classic vacuum tube know-how. It features a sleek, minimalist design with wooden accents and exposed vacuum tubes, making it both a functional audio device and an aesthetic statement.
Function Description:
The Billie Amp serves as the central hub for an audio system, amplifying sound from various sources and delivering it to speakers or headphones. Its hybrid design utilizes vacuum tubes for the pre-amplification stage, contributing to a warm, rich, and detailed sound signature often associated with tube amplifiers, while solid-state components handle the power amplification for efficiency and reliability. The amplifier supports both digital and analog audio inputs, including optical, Bluetooth, and RCA, catering to a wide range of modern and legacy audio sources. It also includes a dedicated phono input for turntables with moving magnet cartridges, allowing vinyl enthusiasts to connect their record players directly. A subwoofer output (LINE OUT) is provided for integrating a subwoofer into the system, enhancing bass response.
Important Technical Specifications (derived from the manual):
- Input Voltage: The amplifier supports both 120V/60Hz and 230V/50Hz AC voltage, indicated by a switch on the rear panel. Users must ensure the correct voltage is selected to avoid damage.
- Inputs:
- 2 x Optical (Digital)
- 1 x Bluetooth (Digital)
- 1 x VINYL (RCA, Analog - calibrated for moving magnet cartridges)
- 2 x RCA ANALOG (Analog)
- Outputs:
- Speaker Outputs (Left and Right, binding posts)
- LINE OUT (for subwoofer connection)
- Headphone Output (front panel, disengages muting when connected)
- Tubes: The amplifier uses ECC99 tubes. Matched tubes are recommended for optimal sound. Tubes have a limited lifespan and should be handled with care when cool and with the power off.
- Bluetooth Codec: Billie uses the aptX codec by default for high-quality wireless audio. For incompatible devices, AAC or SBC codecs are used.
- Grounding: A GND thumbscrew is provided for attaching a turntable ground wire. The power cord is grounded for safety.
Usage Features:
- Setup and Installation:
- Unpacking: Carefully remove the amp from its packaging, retaining all materials for potential servicing or returns.
- Peripheral Connection: Connect audio sources to the rear panel RCA, optical, or Bluetooth inputs. The VINYL input is specifically for moving magnet cartridges; preamplified turntables should use AUX inputs. A turntable ground wire connects to the GND thumbscrew.
- Speaker Connection: Connect speakers to the binding posts, ensuring correct polarity (black to negative, red to positive). Do not connect speakers while the amp is on. Powered speakers should only connect to the LINE OUT.
- Tube Installation: Gently insert tubes into their sockets, aligning pins carefully and using a slight circular rocking motion. Handle tubes only when cool and with the power off.
- Power Connection: Attach the power cord and ensure the correct voltage is selected on the rear panel.
- Operation:
- Power On/Off: Turn on the power switch on the rear panel. Billie performs a boot-up and volume reset. For daily usage, set the volume to zero for low-power standby; tubes power off after a 10-second delay. For complete power off, set volume to zero and turn off the rear power switch.
- Volume Control: Use the front panel volume knob to adjust output.
- Source Selection: The front panel source selection knob cycles through inputs in the order: OPTICAL 1, OPTICAL 2, BLUETOOTH, VINYL, RCA ANALOG 1, RCA ANALOG 2.
- Muting: Press the source knob to mute (lights 'breathe'). Press again or turn the volume knob to unmute. Connecting headphones also disengages muting.
- Bluetooth Pairing: Press and hold the source knob until the Bluetooth source light turns blue. Pair with 'BillieAmp' on your device. The light returns to the default color upon successful pairing.
- Remote Control: The Billie Remote provides convenient control over various functions:
- POWER: Controls starting volume.
- VOLUME UP/DOWN: Adjusts volume. Volume UP also initiates Bluetooth pairing. Volume DOWN also turns off tube lights.
- SOURCE LEFT/RIGHT: Navigates previous/next songs (for Bluetooth).
- MUTE / PAUSE: Mutes the pre/sub out.
- SETTINGS: Double-click to activate settings. Follow with another key to register a setting (e.g., SETTINGS + POWER to set starting volume).
- Sound Optimization: Tubes require approximately 20 minutes to fully heat up and stabilize for optimal sound. Matched ECC99 tubes are recommended.
Maintenance Features:
- Cleaning: Clean the unit with a dry microfiber cloth. Avoid liquids.
- Tube Handling: Handle tubes only when cool and with the power off. Avoid excessive force. Do not use tubes with cracks, discoloration, or damaged pins.
- Safety Precautions:
- Do not open the equipment case; there are no user-serviceable parts inside. Refer all servicing to qualified personnel. Unauthorized modification voids the warranty.
- Avoid exposing the unit to heat sources, humidity, direct sunlight, liquids, or damp/wet conditions.
- Do not bypass the power cord ground pin or use incorrect voltage.
- Unplug the apparatus during lightning storms or when unused for long periods.
- Dispose of electrical and electronic products separately via designated collection facilities.
- Warranty: The warranty is voided by unauthorized modifications, incorrect voltage usage, or bypassing the power cord ground pin. Servicing is required for damages such as power receptacle damage, liquid spills, objects falling into the apparatus, or if the unit does not operate normally or has been dropped.
- Settings Reset: All settings (except starting volume) reset to default when the power is set to standby. Turning off the amp using the rear power switch resets all settings to factory default.