Do you have a question about the Heybike mars and is the answer not in the manual?
Always wear a helmet when riding your electric bike for safety.
Keep the two keys properly; spare keys are not provided.
Avoid riding in wet conditions due to risk of sliding and damage.
Never ride the bike under the influence of drugs or alcohol.
The electric bike is not waterproof; water damage is not covered by warranty.
Riding carries risks of injury or death; use caution and ride at your own risk.
Do not exceed the posted speed limit and obey all traffic laws.
Never exceed the 330 lbs (150 kg) maximum load rating for the electric bike.
The electric bike should never be used by children under the age of 18.
Perform thorough checks of the bike's operation, brakes, guards, and tires before riding.
Be careful not to pinch fingers between the frame latch and the frame during assembly.
Securely lock the folding mechanism by closing the latch and turning the lock.
Open the kickstand and place the bike upright.
Insert and align the stem correctly with the tire direction.
Fold the handlebar and tighten screws to secure it in place.
Adjust seat height for comfort and safety, respecting insertion limits.
Ensure the seatpost is properly secured with the quick release lever.
Do not exceed seatpost insertion marks to prevent frame breakage and rider injury.
Verify all latches, levers, and quick releases are secured before riding.
Adjust suspension fork lockout and preload for riding comfort and efficiency.
Install pedals correctly by hand and tighten with an allen wrench, ensuring proper thread direction.
Check chain alignment for smooth drivetrain performance after pedal installation.
In position 1, the bike is on and battery locked; display controls bike power.
In position 2, the bike is off and battery locked; no controls are active.
In position 3, the battery is unlocked for removal; bike must be powered off.
Press the key before switching to unlock position.
Test the battery lock security by pulling the battery to ensure it's secured.
Ensure handlebar and seat are properly adjusted and secured.
Turn the key to ON, then press and hold the power button to turn on the LCD display.
Turn on headlights and taillights using the remote buttons if desired.
Select Pedal Assist Level (PAS) from 0-3 using the '+' and '-' buttons.
Begin riding carefully, using pedal assist or throttle as needed.
Do not use the throttle while dismounted; ensure the bike is powered off.
Remove the battery by releasing the seat lever, turning the key, and sliding upwards.
Reinstall battery by aligning the slot and turning the key to lock.
Check battery level by long-pressing the button on the battery itself.
Ensure battery is off, remove port cover, and place charger securely.
Connect charger to battery and power outlet; observe LED status lights.
Unplug charger from outlet first, then from the battery after charging is complete.
Identify key display elements like Battery Indicator, Speed, and Pedal Assist Level.
Understand TRIP, ODO, MAXS, AVG data and Battery Level icon.
Displays current pedal assisted level (0-3).
Learn how to turn bike on/off, adjust PAS, toggle odometer, and control lights.
Enter setting mode by pressing two buttons; use buttons to confirm and quit.
Configure trip clearing, backlight level, and speed units (MPH/KPH).
Access settings for wheel diameter and maximum speed.
Enter Personalized Setting for voltage, speed, and power sensor adjustments.
Configure battery voltage, pedal assist, current limit, and sensor settings.
Adjust assisted rotation direction, sensor sensitivity, and magnet count.
Customize walking mode, throttle speed limits, and system settings.
Information regarding the start-on password setting.
Proper methods for cleaning and storing the e-bike to prevent damage.
Guidelines for using, maintaining, and charging the battery safely.
Advice on storing the bike in suitable conditions and proper battery disposal.
Inspect drivetrain, wheels, and frame for alignment, trueness, and damage.
Check brake alignment, cable tension, shifting, chain stretch, and spokes.
Inspect drivetrain, chainring, freewheel, derailleur, and all cables.
Ensure brakes, pads, and cables are functional, adjusted, and secured.
Verify tire inflation, tread, condition, and wheel trueness/spoke tension.
Ensure handlebar and stem are adjusted, tightened, and allow proper steering.
Confirm chain is clean, oiled, and runs smoothly.
Ensure bearings are lubricated and free of excess movement; check crank security.
Ensure pedals and cranks are securely tightened and not bent.
Check derailleur adjustment, shifter/brake levers, and cable lubrication.
Inspect frame/fork for damage and ensure seat is properly adjusted and secured.
Verify motor operation, cable security, and axle bolt tightness.
Ensure battery is charged, secured, and stored in a dry location.
Check connectors, cables, housing, and ensure lights are functional.
Ensure accessories, reflectors, helmet, and safety gear are properly fitted and secured.
Maintain proper tire pressure (20 PSI recommended) for safety and performance.
Avoid under/overinflating tires; use regulated air sources to prevent bursts.
Replace worn tires or tubes promptly to prevent injury or damage.
Using aftermarket tires may void warranty; ensure they have reflective sidewall striping.
Diagnose issues like low battery, faulty connections, or improper startup sequence.
Troubleshoot issues related to battery, throttle, or magnet ring problems.
Address problems with motor responsiveness due to wiring, throttle, or motor damage.
Identify causes for reduced range like tire pressure, battery health, or brake rubbing.
Check charger connection, battery condition, wiring, or charge fuse.
Diagnose unusual noises from wheels or motor related to spokes, rims, or wiring.
Contact support with photos for missing or broken parts.
Bike arrives mostly assembled with tools and video for remaining steps.
Describe problems in detail with photos/videos and order ID for warranty service.
Understand common error codes for current, throttle, motor, and communication issues.
Return policy for unsatisfied customers within 30 days of receipt.
Item must be in original condition with less than 10 miles for return eligibility.
Deductions for shipping fees or restocking may apply for non-defective returns.
Conditions for warranty fund qualification, including RMA and proof of purchase.
Warranty covers defects in materials and workmanship for original purchaser.
List of components covered under the limited warranty.
Excludes normal wear, consumables, damage from misuse, or unauthorized modifications.
Battery not warranted against power surges, improper charger use, or water damage.
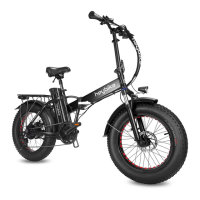
The Heybike Mars Electric Bike is a foldable electric bicycle designed for versatile use, offering both pedal-assist and pure electric modes. It is equipped with fat tires, a suspension fork, and a rear rack, making it suitable for various terrains and carrying small loads.
The Heybike Mars functions as an electric bicycle, providing assistance to the rider through a motor. It features an LCD display that shows important riding data such as speed, distance (trip and odometer), battery level, and pedal-assist level. The bike can be operated in several modes:
The bike is designed with a folding mechanism, allowing for compact storage and easier transport. It includes a removable battery for convenient charging and enhanced security. Safety features include front and rear brakes, a headlight, taillight, and an electric horn.
Assembly and Setup: The Heybike Mars arrives mostly pre-assembled, with a user manual and tools provided for the remaining assembly steps. Key assembly steps include:
Battery and Charging: The battery is removable for charging on or off the bike. To remove the battery, the key is rotated to the UNLOCK position, and the battery is slid upwards. To reinstall, align the battery with the slot and turn the key to the locked position. Charging involves connecting the charger to the battery's charging port and then to a power outlet. The LED indicator on the charger turns red during charging and green when fully charged. It's recommended to fully charge the battery before the first use and to charge it every other month to preserve its life.
Operation:
Safety Precautions:
Daily Care and Maintenance:
Recommended Service Intervals: Regular inspection and maintenance are crucial for optimal performance and safety.
Pre-Ride Safety Checklist: Before every ride and after every 25-45 miles (40-72 km), a comprehensive checklist should be followed:
Tire Inflation and Replacement: The bike uses 20"x4" rubber tires with inner tubes. Maintain proper air pressure (20 PSI recommended) to prevent loss of control or tire bursts. Inflate tires from a regulated air source with a pressure gauge. Replace tires and tubes when wear is evident or a flat occurs. Using aftermarket tires or tubes not provided by Heybike may void the warranty or create unsafe riding conditions.
Troubleshooting: The manual provides a troubleshooting guide for common issues like the bike not working, irregular acceleration, motor not responding, reduced range, and battery not charging. It lists possible causes and common solutions, such as charging the battery, repairing connections, replacing components, or adjusting settings. Error codes displayed on the LCD screen (e.g., E-21 for current issue, E-22 for throttle issue) help diagnose specific problems.
Warranty: Heybike offers a limited warranty covering defects in materials and workmanship for the original purchaser. The warranty period begins upon receipt of the e-bike and ends upon sale or transfer to another person. It covers components like the battery, frame, forks, stem, handlebar, headset, seat post, saddle, brakes, lights, bottom bracket, crank set, pedals, rims, wheel hub, freewheel, cassette, derailleur, shifter, motor, throttle, controller, wiring harness, LCD display, kickstand, reflectors, and hardware. The warranty does not cover normal wear and tear, consumables (tires, tubes, brake pads, cables, grips, chain, spokes), damage from misuse, neglect, abuse, commercial use, alterations, improper assembly, water damage, extreme riding, or unauthorized service/parts.
| Top Speed | 20 mph |
|---|---|
| Max Speed | 20 mph |
| Weight Capacity | 330 lbs |
| Load Capacity | 330 lbs |
| Foldable | Yes |
| Motor | 500W |
| Battery | 48V 12.5Ah |
| Range | 37 miles (pedal assist mode) |
| Brakes | Dual disc brakes |
| Suspension | Front suspension |
| Tires | 20" x 4.0" Fat Tires |