SETUP INSTRUCTIONS
CCU2 - USER MANUAL (version 2014)
3
1
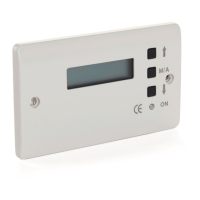
The front of the controller has a digital display which will give you
information on the current status in LCD form. There are also 3 square
buttons which programme the controller and finally a lamp to signal that
power is present at the module.
2
With your wiring complete switch on the power at the fused spur. The
power lamp should illuminate and a display appear on the LCD screen.
3
Before the controller can work you need to set the parameters by which
the controller operates.
4
Firstly press the ‘M/A’ button until ‘MANUAL’ appears on the display.
Now press the bottom button marked with the ‘down arrow’ this will
fully close the actuator. Next press and hold the top button ‘up arrow’
and count the number of seconds it takes for the actuator to reach its
fully open position.
5
With the power still on press and hold the ‘M/A’ button. Still holding the
button switch off the power at the fused spur. Count to 10 seconds and
switch the power back on. Only when the power is on and the display
showing should you release the ‘M/A’ button.
6
The controller has now entered the “Setup Menu’ and the display now
requires that you enter the time in seconds that your actuator takes to
reach its fully open position. Use the up and down arrows to increase or
decrease the value. When you have set the correct time for your actuator
press the ‘M/A’ button once more.
7
The display now shows the rain sensor sensitivity, please leave at ‘05’
for normal use. Press the ‘M/A’ button once more.
8
This new display relates only to special functions and should be
bypassed. Press the ‘M/A’ button once more.
 Loading...