EasyManua.ls Logo

Hilka 84800120 - User Manual

Hilka 84800120
2 pages
Print Icon
To Next Page IconTo Next Page
Loading...
84800120
Pistol Grip Grease Gun Set
Assembly
• Screw the Outlet Pipe (2) into the Gun Head(1)
• Fit the solid extension pipe (3) to the outlet pipe(2) or the flexible extension pipe(4)
• If the Flexible Pipe (4) is to be used you will need to fit the Grease nipple coupler (5).
Loading the Grease cartridge into the gun
• Remove the barrel (6) from the Gun head (1)
• Pull back the Sprung pull rod (7) as far as it will go, (this will automatically lock in its extended
position)
• Remove the plastic cap(8) from the grease cartridge(9)
• Insert the grease cartridge(9) into the barrel
• Remove the foil seal from the cartridge top
• Refit the Barrel(6) with the fitted cartridge( back into the gun head(1)
• Release the locking lever (7) at the base of the barrel(6) this will then pressurize the grease
into the gun head
Greasing
Wipe clean the grease fitting and the tip of the nozzle, connect the nozzle, and then reciprocate
the lever. If grease is charged normally, old grease is pushed out from the groove or clearance
near the fitting. For the amount of grease to charge, refer to the instruction manual for the target
machine, or charge the machine with new grease until old grease is completely pushed out.
Question and Answer IconNeed help?

Do you have a question about the Hilka 84800120 and is the answer not in the manual?

Overview

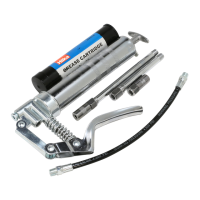
The Hilka Pistol Grip Grease Gun Set (84800120) is a robust tool designed for efficient lubrication, featuring a pistol grip for comfortable and controlled operation. This set is engineered to simplify the greasing process for various machinery, ensuring proper maintenance and extended equipment life.

Function Description

The primary function of the Hilka Pistol Grip Grease Gun is to deliver grease under pressure to lubrication points, typically through grease nipples. It operates by pressurizing a grease cartridge within a barrel, allowing for controlled dispensing of lubricant. The pistol grip design enhances user control and reduces fatigue during operation.

Key Components and Assembly:

The set includes several components that work together to form a complete greasing system:

  • Gun Head (1): The main body of the gun where the pumping mechanism is housed.
  • Outlet Pipe (2): Connects to the gun head and serves as the primary conduit for grease.
  • Solid Extension Pipe (3): A rigid extension that can be fitted to the outlet pipe for reaching specific lubrication points.
  • Flexible Extension Pipe (4): A flexible alternative to the solid extension, offering greater maneuverability and access to hard-to-reach areas.
  • Grease Nipple Coupler (5): An attachment for the flexible pipe, designed to securely connect to grease nipples.
  • Barrel (6): The housing for the grease cartridge.
  • Sprung Pull Rod (7): Used to pull back and lock the plunger mechanism, facilitating cartridge loading and pressurization.
  • Plastic Cap (8): Protects the grease cartridge.
  • Grease Cartridge (9): Contains the lubricant.

Assembly Process:

  1. Screw the Outlet Pipe (2) into the Gun Head (1).
  2. Fit either the solid extension pipe (3) or the flexible extension pipe (4) to the outlet pipe (2).
  3. If using the Flexible Pipe (4), attach the Grease nipple coupler (5).

Loading the Grease Cartridge:

  1. Remove the barrel (6) from the Gun head (1).
  2. Pull back the Sprung pull rod (7) as far as it will go; it will automatically lock in its extended position.
  3. Remove the plastic cap (8) from the grease cartridge (9).
  4. Insert the grease cartridge (9) into the barrel.
  5. Remove the foil seal from the cartridge top.
  6. Refit the Barrel (6) with the fitted cartridge back into the gun head (1).
  7. Release the locking lever (7) at the base of the barrel (6) to pressurize the grease into the gun head.

Usage Features

Greasing Procedure:

  1. Wipe clean the grease fitting and the tip of the nozzle to prevent contamination.
  2. Connect the nozzle to the grease fitting. The coupler features a jaw-type construction that snaps onto the grease nipple for a tight fit. Push the coupler straight onto the fitting.
  3. Reciprocate the lever on the pistol grip to dispense grease.
  4. Greasing is considered normal when old grease is pushed out from the groove or clearance near the fitting.
  5. Refer to the instruction manual of the target machine for specific grease amounts, or continue greasing until old grease is completely pushed out.

Connecting and Disconnecting the Nozzle:

  • Connecting: Push the nozzle vertically onto the fitting until it grips, then begin greasing. Ensure the coupler is as square to the grease fitting as possible.
  • Disconnecting: Once greasing is complete, slightly tilt the grease nipple's nozzle, twist, and pull back. This tilt and twist action facilitates easy removal.
  • WARNING: Never try to disengage the grease coupler by pulling it out straight (Fig 1). Always tilt the grease coupler as shown in Fig 2 to remove it.
  • Troubleshooting Disconnection: If the nozzle remains stuck, unscrew the nozzle several turns from its main body to release clamping pressure. Do not unscrew it all the way, as the clamping mechanism may fall apart.

Grease Cartridge Compatibility:

The gun is designed to work with 2 pce 3oz Grease Gun Cartridge Code 84802003, which can be purchased via the Hilka website (https://hilka.co.uk). For manual loading with a different type of grease, remove the empty cartridge, refill it, and reload it into the grease gun. The grease gun requires the cartridge to function correctly.

Important Technical Specifications (Implied):

  • Grease Type: Compatible with standard grease cartridges (e.g., 3oz cartridges, Code 84802003).
  • Coupler Type: Hydraulic jaw-type coupler, suitable for various hydraulic grease fittings (JIS B 1575, Type a, Type b, Type c).
  • Operation: Manual pistol grip lever action.
  • Pressure: Generates sufficient pressure for effective lubrication.

Maintenance Features

General Maintenance:

  • The grease gun does not require special routine maintenance checks.
  • It is crucial to prevent foreign material from entering the grease.
  • Keep the grease fitting and the grease gun clean, especially the lubrication inlet, which can accumulate dirt and sand.

Troubleshooting Greasing Issues:

  • Air Trapped in Gun Head: If grease does not come out easily during first use, it may be due to trapped air. To resolve this, fully open or close the lever, and apply some extra pressure to the sprung rod end (7). This will help remove initial air from the head.
  • Lever Operation: Operating the lever halfway through the stroke will not draw grease into the grease cylinder effectively. Ensure full strokes for proper function.

Replacement Parts:

  • Replacement Grease Cartridge (item 9): 2 pce 3oz Grease Gun Cartridge Code 84802003.

Manufacturer Information:

  • UK: Hilka Tools (UK) LTD, 1 Roebuck Place, Surrey KT9 1EU, www.hilka.co.uk
  • EU: Hilka Tools (Ireland) LTD, Unit 3D North Point House, Cork T23 AT2P Ireland

Hilka 84800120 Specifications

General IconGeneral
BrandHilka
Model84800120
CategoryTools
LanguageEnglish