EasyManua.ls Logo

Hisense Laser Cinema PL1H Series - User Manual

Hisense Laser Cinema PL1H Series
28 pages
Print Icon
To Next Page IconTo Next Page
Loading...
Quick Setup Guide
Read the guide carefully and ensure you have fully understood its contents before operating this device for the first time.
English
Question and Answer IconNeed help?

Do you have a question about the Hisense Laser Cinema PL1H Series and is the answer not in the manual?

Summary

Warranty and Disclaimer

Acceptance of Terms

User agrees to terms or can return the product.

Third Party Content Disclaimer

Disclaimer for Third Party Content and Services provided with the Laser Cinema.

Disclaimer Scope

Defines the scope of the disclaimer for the Laser Cinema and accessories.

Third Party Content Basis

Explains how third-party content is accessed and used.

User Obligations for Third Party Content

User's responsibilities regarding third-party content use.

Important Notices and Symbols

General Safety Instructions

Precautions for safe and correct product use.

Electric Shock Warning

Warning about electric shock risk and not opening the device.

Dangerous Voltage Symbol

Symbol explanation for dangerous voltage warning.

Maintenance Instructions Symbol

Symbol explanation for important operating/maintenance instructions.

Intended Use and Environment

Environmental and Fire Warnings

Warnings about humidity, dust, liquids, and fire risks.

Physical Safety Precautions

Precautions to prevent the Laser Cinema from falling and causing injury.

Power and Ventilation

Power Cable Safety

Guidelines for safe handling of the power plug and cable.

Ventilation and Overheating

Importance of proper ventilation to prevent overheating and fire.

Operational Warnings and Care

Supervision and Unattended Operation

Instructions regarding supervision of children and unattended operation.

Volume and Hearing Safety

Warnings about loud music and potential hearing damage.

Thunderstorm Precautions

Precautions to take during thunderstorms to prevent damage.

Extended Absence Advice

Advice on disconnecting power during extended periods of absence.

Cleaning and Maintenance

Instructions for cleaning the device safely and effectively.

Service and Repair Guidelines

Guidance on when and how to seek professional service or repair.

Packaging, Modification, and Batteries

Product Modification Warning

Warning against product modification and its consequences.

Remote Control Battery Handling

Guidelines for battery installation, use, and disposal.

Antenna Grounding Safety

Importance of grounding outdoor antennas for surge protection.

Disposal Information

Reference to recycling section for proper disposal.

Laser Safety Precautions

Warning about direct laser light exposure and product modification.

General Cautions and Safety

Radiation Exposure and Eye Safety

Warnings about controls, adjustments, and laser eye protection.

Liquid and Fire Hazard Prevention

Instructions on avoiding liquids, fire sources, and heat.

Ventilation, Child Safety, and Lens Care

Keeping vents clear, avoiding objects near lens, and child safety.

Lens Cleaning Procedure

How to clean the projector lens safely.

Electrical Safety Symbol Explanations

Explanation of AC voltage and Class I product symbols.

Accessories List

Included Accessories

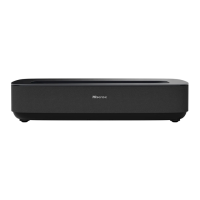
Lists all items included with the Laser Cinema.

Laser Cinema Diagram

Device Component Overview

Diagram showing key components and ports of the Laser Cinema.

Handling and Lens Protection

Recommendation for two-person handling and lens protection.

STEP 1 Mount the Screen

STEP 2 Install the Laser Cinema

Instructions for installing the Laser Cinema and connecting cables.

Secure Cable Connections

Importance of secure cable connections for picture quality.

Connecting External Devices

Satellite Antenna Setup

Connecting a satellite antenna and power supply.

Network Connectivity (Ethernet)

Connecting to the network via Ethernet for internet connectivity.

CI+ Module Installation Procedure

Instructions for inserting CI+ modules for channels.

Connecting External Devices

USB Device Connection Guidelines

Guidelines for connecting USB devices and current limitations.

Audio;Video Input Connections

Connecting external audio and video devices via HDMI and audio adapters.

Headphone Usage Safety

Warning about hearing loss from loud headphone use.

Network Setup

Wired Network Connection (LAN)

How to connect the Laser Cinema via wired LAN.

Wireless Network Connection

How to connect the Laser Cinema wirelessly.

Wireless Setup Requirements

Requirements for wireless connection, security systems, and distance.

Initial Setup and Power On

Power Cord and Device Activation

Instructions for plugging in the power cord and turning on the device.

Ventilation for Overheating Prevention

Warning about insufficient ventilation causing overheating.

Required Ventilation Clearance

Diagram showing required clearance for proper ventilation.

STEP 3 Adjust the Display Image and the Screen

Aligning Image Bottom to Screen

Aligning the bottom of the projected image with the screen.

Image Parallelism Adjustment

Adjusting image alignment by moving the Laser Cinema.

STEP 3 Adjust the Display Image and the Screen

Adjusting Upper-Right Image Corner

Adjusting the upper-right corner of the image for alignment.

Adjusting Upper-Left Image Corner

Adjusting the upper-left corner of the image for alignment.

STEP 3 Adjust the Display Image and the Screen

Filling Top Image to Screen Width

Adjusting image width to fill the screen top.

STEP 4 Use Your Remote

Laser Cinema Remote Functions

Explains the functions of each button on the remote control.

Remote Control Usage Notes

Notes on remote appearance variations and battery life.

Remote Control Operation

Remote Battery Installation Guide

How to install batteries in the remote control.

Remote Battery Safety Information

Safety and handling advice for remote batteries.

Remote Control Range and Angles

Details on the effective range and angle of the remote.

Bluetooth Remote Pairing

Steps to pair the remote control via Bluetooth.

STEP 5 Proceed through the Screen Setup Menu

Projection Mode Settings

How to flip the image orientation.

Automatic Geometric Correction Setup

Guide to automatic image geometric correction using a mobile device.

Geometric Correction Photo Tips

Notes for taking a good photo for geometric correction.

STEP 5 Proceed through the Screen Setup Menu

Manual Geometric Correction

How to manually adjust image geometry using the remote.

Eye Protection Features

Information on eye protection features and lens proximity.

Focus Adjustment Procedure

How to adjust focus using the remote control.

Maintenance and Troubleshooting

General Device Maintenance

Do not touch when hot, avoid oil, use soft cloth.

Lens Cleaning Procedure

Proper methods for cleaning the projector lens.

Correct Device Power Off

Correct procedure for turning off the device.

Initial Troubleshooting Steps

Initial troubleshooting steps for common issues.

Troubleshooting: No Sound or Picture

Troubleshooting steps for no sound or picture issues.

Troubleshooting: External Source Issues

Troubleshooting connection issues for external sources.

Maintenance and Troubleshooting

Troubleshooting: No Sound

Troubleshooting steps for no sound when picture is present.

Troubleshooting: No Picture;Monochrome

Troubleshooting steps for no picture or monochrome display.

Troubleshooting: Distorted Signals

Troubleshooting for distorted or wavy audio/video signals.

Troubleshooting: Blurry;Intermittent Signals

Troubleshooting for blurry or intermittent audio/video signals.

Normal Clicking Sound Explanation

Explanation of normal clicking sounds due to temperature changes.

Troubleshooting: Remote Control Issues

Troubleshooting steps for a non-functional remote control.

Product Specifications

Device Model and Dimensions

Specifications like model name, dimensions, weight, resolution.

Power, Supply, and Input Specs

Details on power consumption, supply, and HDMI input.

Environmental Operating Conditions

Operating temperature, humidity, and pressure.

Recycling and Licensing Information

Product Recycling Guidelines

Instructions for proper disposal of the product and packaging.

HDMI and Dolby Technology Licenses

Trademark and licensing information for HDMI and Dolby technologies.

AVC Patent Portfolio Licensing

Licensing terms for AVC video encoding/decoding.

Overview

This document serves as a Quick Setup Guide for the Hisense Laser Cinema, providing essential information for its installation, operation, and maintenance.

Function Description:

The Hisense Laser Cinema is a device designed for rendering video and audio signals, primarily for home or office environments. It functions as a projector, displaying images onto a screen. It supports various input sources, including HDMI, USB, and antenna connections, allowing for a wide range of content playback. The device incorporates a laser module for image projection, emphasizing the importance of eye safety. It also features network connectivity options, both wired (LAN) and wireless, to access online content and services. The Laser Cinema is equipped with an eye protection sensor, which temporarily disables light output if a user gets too close to the lens, enhancing safety.

Important Technical Specifications:

  • Model Name: Laser Cinema
  • Dimension (W × H × D): 20.9 × 4.7 × 13.2 inches (531 × 120 × 335 mm)
  • Weight: 18.7 lbs (8.5 kg)
  • Active Screen Size (Diagonal): 80 ~ 120 inches
  • Screen Resolution: 3840 x 2160
  • Audio Power: 2 x 15 W
  • Power Consumption: 300 W
  • Power Supply: 120-240V ~ 50/60Hz
  • Receiving Systems:
    • Analog: PAL-D/K, B/G, I, SECAM-D/K, B/G
    • Digital: DVB-T/T2, DVB-C, DVB-S/S2
  • Environmental Conditions:
    • Temperature: 41°F - 104°F (5°C - 40°C)
    • Humidity: 20% - 80% RH
    • Atmospheric Pressure: 86 kPa - 106 kPa
  • HDMI Input Support:
    • RGB / 60Hz (640×480, 800×600, 1024×768)
    • YUV / 60Hz (480i, 480p, 720p, 1080i, 1080p)
    • YUV / 50Hz (576i, 720p, 1080i, 1080p)
    • 3840×2160 / 24Hz, 3840×2160 / 25Hz, 3840×2160 / 30Hz
    • 3840×2160 / 50Hz, 3840×2160 / 60Hz
  • Network Standby Power Consumption: ≤ 2.0 W
  • Power Consumption in Standby Mode: ≤ 0.5 W
  • USB Ports: USB 1 (DC 5V 0.5A MAX) and USB 2 (DC 5V 1A MAX). USB 1.1 and USB 2.0 devices have a maximum current consumption of 500mA, while USB 3.0 devices have a maximum current consumption of 1A.
  • Laser Classification: RG2, CLASS 1 LASER PRODUCT, λ = 455±6nm (Wavelength 455±6nm), compliant with IEC 62471-5: 2015 and IEC 60825-1: 2014.

Usage Features:

  • Installation: The guide emphasizes that two people should handle the device during movement to protect the lens. It recommends connecting all cables before positioning the Laser Cinema.
  • Screen Mounting: If a screen is purchased, users should refer to its specific installation guide.
  • Image Adjustment (STEP 3):
    • Fitting the Bottom of the Image: Users are instructed to ensure the bottom of the image remains parallel with the screen by rotating the Laser Cinema.
    • Parallel Alignment: Instructions are provided for rotating the Laser Cinema clockwise or counterclockwise to align the bottom of the image if it is uneven.
    • Image Width Adjustment: Users are guided to move the Laser Cinema closer or farther from the screen to adjust the image width.
    • Corner Adjustment: Detailed steps are given for adjusting the upper-right and upper-left corners of the image using the front-right and front-left feet, respectively, and rotating the Laser Cinema to achieve parallel alignment with the screen.
    • Filling the Top of the Image: Instructions involve rotating the left- and right-front feet and moving the Laser Cinema to fill the screen width.
  • Projection Mode: Allows flipping the image top-to-bottom and/or left-to-right.
  • Auto Geometric Correction: Requires the Laser Cinema and a mobile device to be connected to the same wireless network. Users adjust the Laser Cinema position, then use a mobile device to scan a QR code, take a photo of the screen, and upload it for automatic correction. Specific guidelines for taking the photo are provided to ensure accuracy.
  • Manual Geometric Correction: Allows users to select points on the projected image and move them to fit the screen using remote control buttons. Quick and precise adjustments are possible.
  • Focus Adjustment: Focus parameters can be adjusted using the up and down buttons on the remote control, with real-time feedback from a background image card.
  • Remote Control (STEP 4):
    • Button Functions: A detailed diagram and list describe the functions of various buttons, including power, input selection, app access, media control, navigation, volume, channel switching, microphone activation, subtitle control, info/teletext, mute, number buttons, and EPG/channel list display.
    • Hands-free Wake-up: A physical switch activates this feature, with a note to turn it off to save battery life when not in use.
    • Battery Installation: Instructions for inserting AA or AAA batteries, ensuring correct polarity.
    • Remote Control Range: Effective up to 8 meters in front of the Laser Cinema, with a controlled horizontal angle of ±30° and vertical angle of ±15° at 6 meters (in unpaired state).
    • Pairing (for Bluetooth remote control): Instructions to pair the remote by pressing any button (except power and mic) within 3 meters of the Laser Cinema after power-on. Troubleshooting tips for pairing issues are included.
  • Network Setup:
    • Wired (LAN): Connects to an external modem or router via an Ethernet/Cat 5 cable.
    • Wireless: Requires a wireless router or modem. The device has a built-in Wireless LAN Adapter. Notes specify that external USB network adapters are not supported, DHCP is recommended, and security systems like WPA, WEP, WPA2 are compatible. A distance of less than 10 meters between the router and Laser Cinema is recommended for smooth network performance.
  • Power On/Off: Plug the power cord into a wall outlet and press the POWER button.
  • Ventilation: Critical for preventing overheating and damage. A minimum of 20 cm free space on the sides and 5 cm free space on the back is required. Users are warned not to block vents or place the device in poorly ventilated spaces.

Maintenance Features:

  • General Care:
    • Avoid touching the device when hot.
    • Do not wipe with oil or use rubber/ethylene products, as they can cause stains or damage.
    • Clean the exterior with a damped soft cloth after turning off the device.
  • Lens Care:
    • Do not touch the lens with bare hands.
    • Do not use ordinary cleaning cloth on the lens.
    • Use a dust blower to remove dust.
    • Grease, dirt, and fingerprints should be cleaned carefully by a professional using optical cleaning cloth, lens wiping paper, and professional cleaning solutions to avoid damaging the optical film and image quality.
  • Power Off: Always press the Power button on the remote control to turn off the device; do not cut off power directly while it's operating.
  • Troubleshooting: A "Quick Problem-Solving Tips" section addresses common issues such as:
    • Delay in picture appearance (normal during initialization).
    • No sound or picture (check power cord, remote power button, LED light).
    • No picture/sound from external source (check connections, input mode selection).
    • Sound but no picture/black and white picture (check volume, mute, color saturation, try different channels).
    • Distorted/wavy sound/picture (move away from other electric appliances, try different power outlet).
    • Blurry/cut out sound/picture (check external antenna direction/position/connection, adjust antenna, fine-tune channel).
    • "Clicking" sound from plastic cabinet (normal due to temperature changes causing expansion/contraction).
    • Remote control not working (confirm Laser Cinema power, change batteries, check battery installation).
  • Long Periods of Absence: Disconnect the power plug and all antenna cables to prevent standby power consumption.
  • Cleaning and Care: Unplug the power cord before cleaning. Use a soft, moist, clean, color-natural cloth. Avoid insect repellent, solvent, thinner, or volatile substances. Do not spray liquids directly. Protect the display panel from scratches. Wipe the power plug with a dry cloth regularly.
  • Service/Repair: Do not remove the cover/back; no user-serviceable parts inside. Refer all service to qualified personnel.
  • Battery Disposal: Discard batteries in a designated area, do not burn. Remove old batteries immediately to prevent leakage. Remove batteries if not using the remote for a long time. Clean battery compartment if chemicals leak. Do not mix old/new or different battery types. Stop using if the remote gets warm/hot and contact support.

Hisense Laser Cinema PL1H Series Specifications

General IconGeneral
BrandHisense
ModelLaser Cinema PL1H Series
CategoryHome Theater System
LanguageEnglish

Related product manuals