MH-082-00 Ecomaster Basic Manual PAGE 5 de 7
Ecomaster Basic
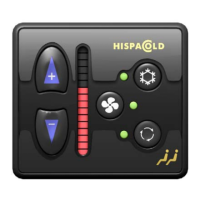
1.4 Changing the temperature selected.
Upon activating the air conditioning a series of led lights in a bar will light up, indicating the temperature
selected.
The greater the number of led lights lit up, the higher the level of cold desired, and therefore the lower the
temperature selected; or conversely, the lower number of lights that are lit the higher the temperature
selected.
To select a lower temperature, i.e. colder temperatures, press the key (1). Each time you press the
key (1) another light in the led bar will light up.
To select a higher, or less cold, temperature, press the key . (2) Each time you press the key (2) a
light in the led bar will turn off.
The temperature selected corresponding to the number of led lights lit up as shown in the figure.
25º C
26º C
27º C
23º C
24º C
21º C
22º C
19,5º C
20º C
18,5º C
17,5º C
18º C
16,5º C
17º C
16º C
19º C
Interior sensor temperatura scale
1.5 Visualizing the vehicle interior temperature.
While the air conditioning is functioning the control will indicate interior temperature with a blinking led
light as shown in the table above ( if the thirteenth led from the top blinks, this indicates that the
temperature is 24ºC; if the seventh light blinks then the temperature is 19ºC, etc.).
If the temperature is above 27ºC the bottom led will blink; if the temperature is below 16ºC the upper led
will blink. If no led is blinking, this means there is an error in the interior temperature sensor.