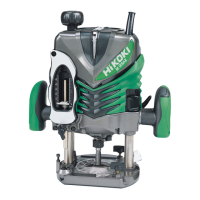
HOW TO USE
THE
ROUTER
1
. Setting
the cutting depth:
Knob
Wing bolt (B)
As shown in Fig.
4,
turn the stopper
block
so
that the
section
to
which
the cut depth
setting
screw on
stopper block is not attached
comes
to the
bottom of
the
stopper pole.
Loosen
wing
bolt <A)
and turn
knob
to
bring
stopper pole in
contact with
stopper block.
Wing
bolt
(A)
Cut
depth
setting
screw
Stopper
block
Stopper
pole
Fig. 4
Wing
bolt
<B)
Scale
Stopper
pole
Stopper
pole
Wing
bolt (A)
Fig. 7
Cut depth
setting
screw
(2)
As shown in Fig.
5,
loosen the lock lever
and
press
down the main
unit
until the
bit
comes into
slight
contact with the surface of the materials.
Tighten the
lock
lever
at
this
point.
Fig. 8
(3)
As
shown in Fig.
6,
loosen
wing bolt
(B). Turning
knob
while pulling it outward will cause to
move.
Pushing
it
back and turning will cause
stopper pole
to
move.
Turn knob while pulling and
align the arrow on stop-
per pole
to
"0"
of
scale.
Tighten
wing bolt (B). This
condition
is
the
"0"
cutting depth.
(4)
As
shown in
Fig
7,
turn back knob and
then
tighten
the wing bolt (A) when the
arrow
on
the
stopper
pole
indicates
the desired cutting depth.
(5)
Loosen the
lock
fever and press the main unit
down
until the stopper pole comes in contact with
the
stopper block to
obtain
the
desired cutting depth.
(6)
The two cut-depth setting
screws attached
to the
stopper
block
can be adjusted to simultaneously set
three different cutting depths.
As
shown in Fig.
8,
use a
wrench
to
tighten
the nuts
so
that
the cut-
depth setting screws do not come loose
at
this
time.
10

 Loading...