– 11 –
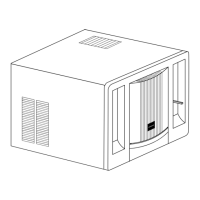
1 Remove the four screws which fasten the
base pan to the cabinet at the side and back.
2 Remove the stopper at front left side of base.
3 Slide out the unit by pulling the handles.
After slide in the unit, please install the sealer
between the base pan and cabinet to prevent
from entering rain water in case of typhoon.
Fasten the unit to cabinet at the side with the
screw, then refit the front cover.
If power cord is withdrawn from left side
of unit, please arrange the power cord
as in figure after installing the front
cover.
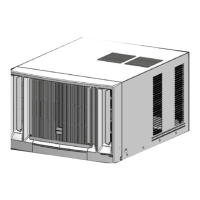
CONDENSED WATER DRAINAGE
This air conditioner employs a “turbo fan splashing ring” which is designed to splash the
condensated water on the condenser surface for maximum cooling efficiency, thus producing
a splashing sound.
If you are uncomfortable with the sound, you can install an
outside drainage by using the following procedure which may,
however cause a small loss of performance.
1 Remove the rubber plug from the base pan.
2 Install the drain pan by using 2 pieces of screws (provided)
at the cabinet.
3 Connect the drain pan with the drain hose. (Drain hose or
tubing can be purchase locally to satisfy your particular needs.
Drain hose inner diameter size should be around ø13mm or
1/2 inch.)
4 Slide the air conditioner unit back into the cabinet.
When the screws at the both side of the cabinet cannot be fasten, please use the stopper to fix
the cabinet and the base pan located at in front of the unit.
Drain hose
Rubber plug
Screws
Drain pan
Cabinet
Sealer
Handles
Stopper
AUTO SWING
MAIN SWITCH TEMPERATURE
WAIT 3 MINUTES
BEFORE
RESTARTING
CAUTION
ON
OFF
OFF
TEST
COOLER
QUIET FAN
HI FAN
HI COOL
QUIET COOL
10
98
7
6
5
4
20mm
or more
20mm
or more
Fix the power
cord with the
band.
RA-13JF2_EN 29/09/2006, 09:20 am11
 Loading...