Do you have a question about the Honsel BZ 103 A and is the answer not in the manual?
Introduction to the operating manual's content and purpose.
Explanation of symbols and their meanings in the manual.
Information on how text elements are presented in the manual.
Crucial warnings and guidelines to ensure safe operation of the machine.
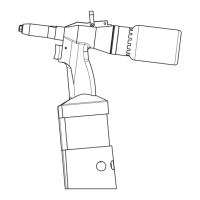
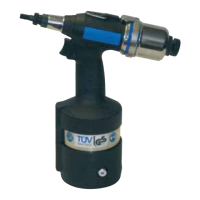
Defines the primary purpose and application of the pneumatic-hydraulic setting tool.
Specifies conditions under which safe operation is not assured.
Lists all items included in the delivery package of the tool.
Covers the general setup procedures and component arrangements for the machine.
Guidelines for safely transporting the machine, keeping it in original packaging.
Recommendations for storing the machine properly to prevent damage.
Steps to take when taking the machine out of service for an extended period.
Instructions for the proper and environmentally responsible disposal of the machine and its media.
Instructions for fitting the system components that collect or discharge fasteners.
Guide on how to replace and install various nosepieces on the setting tool.
Steps for attaching and configuring the optional angle riveting head accessory.
Procedure for replacing or installing various types of front sleeves.
Details on how to safely connect the machine to a compressed air source.
Procedure for checking the functionality and condition of the tool's stud holder.
Instructions on how to immediately shut down the machine in critical situations.
Step-by-step guide for setting fasteners using the tool's extraction system.
Instructions for setting fasteners when the extraction system is not in use.
Guide for setting fasteners using the contact force control feature for precise assembly.
Procedure for setting fasteners when using the axial trigger accessory.
Instructions on when and how to empty the stud collector.
Steps to safely remove fasteners from a part after setting.
Overview of recommended maintenance activities and their frequencies for optimal performance.
Detailed steps for maintaining and servicing the critical clamping mechanism.
Procedure for cleaning the internal screen filter to ensure proper air flow.
Instructions for draining and refilling the hydraulic oil for the tool.
Information on when and how to send the machine to the manufacturer for service.
Guidance on identifying and replacing common wear parts in the tool.
General information and procedures related to disassembling the tool for maintenance.
| Brand | Honsel |
|---|---|
| Model | BZ 103 A |
| Category | Power Tool |
| Language | English |