This document describes the M2221-QL-MG network camera, providing details on its functions, technical specifications, usage, and maintenance.
Function Description
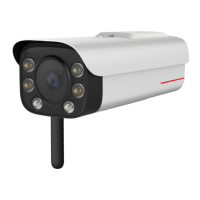
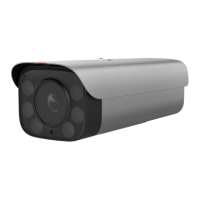
The M2221-QL-MG is an Internet Protocol Camera (IPC) designed for video surveillance. It supports Power over Ethernet (PoE) for simplified installation, allowing both power and data transmission over a single cable. The camera features various interfaces for connectivity, including LAN/PoE, power input (24 V AC), ground, RS485 for half-duplex data transmission, alarm input/output, and audio input/output. It is equipped with a reset button for device restart or factory settings restoration, and an SD card slot for local storage, supporting Micro SD cards of Class 10 or higher. The camera's operational status is indicated by an LED, showing power off, system starting, proper running, hardware fault, temperature alarms, or network port packet loss.
Important Technical Specifications
- Model: M2221-QL-MG
- Default Login IP Address: 192.168.0.120
- Default Username: admin
- Power Input: 24 V AC (-25%, +24.9%)
- PoE Support: Yes
- SD Card Support: Micro SD, Class 10 or higher
- Alarm Output: Rated power ≤ 30 W, rated voltage ≤ 110 V DC or 125 V AC
- RS485 Cable Thickness (if crimp terminals used): 0.75 mm² (max 15m) or 1.0 mm² (max 20m)
- Ground Impedance: ≤ 5 ohms
- Alarm Cable Core Diameter: 22 AWG to 28 AWG
- Alarm Cable Impedance: ≤ 100 ohms
- Hardware Warranty: 12 months
- Software Media Warranty: 3 months
- Environment Friendly Use Period (EFUP): 20 years (for the product, some replaceable parts may have different EFUPs)
- Operating Temperature: -40°C to +60°C (illuminated), -40°C to +40°C (unilluminated)
- Corrosion Resistance: Applicable to areas 1500 meters away from the seaside (far away from chemical industry or heavily polluted areas)
- Product Classification: Class A product (may cause radio interference in domestic environments)
- Screws: M6*12 (2 pcs)
- Crimp Terminals: Supports 0.75 mm² and 1.0 mm² cables (2 pcs)
- Screwdriver: 2.5 mm flat-head (1 pc)
- Wi-Fi Antenna: 1 pc
- Quick Start Guide: 1 pc
Usage Features
The camera offers flexible installation options:
- SD Card and Wi-Fi Antenna Installation: Involves removing the camera bottom cover, inserting the SD card, and installing the Wi-Fi antenna. It's crucial to power off the device before inserting/removing the SD card to prevent system exceptions.
- Beam-Mounted Installation: The camera can be fixed to a universal joint and then mounted to a beam. The universal joint allows for adjustment of horizontal and vertical shooting angles.
- Pole-Mounted Installation: Utilizes hose clamps to fix the pole mount to a pole. The universal joint allows for angle adjustments, and captive screws secure the joint.
- Wall-Mounted Installation: Involves fixing the camera to a universal joint, marking drill locations, drilling holes, installing expansion bolts, and then securing the wall mount to the wall.
Cable Connection:
- Grounding and Power: Connect the ground cable to ground the device, then connect the power cable. Ensure proper wire thickness and impedance.
- Network Cable: Connect the network cable, ensuring the waterproof connector kit is properly assembled and tightened to prevent loosening or water ingress.
- Alarm and RS485 Cables: Connect alarm and RS485 cables. Twisted pair cables are recommended for alarm connections, with specific wire diameter and impedance requirements.
Waterproofing and Insulation:
- All cables, including power, network, and unused pigtails, must be waterproofed and insulated.
- Insulation tape should be wrapped in one layer around each cable joint.
- Waterproofing tape should be stretched evenly to twice its original length and applied in three layers (bottom-to-top, top-to-bottom, bottom-to-top).
- Three layers of insulation tape should be applied, and both ends secured with cable ties.
- The remaining cabling should be covered in a conduit or with protective waterproof rubber tape, forming a drip loop to prevent water ingress.
Installation Verification:
After installation, verify that all screws are tightened, the camera is securely installed, protective measures are in place, ambient temperature meets specifications, insulation and waterproofing are correct, the camera is grounded, protective films are removed, the camera powers on normally, and the web portal is accessible with clear live video.
Data Plan/IP Address:
The camera supports both automatic and manual IP address assignment. When manually configuring, ensure the IP address is valid (1-223, excluding 127.x.x.x). For ONVIF or SDK passive registration, only the IP address needs to be configured.
GB/T 28181 Integration:
For integration with GB/T 28181 compliant platforms, specific parameters like platform IP, port number, device ID, login name (format: login name@domain name), password, and server code must be configured according to platform requirements.
Web Operations:
Access the camera's web portal via its IP address using Internet Explorer (versions 8-11), Google Chrome (38 and later), or Mozilla Firefox (35-51). Ensure TLS 1.0, 1.1, or 1.2 is enabled in the browser. The default login IP is 192.168.0.120, and the default username is 'admin'.
Maintenance Features
-
Cleaning: Use a soft dry cloth to clean the camera body. Avoid strong or abrasive alkaline cleaners or volatile solvents like alcohol, benzene, or chemical thinners.
-
Environmental Protection: The product has an EFUP of 20 years. Dispose of used batteries according to instructions.
-
Security Precautions:
- Install and power on within 24 hours of unpacking.
- Avoid installation in rainy, windy, or dusty conditions.
- Ensure the power adapter meets specified voltage and current requirements.
- Install and ground a lightning arrester in lightning-prone areas.
- Replace batteries with the correct type to prevent explosion.
- Keep strong and weak current cables at least 5 cm apart.
- Wrap all pigtail cables in insulated, waterproof rubber tape to prevent short circuits or water damage. Cutting pigtail cables will void the warranty.
- Keep the device away from water, other liquids, heat sources, fire sources, and strong magnetic fields.
- Avoid unauthorized modifications to the device's structure, security, or performance.
- Installation and maintenance must be performed by professional technical engineers.
- If the installation environment exceeds 50°C, install the product in an area accessible only to professional personnel.
- Use product-attached auxiliaries and recommended fittings.
- Carry the device by its body; do not pull the pigtails.
- Comply with related laws and regulations; post a visible notice if installed in a public place.
-
Troubleshooting:
- Security Certificate Issues: If "There is a problem with this website's security certificate" appears, click "Continue to this web (not recommended)" and install the root certificate or upload your own. If the error persists after installing the root certificate, upload a valid certificate via "Setting > System Configuration > Configuration Management" and restart the browser.
- Forgot Admin Password: Hold down the reset button for at least 5 seconds to restore factory defaults. Exercise caution as this will erase user accounts and configuration data.
- Security Risk Warning: If "Your request for URL has a security risk" appears during login, go to "Tools > Internet Options," click the "Connections" tab, then "LAN Setting," and uncheck "Use a proxy for your LAN."
The product comes with a 12-month hardware warranty and a 3-month software media warranty. The warranty starts 90 days after shipment from Huawei or upon the first service request, whichever is earlier. Specific terms apply to expansion/replacement parts and lithium battery modules. For detailed warranty services, refer to the Huawei Enterprise Standard Warranty and the provided warranty card.