THANK YOU FOR YOUR PURCHASE
©HAB Home Intelligence, LLC.
09/2020
SUPPORT
Step 10
Follow your Z-Wave
controller’s directions to
place it in inclusion mode.
Make sure the battery is
powered ON [I].
Press the IN/EX button 3
times and wait for the device
to be discovered and joined
to the Z-Wave Network.
Step 7
Install iBlind motor in blind
head rail with buttons at
the back. IMPORTANT:
make sure tilt shaft is
aligned with tilt rod holes
in tilt drums. If needed,
use included height
adapter.
Use the USB Cable and
Power Adapter to charge
battery approx. every 5-6
months.
The Solar Panel accessory
is an environmentally
friendly and worry-free
method for keeping the
battery charged. Using
the solar power eliminates
the need to manually
charge every 5-6 months.
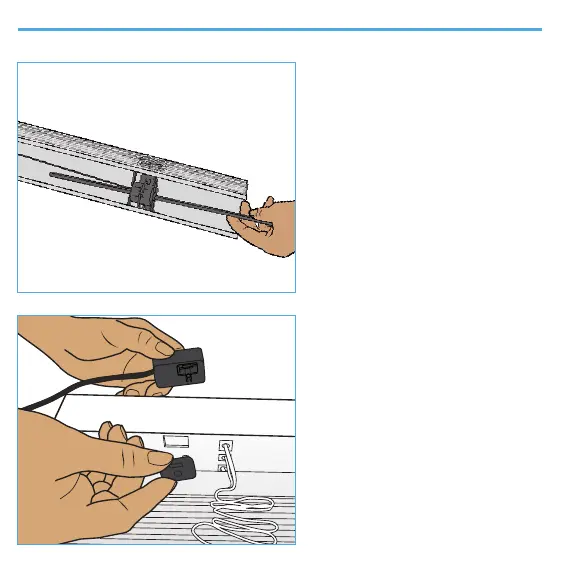
Step 9
Carefully tuck the cables into the headrail. Take care to route the
hidden cables where they won’t interfere with the tilt rod or any of
the other moving mechanisms in the headrail.
Step 11
Install blind into the window mounts and lower the blinds.
Important: If your Z-Wave Controller supports S2 encryption, enter the rst 5 digits
of DSK into your Controller’s interface if it is requested. The DSK can be found on the
bottom of the iblinds motor, the box and, on the back page of this Quick Start Guide.
Step 8
Re-insert tilt rod, rotating
it to pass through the
shaft. Be careful to keep
all tilt drums in the same
orientation. Failure to
properly align tilt drums
can result in blinds tilting
at an angle or damage
window blinds.
CHARGING CUSTOMIZATION PARAMETERS
Step 5
Select tilt shaft to match tilt
rod size & shape. If the tilt
shaft installed by default
ts your tilt rod, continue to
step 6. If not, Remove lid
using included hex wrench
& install appropriate tilt
shaft. Replace lid.
Step 6
Connect battery cable to the
red BAT port. Connect Charge
adapter cable to the USB port.
If you have the solar panel,
connect solar adapter cable to
the white SLR port.
For more about power options visit
our support website -
support.myiblinds.com
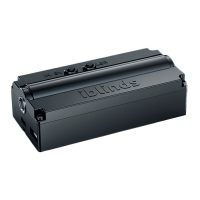
Step 3
Before removing tilt rod,
take note of the current tilt
position on each tilt drum.
Remove tilt rod from
headrail.
Step 4
Install charge adapter inside
headrail and attach clip from
the bottom. Wires should
be facing outer end of blind,
with micro USB port facing
front.
IMPORTANT: When
upgrading your iblinds motor
from a previous version, it is
important to use the charge
adapter that is included with
the new kit. Using the old
charge adapter may cause
damage to the electronics.
Solar Panel
Sold Separately
PARA-
METER
DESCRIPTION DEFAULT VALUES
PREFERENCE
NAME
1 Close
Interval
0x16
(22)
0x0F - 0x1E
(15-30)
Used for large blind auto
calibration endpoint detection. A
smaller value will make the blinds
close tighter.
3 Disable
Report
0
(False)
0,1
Used to disable Z-Wave Report. This
is useful for systems that poll iblinds
immediately after sending a position
command. Disable if an immediate
Z-Wave GET command is causing
iblinds motor to function improperly.
4 Default
ON Value
0X32
(50)
0x01 -0x63
(1-99)
Used to set the default ON Level
-Default value for ON = 50% (0x32).
Change this value if you wish to
change the Charge Adapter push
button ON or the Z-Wave Binary
Switch ON default value.
6 Speed 0 0-100
Used to set the default blind speed.
0 = No Delay. The Larger the value
the slower the speed. Note: A Z-Wave
MultiLevel Switch command sent
with a Duration Value > 0 will always
override the speed parameter.
2 Reverse
Direction
0
(forward)
0,1
Used to reverse the direction of the
blinds.
5 Reserved
For specic hub support, videos , trouble shooting tips
and a link to our community forum please visit our
online support site - support.myiblinds.com
If you have questions or need additional support,
please submit a request using our contact form -
myiblinds.com/pages/contact
Follow us on our Social Media
@myiblinds
@iBlinds
@Myiblinds
WELCOME TO THE IBLINDS FAMILY
 Loading...