Adjust the ush volume by moving the oat upwards for
less and downwards for more. See g. .
Each increment is 1 litre, adjustable from 2-5 litres, or
from 2-3 litres for model 6832.
To adjust the ush volume for the long ush, remove the
unit by turning it a quarter turn clockwise and then lifting
straight up as in g. .
Adjust the ush volume by moving the oat upwards for
less and downwards for more. See g. . Flush volume
settings are marked out on the oat rod. Adjustable from
3-8 litres, or 3-6 litres for model 6832.
To have the same ush volume on both sides of the ush
button, cut away the catch on the lever arm as shown in
g. .
Optional accessory for single ushing: Flush button
kit for same ush volume on both sides, white. Ifö no.
Z98310 RSK no. 7925059.
This modication can be changed by turning the bridge
so that the rear catch is installed facing forwards.
10
Flush button
Ifö Sign WC units are supplied with one of two ush
button options:
- Polished chrome ush button with 4/2 litre ush.
Ifö no. Z98303. RSK 7925053
- White ush button with same 4 litre ush on both sides.
Ifö no. Z98310. RSK no. 7925059
Options include:
Raised chrome or red ush button.
The red ush button is suitable for physically and
mentally disabled users.
Removal of ush button
and cistern cover
Remove the ush button, cover mounting and cover as
illustrated in images , - .
13
15 19
If the WC unit runs – rst check that the outlet valve’s
valve ring is not damaged. If it is, replace the valve ring,
Ifö no. Z96765, as illustrated in images - .
Then check that the inlet valve closes correctly. If it does
not, replace the inlet valve, Ifö no. Z96766, as illustrated
in images - .
The lever arm to the inlet oat is normally installed
on the lower oat setting for optimum water ow. This
setting can handle a water pressure of 10 bars. In the
event of the WC unit running at high water pressures,
the lever arm can be moved to the upper setting and
then handles a maximum water pressure of a 12 bars.
See image .
22
20
23
25
26
Servicing armatures
Set ush water volume
This WC-unit is test approved according to NT VVS 120
for use at full ush down to 3.5 litres. Also approved
according to EN 997 class 1 type 4 for full ushing 4 litres.
All WC units are factory set at delivery for a ushing
volume of 6 litres for full ushing and 3 litres for half. Two
litres is sufcient for ushing out urine and single sheets
of paper. If necessary, adjustment can be carried out for
other ushing volumes
First shut off the water supply. To adjust the ush volume
for the short ush, remove the bridge as shown in g.
, .
Adjusting the ushing volume
21
20
28
29
Reinstalling
Maintenance advice and cleaning
Reinstall in reverse order. The screws for the cistern
mounting must be tightened alternately to a maximum
torque of 2.5 Nm as illustrated in image . The cover
screw must be tightened to a maximum torque of
1.0 Nm as illustrated in image .
32
34
30
29
Normal WC units, bidets and wash basins have a glazed
surface. Glazed surfaces are easy to keep clean and
are resistant against most chemicals. Clean regularly to
prevent cleaning problems. Use normal cleaning agents.
“Clean regularly to prevent cleaning problems. However,
avoid using cleaning agents on the ush button, instead,
use hot water and soap and wipe dry with a cloth”.
This is because cleaning agents for porcelain are not
intended for chrome parts/plastics and can risk cracking
the ush button if used frequently.
Cleaning utensils, which contain abrasive agents, such
as wire wool and green scouring pads, must not be
used. Strong acids, e.g. hydrochloric acid and sulphuric
acid and strong alkalines, e.g. caustic soda should not
be used. Dripping taps and running WC units must be
repaired immediately.
For repair or to purchase spare parts, contact a
plumbing contractor or plumbing centre. They can be
found in the Yellow Pages.
In houses that are unheated during the winter, the WC
unit’s ush cistern must be drained and dried out. Pour
3-4 decilitres of anti-freeze into the water trap and cover
the water mirror with cooking oil or cling lm to prevent
evaporation.
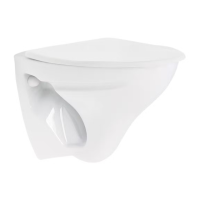
Ifö Sign 6893
You get more free oor space with the WC unit for wall
installation. It facilitates cleaning the bathroom. Installa-
tion kit supplied.
Ifö WC xtures are available for wall reinforcement.
Ifö no. 98910
 Loading...