Do you have a question about the IKEA Omar and is the answer not in the manual?
Information regarding the need for wall-specific screws and plugs for securing the anti-topple device.
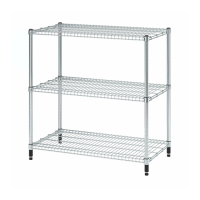
Assemble the initial structure of the shelving unit by connecting poles and base components.
Attach intermediate poles and prepare for shelf placement at desired heights.
Insert clips into the poles to support the shelves at the chosen levels.
Connect the side frames to the vertical poles of the shelving unit.
Slide the wire shelves onto the installed clips on the poles.
Ensure the shelf clips are properly secured onto the upright poles.
Confirm shelves are correctly seated on the securing clips.
Continue securing clips to poles for remaining shelf positions.
Complete the placement of all shelves onto the unit.
Attach the protective caps to the top of the shelving unit poles.
Review assembly, noting warnings against incorrect tools or methods.
| Material | Steel, Epoxy/polyester powder coating |
|---|---|
| Width | 92 cm |
| Depth | 36 cm |
| Type | Shelving unit |
| Adjustable shelves | Yes |
| Color | Silver-color |