14
Using the rotary spit
The rotary spit can be used to cook joints such as rolled joints
and poultry with excellent results. The
meat is roasted thoroughly
and evenly.
The rotary spit function only when the switch is in position grill.
Preparing joints
Place the joint as centrally as possible on the rotary spit and
secure it at both ends with the retaining clips.
You can also truss the joint with string. With poultry,
bind the ends
of the wings underneath the back and
the thighs against the body.
This will prevent them
from becoming too dark.
Pierce the skin on the underside of the wings to allow
the fat to
escape.
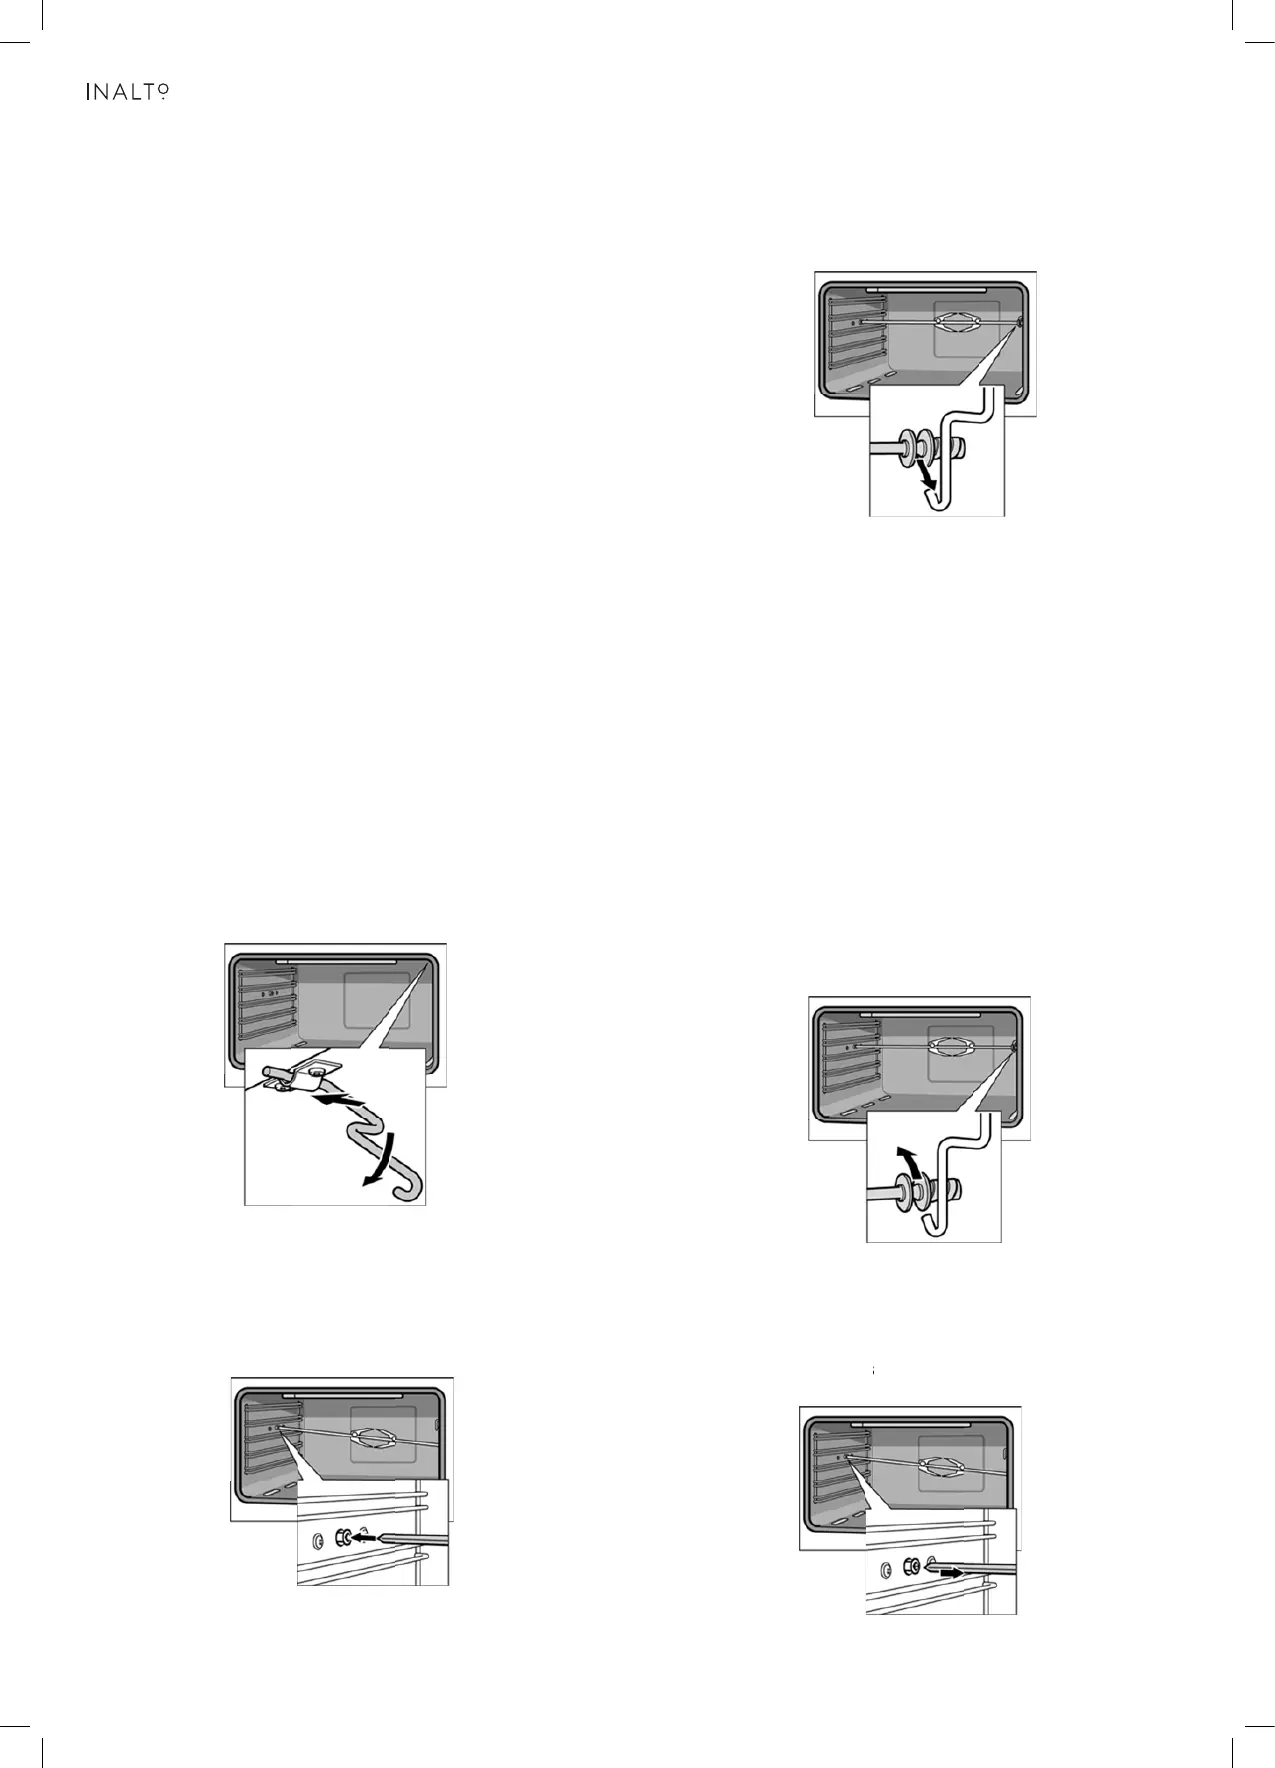
Inserting the rotary spit
I
G
3
Insert the rotary spit as follows:
1.
Hook the s
If you requ
G
Risk of burns
Never tou
Children m
Open the
.
If the oven
3.
Hook the
4.
Pour a litt
pit holder into the brackeet on the ceili
cooking compartment.
ire to preheat the oven, hook in the holder before
preheating.
ch the hot surfaces of the cooking compartment or
the heating elements.
ust be kept at a safe disstance from
at all times.
appliance door carefully. Hot steam
has been preheated, only attach the ratary spit if
you are using an oven cloth or wearing (thermal) oven gloves.
other end int
le bit of wate
shelf pos
To attach the spit, slide one end into the recessed adapter in the
o the holder
r into the ba
ition 1 to co
t
m
left-hand si
r.
king tray and slide this into
llect the run-
ng o f t h e
he appliance
ay escape.
de panel of the cooking compartment.
off fat.
Removing the rotary spit
G
R
N
CChildren must be kept at a safe distance from the appliance
OOpen the appliance door carefully. Hoot steam may escape.
G
N
A
isk of burns.
Never touch the hot surfaces of the coo
at all times.
isk of burns.
ever touch the rotary spit or other accessories directly
they are hot.
lways wear oven gloves or heat-resistant gloves when
handling hot accessories.
Remove the rotary spit as follows:
.
Carefully
or the heating elements.
open the app
spit
liance door
from the hol
oking
. Carefully remove the rotary
lder.
2
.
Carefully
3.
Take out t
withdraw the
he baking tr
rotary spit f
the side panel and remove it from the oven.
ay.
rom the recessed adapter in
ccompartment
Before cleaning the appliance, close the gas stopcock and unplug
appliance or disconnect power at the main circuit breaker of the
electrical system.
Do not clean the appliance surfaces when still hot.
Always clean off spillage as quickly as possible to prevent burning
on which will make removal more difficult. Wash with a clean cloth
soaked in hot soapy water, rinse and dry with a soft cloth.
DO NOT USE ABRASIVES. CAUSTIC PASTES OR SPRAYS.
COARSE CLEANING PADS OR POWDERS. DO NOT USE
EXCESSIVE WATER WHEN CLEANING YOUR OVEN IN ORDER
TO AVOID WATER PRESSING THROUGH CLEFTS INTO THE
BACK OF CONTROLS PANEL OR OF THE UNIT.
NOTE: A steam cleaner is not to be used for cleaning this
appliance .
Pan supports and burners
The burner heads can be removed for cleaning.
NB Do not drop hot burner caps in cold water.
Because of the rapid cooling they might get damaged.
Lift off and soak for about 10 minutes in hot water with a little
detergent. After having cleaned and washed them, dry them
carefully.
Make sure that no burner holes are clogged.
Clean the burners once a week or more frequently if necessary.
Make sure you have reassembled the burners correctly.
Pan supports can be washed by hand or in a dishwasher.
Remember to remove rubber feet (if fitted) prior to washing.
Refit them afterwards.
Do not use harsh abrasive cleaners or sharp metal scrapers to
clean the oven door glass since they can scratch the surface,
which may result in shattering of the glass.
For a triple crown burner, make sure head "C" and covers "A"
and "B" are properly placed on their seats as figure E and not off-
centered as in figure F.
Daily
Regular wiping down directly after use prevents dirt from burning
on. Clean the appliance with water and a detergent or all purpose
cleaner.
Avoid using too much water to prevent it entering the burner or
ventilation openings.
Oven accessories (shelves, trays etc) should be washed in mild
detergent solution and should not be treated with abrasives. The
oven interior panels should be cleaned with mild detergent solution,
mild cream cleaners or a moist soap pad.
lnstall shelves by locating them in the horizontal guide rails on
the oven walls.
The raised portion of the shelf is to be facing the rear wall of the
oven.
IMPORTANT
Do not use excessive water when cleaning the oven and avoid
water passing through the fan grill or ducts in the oven back .
Avoid letting grease deposit collect around the upper heating
element: it will cause smoking and may start a fire.
Fig. G
Fig. H
B
A
Fig. E
B
A
Fig. F
in burner head
electrode
CLEANING
Removing the hoo
ely.
racks are all
partment at
k-in racks in
fixed to the
ok-in rack sl
hooks into t
as follows:
l holes in th
ert
( Fig. G )
( Fig. H )
 Loading...