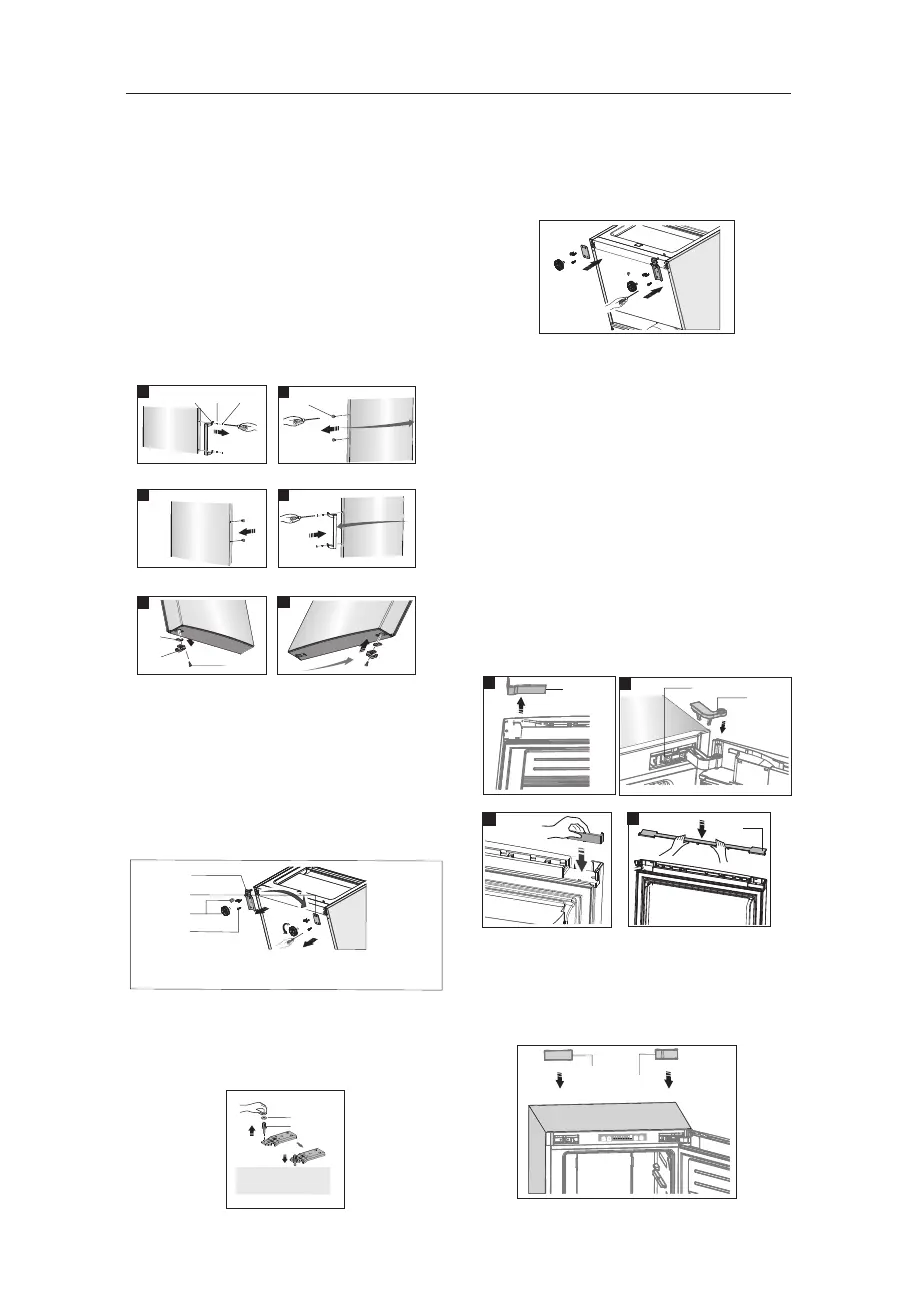
5. Place refrigerator flatwise, remove
part③ and then loose screws④ .
Remove part ② and part① as the
picture.
4.Lever handle covers ① and loose
screws ② , remove the handle ③ as
show figure Ⅰ ,then place it at side
for use. Take the screw hole covers ④
down as show figure Ⅱ , and install
them in the right side as show figure
Ⅲ . Change handle to left, install it as
show figure Ⅳ . Detach door stopper
⑤ and limit block ⑥ and then install
door stopper and limit block to right as
show figure Ⅴ and Ⅵ.
① Handle covers ② Screws
③ Handle ④ Screw hole covers
⑤ Door stopper ⑥ Limit block
⑦ Self-tapping screws
6. Screw out lower hinge axis, change
it to the near hole site as the picture
below, and then screw up and mount
washer as the picture below.
③
④
①
②
①
Le
ft
Lowe
r
hi
ng
e
pa
rt
② Front
foot
fixe
d
boar
d
③ Ad
just
ab
le
bottom fee
t
pa
rt ④
sp
ecial fl
ange s
elf-ta
pp
ing sc
re
w
8. Take off the part ①, place it at side
for use as show figure Ⅰ . Move the
freezer door to appropriate position,
adjust part ② and door, then fix part
② by screws as show figure Ⅱ .
(Please hold upper door by hand when
installing). Fix the part ③ as show
figure Ⅱ (which is in the plastic bag) .
Reverse part ① by 180°and install it
onto the left corner of the door as
show figure Ⅲ . Finally mount part ④
as show figure Ⅳ.( which was taken
down in step 2)
9.Finally install part ① and part ②
(both of which are taken down in step
2) in the refrigerator body as the
picture below.
Ⅱ
④
Ⅰ
③
②
①
Ⅳ
⑥
⑦
⑤
Ⅴ
Ⅵ
Ⅲ
①
②
7.Just remount to the step 5,change
part① to right and part② to left and
then fix them with screws④ . Finally
install part③.
Note: washer m
ay
st
ic
k to t
he doo
r.
wa
sh
er
hing
e axis
Ⅱ
②
③
④
Ⅳ
Ⅲ
①
Ⅰ
10


 To Next Page