Do you have a question about the Innova 3551a and is the answer not in the manual?
Covers fire safety and eye protection requirements for safe operation.
Addresses clothing, ventilation, and smoking hazards during work.
Covers vehicle setup, hot surfaces, and battery handling safety.
Warns about high voltage and vehicle jacking risks.
Explains the importance of ignition timing for engine performance and economy.
Describes the timing light's intended use on 12-volt vehicles.
Details connecting the timing light to 6-volt electrical systems.
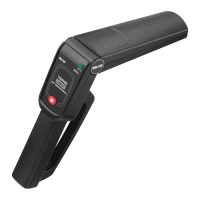
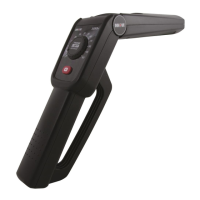
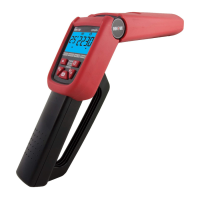
Details the timing light's components and control panel functions.
Lists pre-checks for mechanical issues before starting any test procedure.
Outlines steps to prepare the engine before performing a timing check.
Provides steps for safely connecting the timing light to the vehicle.
Details how to perform a base timing check using the timing light.
Explains how to check mechanical or centrifugal timing advance.
Details the procedure for checking vacuum timing advance.
References vehicle manual for checking electronic timing controls.
Explains how to clean the inductive pickup clip for optimal performance.
Provides information on obtaining replacement inductive pickup leads.
The Innova Timing Light, available in models 3551 and 3555, is a diagnostic tool designed to assist in checking and adjusting engine timing for optimal performance and fuel economy. Proper ignition timing is crucial for a vehicle's engine, and this device provides a simple and efficient method for verifying it. The timing light is suitable for use on all 12-volt negative ground vehicles equipped with conventional breaker point, electronic ignition systems, or, for the Model 3551, Distributorless Ignition Systems (DIS). For vehicles with 6-volt electrical systems, the timing light can be used with a separate 12-volt automotive battery and a specific connection procedure involving jumper wires.
The primary function of the Innova Timing Light is to illuminate the engine's timing marks, allowing a technician to observe the position of the rotating timing mark in relation to a fixed reference pointer. This visual check helps determine if the ignition timing is set according to the manufacturer's specifications.
The Model 3551 is a conventional timing light, offering basic timing checks. It features a simple On/Off switch to activate and deactivate the light.
The Model 3555 is an advance timing light, which includes additional capabilities for checking the operation of a vehicle's mechanical or vacuum advance timing controls. This model features an Advance Control Knob that allows the user to select timing light advance settings from 0° to 60°. This feature is particularly useful for diagnosing issues with the advance systems, which ensure ignition occurs at the proper time during the compression stroke. These advance controls can include mechanical advance, vacuum advance, vacuum retard, electronic advance, electronic retard, or a combination thereof, depending on the vehicle's make and model.
Before using the timing light, it is essential to perform a thorough check of the vehicle, addressing any known mechanical problems, loose or damaged hoses, wiring, or electrical connectors. Users should always refer to the vehicle's service manual for proper connection of vacuum hoses, electrical wiring, and wiring harness connectors, and check fluid levels, spark plugs, air cleaner, vacuum hoses, belts, and electrical connections.
Engine preparation is critical before timing. The vehicle's Emission Control Label or service manual should be consulted for specific timing procedures and specifications. This includes locating and cleaning the timing mark and reference pointer, ensuring spark plugs are in good condition, and running the engine until it reaches its normal operating temperature. The engine must be turned off before connecting the timing light.
Connecting the timing light involves clamping the inductive pickup clip around the No. 1 spark plug wire. It is crucial to keep the inductive pickup clip away from hot engine parts like the exhaust manifold to prevent damage. The red battery clip connects to the positive (+) battery terminal, and the black battery clip connects to the negative (-) battery terminal. The inductive pickup leads then connect to the bottom of the timing light handle.
For initial (base) timing checks, after connecting the timing light and preparing the engine, the engine is started and run at the manufacturer's specified idle speed. For the Model 3555, the Advance Control Knob must be rotated fully counterclockwise to "0". The timing light barrel can be adjusted to adequately light the timing marks. Pressing the On/Off switch activates the light, allowing the user to observe the rotating timing mark's position relative to the reference pointer. This reading is then compared to the manufacturer's specifications. If the readings are not within tolerance, parts replacement or timing adjustment may be necessary.
For advance timing control checks (Model 3555 only), the mechanical/centrifugal advance can be checked by slowly increasing engine speed to the manufacturer's specified RPM and observing the timing mark movement. If the movement is rough or erratic, the mechanical advance system may be defective. The Advance Control Knob is then rotated clockwise until the timing mark and reference pointer realign, and the degrees of advance are read from the calibrated dial. Vacuum timing advance checks require a vacuum pump equipped with a vacuum gauge. The vacuum hose is disconnected from the distributor's vacuum advance port, plugged, and the vacuum pump is connected to the distributor's vacuum port. After recording initial timing, the specified vacuum is applied, and the Advance Control Knob is adjusted to realign the timing marks to the initial setting. The difference in readings indicates the vacuum advance. Procedures for checking vacuum/electronic retard and electronic advance vary by vehicle and manufacturer, requiring consultation of the vehicle's service manual.
The Innova Timing Light is designed for durability, but proper maintenance ensures reliable operation.
Cleaning the Inductive Pickup Clip: Dirt or grease on the inside surfaces of the inductive pickup clip can cause erratic flashing or poor operation of the timing light. Users should periodically clean these contact surfaces by wiping them with a soft cloth. This helps maintain a strong and consistent signal from the spark plug wire.
Replacing the Inductive Pickup Leads: The timing light is equipped with detachable leads, which can be disconnected from the main unit for easy storage after use. If the test leads or clips become damaged due to wear, accidental contact with hot engine parts, or other issues, a replacement set can be obtained from the dealer or directly from the service center. This modular design allows for easy replacement of damaged components without needing to replace the entire timing light, extending the life of the tool.
In case the timing light fails to operate or operates erratically, troubleshooting steps include checking battery clip connections and polarity, ensuring the inductive pickup clip's ferrite cores are clean, verifying proper connection of the inductive pickup clip to the No. 1 spark plug wire, and confirming the No. 1 spark plug is working correctly by testing with another spark plug cable. Low spark plug voltage or faulty spark plug wires can cause erratic operation, and some ignition systems or specialty spark plug wires may radiate high levels of Electro-Magnetic Interference (EMI) or Radio Frequency Interference (RFI), which can affect testing equipment. In such cases, consulting the manufacturers of these parts for guidance on using an inductive pickup is recommended.
| Model | 3551a |
|---|---|
| Category | Automobile Accessories |
| Data Logging | No |
| Live Data | Yes |
| Display Type | LCD screen |
| Connectivity | Wired |
| Power Source | Vehicle battery |
| Compatibility | OBD2 compliant vehicles (1996 and newer) |
| Functions | Read and clear codes, view freeze frame data, I/M readiness status |