EasyManua.ls Logo

Interphone ACTIVE CONNECT - User Manual

Interphone ACTIVE CONNECT
10 pages
Print Icon
To Next Page IconTo Next Page
Loading...
QUICK GUIDE
WARNING ON THE BATTERY OF THE PRODUCT
Fully charge the battery before using the product for the
rst time.
Do not store the Product without charging it. Failure to do so may cause irreversible da-
mage to the battery capacity. Charge the battery every TWO months.
WARNING ON THE WATER RESISTANCE OF THE PRODUCT
The control unit, connected to the audio kit , can be immersed in a metre of fresh water
for a maximum of 30 (thirty) minutes.
Despite this classi
ation, the device is not immune to greater stress, such as prolonged
immersions or high pressure water jets.
Using the product during intense meteorological phenomena, at high speeds, may be
equivalent to subjecting the product to a high pressure jet.
FOLLOW ALL SUGGESTIONS CAREFULLY TO AVOID DAMAGING THE DEVICE:
Do not immerse the product in fresh water which is more than a metre deep for more than
30 minutes.
Do not store th
e product when still wet: dry it with a clean, so
cloth. Dry any water or moi
-
sture present in the connector of the control unit and/or audio kit with hot air for at least 10
minutes, so as to prevent the oxidation of the contacts.
Do not expose the product to salt water or ionised water, drinks or other liquids.
If the device is exposed to liquids other than fresh water, wash the device with cold fresh
water and dry it carefully with a clean, so cloth.
Do not expose the product to high pressure water jets.
Make sure that the audio kit connector is completely inserted in the control unit.
If not, complete protection against water and dust is not guaranteed.
CHAPTER 1 – COMPOSITION OF THE KIT
Microphone for full face helmet
Speaker kit
USB cable for charging and data
Velcro and spare sponges
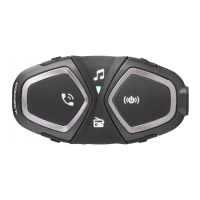
Phone
Bluetooth unit
Volume +
Volume -
Music
FM Radio
Up (<)
Down (>)
Clamp bracketAdhesive bracket
CHAPTER 2 – INSTALLATION INSTRUCTIONS
Locate the area in correspondence
with the ear
If possible, remove the two
cushions or padding
Position the strips of Velcro
for the speakers
Filp-up/jet helmet Full face helmet
Choose the microphone to use:
Place the speakers
1
3
2
4
5
(!) Warnings on installation:
1. The centre of the speakers must be placed
in correspondence with the ears, as close as
possible.
2. The marking MIC on the microphone
must be directed towards the mouth.
Adhesive bracket
Re-install the cushions
Clamp bracket
Install the control unit and connect the cable
6
7
8
MIC
CHECK FOR SOFTWARE UPDATES ON WEBSITE
www.interphone.com
BTF10
Question and Answer IconNeed help?

Do you have a question about the Interphone ACTIVE CONNECT and is the answer not in the manual?

Overview

The Interphone BTF10 ACTIVE CONNECT is a Bluetooth-enabled communication system designed for motorcycle helmets, allowing riders to stay in touch, listen to music, and receive GPS instructions.

Function Description

The BTF10 ACTIVE CONNECT serves as a versatile communication hub for motorcyclists. Its primary functions include:

  • Intercom Communication: Enables communication between multiple riders. The device supports conference calls between up to 4 users, with specific pairing procedures for 2, 3, or 4 Interphone ACTIVE units.
  • Telephone/GPS Connectivity: Allows pairing with mobile phones and GPS devices for hands-free calling, voice dialing, redialing the last number, and receiving GPS navigation instructions.
  • Music Playback: Supports streaming music from a paired phone and offers music sharing functionality with another intercom unit.
  • FM Radio: Includes an integrated FM radio with scan and save frequency features, allowing users to store up to 8 strongest stations.
  • Voice Guide: Provides voice prompts for various operations and settings, with the option to change the voice guide language.

Important Technical Specifications

  • Bluetooth® Compliance: Bluetooth® v. 4.2 - Class I.
  • Supported Bluetooth Profiles: HFP (Hands-Free Profile), A2DP (Advanced Audio Distribution Profile), AVRCP (Audio/Video Remote Control Profile).
  • Frequency: Operates within the 2.402-2.480GHz range.
  • Power: 18 dBm EIRP (Equivalent Isotropically Radiated Power) for EU ACTIVE mode, and 10 dBm EIRP for EU CONNECT mode.
  • Operating Temperature: 0-45°C.
  • Charging Temperature: 10-40°C.
  • Dimensions: 44x87x22 mm.
  • Weight: 48 g.
  • Range: Up to 10 meters.
  • Talk Time: 15-12 hours.
  • Stand-by Time: 1000 hours.
  • Charging Time: 3 hours.
  • Battery Type: Lithium-ion rechargeable.
  • SAR Value: Maximum SAR value is 0.171 W/kg (head/body) averaged over 1 gram of tissue, measured at 5 mm to the body while transmitting at the highest certified output power level in all frequency bands.

Usage Features

The device features an intuitive control panel with distinct buttons for various functions:

  • Power/Intercom Button ((())): Used to turn the device on/off, initiate/end intercom calls, and confirm settings.
  • Volume Up (+)/Music Next Track (>) Button: Increases volume, selects the next music track, and is used for language selection.
  • Volume Down (-)/Music Previous Track (<) Button: Decreases volume, selects the previous music track, and is used for language selection.
  • Phone Button (?): Manages phone calls (answering, voice dial, redial).
  • Music Play/Pause Button (?): Enables/disables music playback.
  • FM Radio Button (?): Activates/deactivates the FM radio, scans frequencies, and saves stations.

Installation: The BTF10 can be installed in full-face, flip-up, or jet helmets using either an adhesive bracket or a clamp bracket. The installation process involves:

  1. Removing helmet cushions/padding.
  2. Locating the ear area for speaker placement.
  3. Positioning Velcro strips for speakers.
  4. Placing the speakers, ensuring their centers correspond to the ears.
  5. Choosing the appropriate microphone (full-face or flip-up/jet) and directing the "MIC" marking towards the mouth.
  6. Attaching the chosen bracket (adhesive or clamp) to the left side of the helmet.
  7. Re-installing the cushions.
  8. Installing the control unit and connecting the cable.

Basic Configuration:

  • Turning On/Off: Press the ((())) button until the blue LED comes on (on) or the red LED lights up (off).
  • Changing Voice Guide Language: With the unit on, press and hold < until "settings" is heard. The LED will be purple. Use + to select the language, then press and hold < until the third beep to save. The LED will flash blue.

Pairing:

  • Telephone/GPS Pairing: With the unit off, press and hold ((())) until the LED flashes red/blue alternately. Search for new devices on the phone/GPS and select "interphone active" or "interphone connect." The LED will flash BLUE twice every three seconds upon successful pairing.
  • Intercom Pairing:
    • Manual Pairing: With the intercom off, press and hold ((())) until the LED flashes red/blue. Press ((())) on the second unit to pair.
    • Conference between 2 users: Press ((())) on unit 1 or unit 2.
    • Conference between 3 users (Interphone ACTIVE only): Pair unit 1 to 2, then unit 2 to 3. Press ((())) on unit 2 to start the conference.
    • Conference between 4 users (Interphone ACTIVE only): Pair unit 1 to 2, then unit 2 to 3, and finally unit 3 to 4. Press ((())) on unit 2 to start the conference, then ((())) on unit 4 to start the conference.

Maintenance Features

  • Battery Charge: The device is charged via a micro USB cable connected to a standard USB charger. A red LED indicates charging, and a green LED indicates a full charge.
  • Software Updates: Users are encouraged to check for software updates on the official website (www.interphone.com).
  • Cleaning: The product should be cleaned with a soft, dry cloth. Avoid using water or moisture directly on the connector or audio kit. If exposed to liquids, dry the device with a soft, clean cloth.
  • Storage: Store the product in a dry, well-ventilated place. For prolonged storage, fully charge the battery every two months to prevent capacity degradation.
  • Water Resistance: The device is not immune to greater stress, such as prolonged immersions or high-pressure water jets. Avoid subjecting the product to a high-pressure jet.
  • Disposal: The product and its battery should be disposed of responsibly according to local regulations for electronic waste. The battery is non-replaceable by the user and should be removed by a local waste disposal authority.

Warnings:

  • Battery: Fully charge the battery before first use. Do not store the product without charging it. Failure to do so may cause irreversible damage to battery capacity.
  • Water Resistance: The control unit, connected to the audio kit, can be immersed in a meter of fresh water for a maximum of 30 (thirty) minutes. However, this classification does not imply immunity to greater stress or high-pressure water jets.
  • Hearing Damage: Do not listen at high volume levels for long periods to prevent possible hearing damage. Only use the provided headset.
  • Interference: The device complies with FCC and IC rules regarding harmful interference. Users are advised to reorient antennas, increase separation, or consult a dealer if interference occurs.
  • Modifications: Changes or modifications not expressly approved by the responsible party could void the user's authority to operate the equipment.

Interphone ACTIVE CONNECT Specifications

General IconGeneral
BrandInterphone
ModelACTIVE CONNECT
CategoryIntercom System
LanguageEnglish

Related product manuals