Do you have a question about the Invacare Top End Force Handcycle Series and is the answer not in the manual?
Explains signal words like DANGER, WARNING, CAUTION, and IMPORTANT used in the manual.
Defines the term "qualified technician" for manual procedures and advice.
Details the limited warranty coverage for frames, upholstery, and components for the handcycle.
Identifies key warning and information labels on the Force and Force-2 handcycle models.
Identifies key warning and information labels on the Force G handcycle model.
Identifies key warning and information labels on the Force R handcycle model.
Identifies key warning and information labels on the Force K handcycle model.
Identifies key warning and information labels on the Force X handcycle model.
Lists specifications and dimensions for the Top End Force handcycle models.
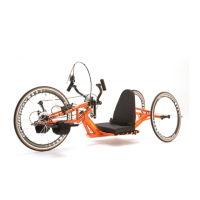
Provides labeled diagrams identifying key parts of the Force/Force-2 and Force G handcycles.
Offers a table for converting tire pressure from PSI to Kilopascals.
Outlines crucial safety instructions, warnings, and accessory usage guidelines for the handcycle.
Explains essential adjustments for rider comfort, safety, and proper handcycle operation.
Covers safe operation, transport recommendations, seat positioning strap use, and brake checks.
Provides detailed steps and warnings for safely transferring to and from the handcycle.
Lists essential checks for frame, brakes, wheels, chain, and upholstery for safe operation.
Offers solutions for common issues like sluggish turns, wheel flutter, squeaks, and looseness.
Provides critical maintenance advice, including tightening hardware and checking for damage.
Outlines initial setup steps for Force Series handcycles, excluding Force-2 assembly.
Provides step-by-step instructions and required tools for assembling the Force-2 handcycle.
Explains the proper use of shifters and gear combinations for optimal handcycle performance.
Details techniques for safely backing up and maneuvering the handcycle in confined spaces.
Covers the operation of hand brakes, fork-mounted brakes, and disc brakes for safe stopping.
Guides on how to steer, turn, and corner the handcycle safely at different speeds.
Instructions on how to replace or adjust the footrest for proper rider positioning.
Explains how to use and replace the footrest straps for secure foot placement.
Details how to adjust the hand crank for optimal chain tension and rider comfort.
Provides instructions for adjusting the seat position forward or backward for optimal fit.
Explains how to adjust the backrest angle for comfortable trunk support and proper positioning.
Step-by-step guide for installing the rear wheels onto the handcycle frame.
Describes how to measure and determine the toe-in or toe-out condition of the rear wheels.
Instructions on how to adjust the camber inserts to correct toe-in or toe-out conditions.
Steps for removing and installing camber inserts for wheel alignment adjustments.
Recommends qualified technician for tire, tube, and spoke maintenance.
Procedures for removing and installing the front fork on specific Force models.
Step-by-step guide for removing and installing the front wheel of the handcycle.
Detailed instructions for replacing the left and right side crank arms.
Procedures for installing, removing, and adjusting the steering dampener for stability.
Steps for correctly installing the chain onto the handcycle's sprocket system.
Guidance on adjusting the chain tension for optimal performance.
Recommends qualified technician for installing crank handles.
Instructions for installing V/S crankarm handles, emphasizing proper fit.
Details adjustment and replacement of caliper brakes and parking brake systems.
Covers cleaning, cable adjustment, and brake pad inspection/replacement for disc brakes.
Instructions for removing and installing new seat upholstery for the handcycle.
Steps for attaching a new back cushion to the handcycle's back frame.
Procedure for replacing the integrated backrest strap on the Force X model.
Instructions for installing and operating safety lights for dusk/night visibility.
Steps for mounting a water bottle bracket and bottle onto the handcycle.
Basic guidance on securing and fitting a safety helmet.
Instructions for installing a cycling computer, including sensor placement.
Procedures for assembling, adjusting, and using the handcycle rack for transport.
How to use an alignment gauge to check and adjust rear wheel alignment (toe-in/toe-out).
Lists and briefly describes available optional accessories for the handcycle.
| Category | Handcycle |
|---|---|
| Manufacturer | Invacare |
| Drive Type | Hand-powered |
| Foldable | No |
| Frame Material | Aluminum |
| Wheel Size | 26-inch rear |
| Weight Capacity | 250 lbs |
| Adjustability | Seat angle, crank position, footrest |
| Brakes | Disc brakes |