3
Features
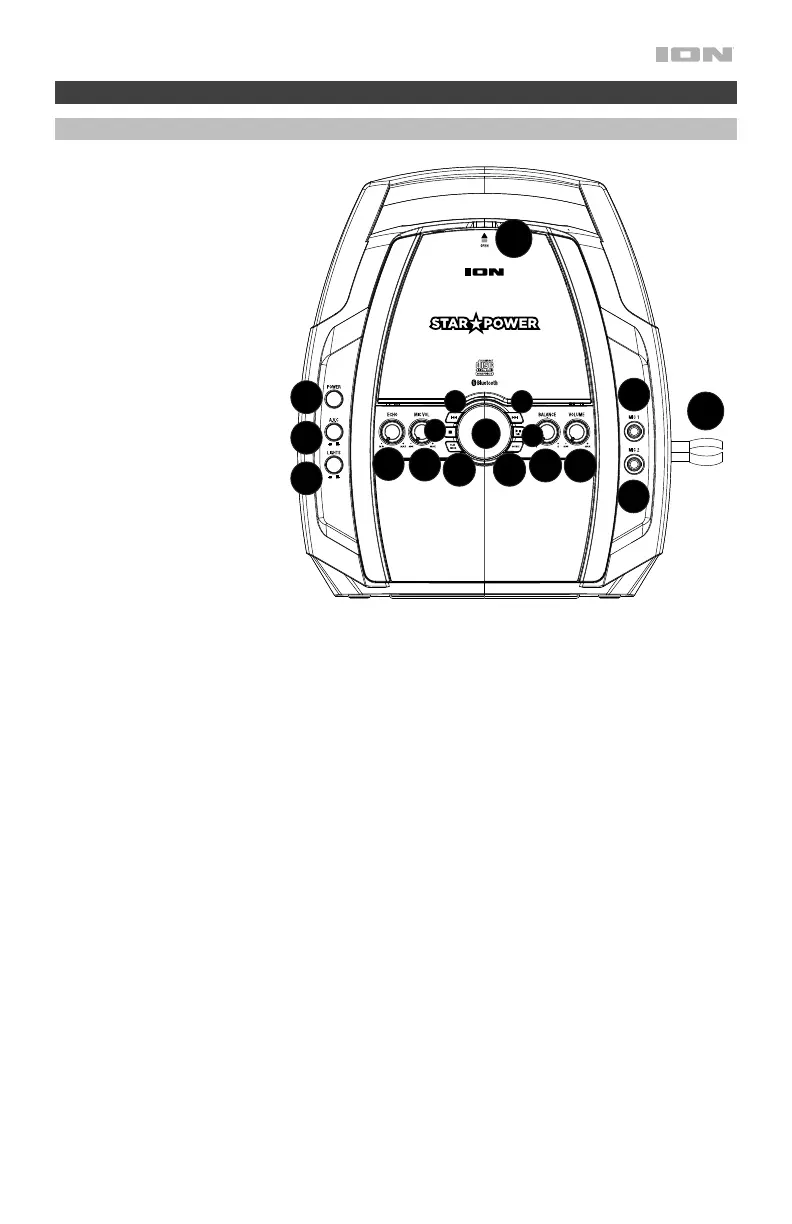
Top Panel
1. Power: Press this button
to turn Star Power on or
off.
2. Microphone Volume:
Adjust this knob to
increase or decrease the
signal gain for the Mic 1
and Mic 2 inputs.
3. Echo: Adjust this knob to
add an echo effect to the
Mic 1 and Mic 2 signal.
4. AVC (Automatic Voice
Control): When the AVC
function is activated, the
main vocal on a multiplex
track (split track) is
removed when the singer
begins singing into the
microphone. When the
singer stops singing, the
main vocal on the
multiplex track is
automatically re-activated.
This is useful during
practice sessions when a
singer is learning a song.
Note: The AVC function
only works with multiplex
(split track) recordings and not with standard audio recordings.
5. Lights: Press this switch in to activate the light effects.
6. Play Mode: While a CD is playing, press this button once to repeat a single track (a blinking dot will
appear near the REP option on the display). While a CD is playing, press this button again to repeat
the entire CD (a solid dot will appear near the REP option on the display). While a CD is playing, press
this button again to turn off repeat (the dot near the REP option on the display will disappear). When a
CD is stopped, press this button to program the track playback order. See Programming CD Track
Playback Order for more details on using this function.
7. Source: Press this button to cycle through the sources for Bluetooth, Aux Input, and CD.
8. Mic 1: Connect the included dynamic microphone to this 1/4” (6.35 mm) input.
9. Mic 2: For duet singing, connect another dynamic microphone (sold separately) to this 1/4” (6.35 mm)
input.
10. Mic Holder: Secure your mic here when it is not being used.
11. CD Compartment: Open the CD compartment to load/remove a CD.
12. Volume: Adjust this knob to control the overall volume of the internal speakers and RCA outputs from
the CD audio, Bluetooth, microphone inputs, and Aux In sources.
13. Balance: Adjust this knob to control the separation between the left and right channel signal going to
the internal speakers.
14. Play/Pause/Pair: Press this button to play or pause the CD. In Bluetooth mode, press and hold this
button for 3 seconds to disconnect from a paired Bluetooth device.
15. Stop: Press this button to stop CD playback.
16. Next Track/Scan Forward: Press and release this button to go to the next CD track. Press and hold
this button to scan forward through the current track.
Note: Scan-forward will not work with CD+G discs.
17. Previous Track/Scan Backward: Press and release this button to go to the previous CD track. Press
and hold this button to scan backward through the current track.
Note: Scan backward will not work with CD+G discs.
18. Display: This screen shows the unit’s current operation.
1
2
3
4
5
8
9
11
12
13
14
15
16
10
17
18
7
6
 Loading...