This document describes the iPets Training Collar System, a device designed to assist in dog training. The system allows for leash-free control of a dog within a range of up to 880 yards by sending signals from a Remote Transmitter to a Collar Receiver worn by the dog. These signals deliver an annoying but safe stimulation, which, with consistent use, helps the dog associate misbehavior with corrections, leading to a well-trained pet.
Function Description:
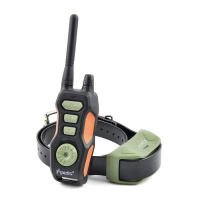
The iPets Training Collar System utilizes a Remote Transmitter and a Collar Receiver to deliver various types of stimulation to a dog. The system offers three modes: Tone, Vibration, and Static Shock. The Remote Transmitter features an Intensity Dial to adjust the level of stimulation from 0 to 8 for both Vibration and Static Shock. It also includes a Receiver Selector Dial, allowing control of up to three Collar Receivers simultaneously (additional receivers are purchasable). The system is designed with an ergonomic layout for ease of use and includes a Belt Clip for hands-free training. An auto-off feature conserves battery life when the Collar Receiver is not in use, and the Collar Receiver can be remotely turned on/off.
The product is not recommended for aggressive dogs or dogs prone to aggressive behavior, as this could lead to severe injury or death. Users are advised to consult a veterinarian or certified trainer if unsure about the product's suitability for their dog.
A critical caution is the risk of skin damage. Improper fit, wearing the collar for too long, or making it too tight can cause skin damage, including redness, pressure ulcers (bedsores), and even pressure necrosis, which can be mistaken for burns. To prevent this, users should:
- Avoid leaving the collar on the dog for more than 12 hours per day.
- Reposition the collar on the pet's neck every 1 to 2 hours when possible.
- Check the fit to prevent excessive pressure and trim any excess strap length.
- Never connect a lead to the electronic collar, as this can cause excessive pressure on the contacts.
- Wash the dog's neck area and the collar's contacts weekly with a damp cloth.
- Examine the contact area daily for signs of rash or sores.
- Discontinue use if a rash or sore is found until the skin has healed.
- Consult a veterinarian if the condition persists beyond 48 hours.
The manufacturer emphasizes that millions of pets are comfortable with stainless steel contacts, but some pets may be sensitive to contact pressure. If the pet becomes tolerant of the collar over time, some precautions may be relaxed, but daily checks of the contact area should continue. If redness or sores are detected, discontinue use until the skin is fully healed.
The iPets brand aims to ensure pet safety and successful training. Users with queries are encouraged to contact customer service. It is important to charge the product before its first use.
Components:
The system includes:
- Remote Transmitter: The handheld device used to send signals.
- Collar Receiver: The device worn by the dog that receives signals and delivers stimulation.
- Adjustable TPU Belt: The strap that holds the Collar Receiver on the dog's neck.
- Charger: For charging both the Remote Transmitter and Collar Receiver.
- USB Cable: Connects the charger to the devices.
- Test-Light Bulb: Used to test the Static Shock function.
- Contact Points: Metal screws on the Collar Receiver through which static shock stimulation is delivered. The PET618-2 model includes two sets of contact points, while PET618-1 and PET618-3 include one set.
Key Definitions (Remote Transmitter):
- Antenna: Transmits signals to the Collar Receiver.
- Transmitter Indicator Light: Flashes green when stimulation buttons are pressed, and solid red when charging.
- Intensity Dial: Adjusts stimulation levels (0-8) and powers the transmitter on/off.
- Receiver Selector Dial: Selects which receiver to control (up to three).
- Vibration Button: Delivers vibration stimulation.
- Static Shock Button: Delivers static shock stimulation.
- Tone Button: Sends an audible tone signal.
- Transmitter Charging Jack: For charging the transmitter battery.
- Belt Clip: For hands-free carrying.
- Remote Transmitter Pairing Symbol: Used for pairing with the Collar Receiver and powering it off.
- Rubber Cover: Protects internal components from dust and water; must be replaced after charging.
Key Definitions (Collar Receiver):
- Contact Points: Metal screws that deliver static shock stimulation.
- Collar Receiver Charging Jack: For charging the receiver battery.
- Collar Receiver Pairing Receptacle: Used for pairing with the Remote Transmitter and powering it off.
- Rubber Cover: Protects internal components from dust and water; must be replaced after charging.
- Receiver Indicator Light:
- Solid red when charging, switches to green when fully charged.
- Flashes green periodically in standby.
- Green light appears when stimulation buttons are pressed on the transmitter.
- Solid green light during pairing process.
- Red light when powering off.
Usage Features:
- Rechargeable: Both the Remote Transmitter and Collar Receiver are rechargeable.
- Waterproof: Both devices are waterproof.
- Adjustable Intensity: 8 levels of Vibration and 8 levels of Static Shock, easily adjusted with the Intensity Dial.
- Multi-Dog Control: Capable of controlling up to three dogs simultaneously with additional receivers.
- Adjustable Strap: Thick TPU strap accommodates various dog sizes.
- Quick Pairing: Simple and straightforward pairing process.
- Remote On/Off: Collar Receiver can be turned on/off remotely.
- Auto-Off Feature: Collar Receiver automatically turns off after one hour of inactivity to save battery.
Operating Guide:
Step 1 - Prepare the Remote Transmitter:
- Charge: Uncover the Charging Jack, insert the connector, and plug into a wall outlet. The Transmitter Indicator Light will show solid red while charging and turn solid green when complete. Replace the Rubber Cover. Charge fully before first use.
- Power On/Off: Rotate the Intensity Dial from "off" to power on (indicator light flashes green). Rotate to "off" to power off (indicator light ceases flashing).
Step 2 - Prepare the Collar Receiver:
- Charge: Uncover the Charging Jack, insert the connector, and plug into a wall outlet. The Receiver Indicator Light will show solid red while charging and turn solid green when complete. Replace the Rubber Cover.
- Power On/Off (Option 1 - Buttons):
- To turn on: Hold Vibration Button 1, then press and hold Beep Button 1 for 5 seconds.
- To turn off: Hold Vibration Button 1, then press and hold Beep Button 1 for 3 seconds.
- Power On/Off (Option 2 - Pairing Symbols):
- To turn on: Align the Remote Transmitter Pairing Symbol with the Collar Receiver Pairing Symbol until the Receiver Indicator Light is solid green, then separate them.
- To turn off: Align the Remote Transmitter Pairing Symbol with the Collar Receiver Pairing Symbol until the Receiver Indicator Light is red, then separate them.
- The Collar Receiver has an auto-off feature if no signal or operation occurs within one hour.
Step 3 - Pairing Collar Receiver to Transmitter:
- Power on the Remote Transmitter by rotating the Intensity Dial from "off."
- Rotate the Receiver Selector Dial to 1 for the first receiver.
- Ensure the Collar Receiver is off.
- Align the Remote Transmitter Pairing Symbol with the Collar Receiver Pairing Symbol. Hold until the Receiver Indicator Light is a steady green, then flashes. Press any stimulation button to complete pairing.
- For additional receivers, repeat steps, rotating the Receiver Selector Dial to 2 or 3.
Step 4 - Test the Training System Functions:
Ensure pairing is complete before testing.
- Static Shock Function: Place the test bulb over the Collar Receiver's Contact Points. Power on the transmitter, set Intensity Dial to 0. Select the correct receiver. Press the Static Shock Button; the test bulb should flash orange. (To self-test, ensure fingers are across both contact points).
- Vibration Function: Power on the transmitter, set Intensity Dial to 0. Select the correct receiver. Press the Vibration Button; the Collar Receiver should respond.
- Tone Function: Power on the transmitter. Select the correct receiver. Press the Tone Button; the Collar Receiver should emit a tone.
Step 5 - Fit the Collar Receiver:
Proper fit is crucial for effective training.
- Attach the Collar Strap to the Receiver.
- Place the Collar Receiver around the dog's neck with the receiver box and Contact Points on the underside, making direct contact with the skin. Shaving fur may be necessary for good contact.
- Fasten the strap snugly but not taut; a finger should fit underneath.
- Allow the dog to wear it for several minutes, then recheck the fit for comfort.
Step 6 - Re-thread the collar:
The manual provides visual instructions for re-threading the collar, but the images are not available in the provided text.
Maintenance Features:
- Regular Maintenance:
- Ensure Contact Points are not too tight on a weekly basis.
- Rinse Contact Points with alcohol weekly.
- Check the dog's neck for irritation and wash it weekly.
- Rubber Covers: Always replace rubber covers after charging to protect internal components from dust and water.
Troubleshooting:
- Dog not responding:
- Charge both devices for 6 hours before first use.
- Ensure both devices are powered on.
- Check that vibration and static shock intensity levels are not set to 0.
- Ensure the Collar Receiver has sufficient power.
- Check that the collar fits snugly.
- If issues persist, try re-pairing the devices.
- Remote Transmitter not working:
- Check battery status.
- Press and hold the Right Side Button for a few seconds to power on.
- Collar Receiver self-test not working:
- When testing with hands, touch both electrodes simultaneously.
General Training Tips:
- Keep training sessions short and positive (10-15 minutes).
- Train one dog at a time.
- Start training in a familiar outdoor environment.
- Use a long leash with a non-metallic collar initially; ensure it doesn't interfere with Contact Points.
- Teach commands first, then reinforce with the transmitter.
- Vibration is generally more useful for basic obedience.
- Issue one command at a time.
- Reinforce positive behavior with praise and reward.
- Avoid over-correcting.
- If the dog is perplexed, shift focus to a familiar command.
- Do not use the system for aggression or biting behavior; contact a professional trainer.
- Keep sessions short and end on a high note.
- More training tips are available on www.ipets-mall.com and www.facebook.com/ipetsmall.
Frequently Asked Questions:
- Dog's age: Dog should have learned basic obedience commands. Not suitable for dogs under 15 lbs.
- Post-training use: Probably not necessary to wear the collar constantly, but can be used for reinforcement.
- Multi-dog use: Yes, with additional Collar Receivers.
- Waterproof: Yes, if the Rubber Cover seals the Charging Jack.
- Collar replacement: No, cannot replace with another kind of collar.
- Leash attachment: No, can cause excessive pressure on Contact Points. Attach leash to a separate non-metallic collar or harness.
- Wearing duration: Not recommended for more than 12 hours out of every 24-hour period.
- Suitability for all dogs: Collar is adjustable from 5.9" (15cm) to 19.6" (50cm). If neck circumference is smaller than 5.9", rethreading is needed. If larger than 22", it may not be suitable. Not suitable for dogs under 15 lbs.
Warranty:
iPets offers a 90-day warranty against defects in parts, materials, and workmanship from the date of purchase. For repairs or servicing, contact Customer Service.
Customer Service:
- Telephone: 1-866-877-7949
- Email: service@ipets-mall.com
- Hours: Weekdays 9:00 AM - 5:00 PM EST
This warranty provides specific legal rights, which may vary by state.