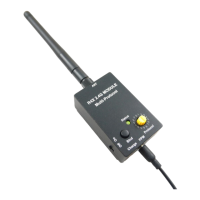
Parameters:
Built-in battery: 500mAh, 3.7V Li-Po battery Operating current: <=100mA
Operating time: 5-12 hours, depends on protocol Operating frequency: 2.4G ISM band
RF power: +22dBm Material of Case: Aluminum alloy CNC
Size: 59x37x21mm, antenna not include Weight: 68g
Normal use operation:
1. Screw down the antenna of module tightly. Turn on you transmitter and set PPM signal output.
2. Connect the 3.5mm plug of signal cable to the DSC (or trainer) port of your transmitter, and
connect the 2.5mm plug to PPM port of RF module.
3. According to Protocols table, turn protocol switch of RF module to choose the proper protocol.
4. After finish binding operation, power on your transmitter and RF module, the status indicator
will turn green,after that turn on your receiver (or craft) , then RF module is ready to work ,
5. There is a buzzer in RF module, it will beep when the battery is low (below 3.5V). Please land
your craft as soon as possible while beeping, and then turn off RF module.
Binding operation:
1. Power on your receiver, and set it to binding mode.
2. Hold and press the bind button of RF module, and then turn on it, after 2 seconds, release the
button, you will see the green light flashing rapidly, then RF module is in binding mode, and
the green light will go solid after binding.
3. Some protocols (eg: S-FHSS) don’t have binding procedure on RF module, and some protocols
(eg: hubsan, e010)will auto bind when power up.
Charging operation:
1. Turn the protocol switch to“0“, power off RF module, then connect RF module to an USB
charger (or other USB power supply) using Micro USB wire (not include), the status indicator
will turn red while charging, and the red light will be off when charging is done.
2. RF module will always work when connect to USB power, no matter the power switch is on or
off, but battery will be charged only when power switch is off.
About protocols:
This module is based on ATmega328P, There are 15 different protocols
mapping To the 16-position protocol selection switch on the module. They
are listed in the default protocols table on the last page, and You can
customize these when you compile you own firmware.
For more information, You can scan the QR code to access :
Notice:
1. We only provide an audio cable, in addition, some transmitters (eg: Futaba,Wfly) need a trainer
cable(standard accessories of transmitter) to connect RF module.
2. Built-in battery has protection logic, it will cut off the battery when voltage is below 3.0V, and
the buzzer may stop working when voltage is below 3.3V.
相关参数:
内置电池: 500mAh,3.7V Li-Po 锂电池 工作电流: <=100mA
工作时间: 5-12 小时,与协议有关 工作频率: 2.4G ISM 频段
射频功率: +22dBm 外壳材质: CNC 铝合金
尺寸: 59x37x21mm,不含天线 重量: 68g
正常使用操作:
1. 首先拧紧高频头天线,打开遥控器并在遥控器上设置输出 PPM 信号。
2. 将附带信号线的 3.5mm 插头接入遥控器 DSC(或者模拟器)接口,另一端 2.5mm 插头接
入高频头模组 PPM 接口。
3. 参照附带的表格,确定接收机的协议对应哪个档位,然后将高频头上的协议旋钮拨到该
档位。
4. 完成对频的情况下,把高频头电源开关拨到“ON“的位置,会亮起绿色指示灯,然后再
给接收机(飞机)通电,之后就可以正常使用。
5. 高频头内置有蜂鸣器,当电池电压偏低时(低于 3.5 伏)。蜂鸣器会鸣叫,这种情况下,
请尽快将您的飞行器降落,之后关闭高频头电源。
对频操作:
1. 给接收机通电,并使它进入对频模式。
2. 按住高频头对频按钮的同时打开电源开关,两秒钟之后,松开按钮,可以看到高频头上
绿色指示灯快速闪烁,这时高频头进入对频模式,对频完成后绿色指示灯常亮。
3. 部分协议(比如 S-FHSS)在高频头上没有对频过程,另外有部分协议(比如 Hubsan,E010)
是高频头开机自动对频,因此,当使用这些协议时不需要按对频按钮。.
充电操作:
1. 将高频头旋钮拨到“0“,电源开关拨到“OFF“的位置,然后用 Micro USB 线(需自备)
把高频头连接到 USB 充电器上(或者其他 USB 供电设备),高频头会开始充电,指示灯
会变成红色,当充电完成时,红色指示灯将熄灭。
2. 当连接 USB 电源时,不论电源开关是否打开,高频头都将处于工作状态,仅当电源开关
在“OFF“位置时,才会对电池充电。
关于协议:
此版本高频头基于 ATmega328P 单片机,有 15 种不同协议分别对应
旋转编码开关的 16 个档位(“0“档保留),两者之前的对应关系请参
见说明书上一页中的列表,如果需要,您也可以自己编译固件以实现
协议定制.
相关信息,请扫描右侧二维码访问 :
注意事项:
1. 高频头只附带一条 2.5mm 转 3.5mm 音频信号线,部分遥控器(比如 Futabat, 天地飞)还
需要一条教练线(一般遥控器自带)才能连接到高频头。
2. 为了避免过充或过放对电池造成损坏,电池带有保护板,当电压低于 3.0 伏时,电池将切
断输出,高频头完全断电。当电压低于 3.3 伏时,蜂鸣器可能因久压停止鸣叫,
 Loading...