10
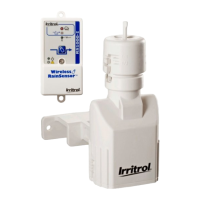
Weather Sensor Installation
Weather Sensor Installation
11
3. The Climate Logic system is designed to provide
eective wireless communication in most applications.
Loss of range can result from interference in the signal
path. To verify signal reception from the selected
installation site, perform the following test:
•Startamanualwateringoperationofazonethatcan
be seen from the installation site. Press and hold the
Sensor Test Pin. If the signal is received, watering
should shut o within a short time.
•NotethesignalbarsontheHomescreentoverify
good signal strength. Three bars is optimal.
•PresstheBYPASS key to cancel the Dry-out delay
mode to resume normal operation.
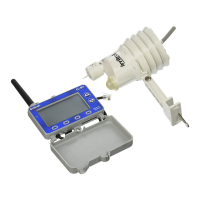
4. Install the Weather Sensor using either of the following
methods:
•Forraingutterinstallation,unscrewthebracket
thumbscrew enough to clear the rain gutter edge.
HoldingtheWeatherSensorinposition,tightenthe
thumbscrew securely.
•Forwoodstructureinstallation,removethe
thumbscrew and secure the bracket using the
provided screws or appropriate stainless fasteners.
•Adjusttheverticalalignmentasneededbyloosening
the phillips screw at the bracket joint; adjust to vertical,
then tighten securely.
• PresstheEXIT key (three times) to return to the Home screen.
After a brief time, the current temperature, watering history
graph line, and signal-strength bars will be displayed.
Note: A single Weather Sensor can be paired to multiple Receiver
Modules when additional Climate Logic systems are installed
within reception range.
2. The Rain Sensor default threshold is ¼” (6 mm) of accumulated
rainfall (nominal). The threshold can be lowered to ⁄” (3 mm) or
raised to ½” (12 mm), or ¾” (19 mm) as preferred. Prior to install-
ing the Weather Sensor, adjust the threshold to the preferred setting as follows:
Note: Increasing the threshold extends the length of time required for the Weather Sensor to signal the
Receiver Module to stop irrigation, as well as extending the dry-out period before scheduled watering can
resume. In areas where heavy fog, mist or high humidity is common, the ⁄” (3 mm) setting is not recom-
mended due to the increased sensitivity to moisture.
•TurntheRainSensorcapslightly,releasingitfromthe
retention pins, allowing the cap to move vertically.
•Turn the cap to engage the retention pins at the preferred
slot position.
Important: The Weather Sensor must have full exposure to sun, wind and rain, and must not be installed
inside a rain gutter, or in any location where immersion, runo, or contact with irrigation spray will occur.
Avoid installation near a heat source, such as a heater vent or chimney. Wooden surfaces are preferred
to concrete or asphalt shingles to reduce reected heat. Installation over a planted area is preferred to a
driveway, walkway etc. Avoid installation near any large metal structure, or high current-draw equipment
that can cause signal interference. Ensure the antenna wire hangs vertically without contact.
CLIMATE LOGIC
MENU
2:32p
11/16
69F 40%
 Loading...