--------------------------------------
(1)
Lubrication
(1) Graissage
No.
1
2
-C-S_MA_a_~_#9_ge_~_'-_c_;_;e_4_0_~
__
G_e_a_'_o_H
~_14Q~
Fuel
Fuel used:
Mixed
by
gasoline
and
engine
oil
(25;
1)
NOTE,
(a) When
fuel
is
supplied,
always
fill
it
through
a
filter
net.
(b)
Use
2-cyde
engine
oil
without
fail
when
oil
is
to
be
mixed
with
fuel.
Tank
capcity
2.7Q
Endroits
Sorte
d'huile
Quantite
1
Carter
principal HuBe aengrenage
1All
N0eo a N
D
140
2
Carburant
Carburant
utilise:
Melange d'essence
et
d'huile
moteur
(25
: 1)
NOTE:
la}
Toujours
faire
I'appoint
en
carburant
en
utilisant
un tamis
de
filtrage.
(b)
Utiliser
uniquement
de
]'huile
pour
moteur
2 temps lars
du melange avec I'essence.
Capacite du reservoir: 2,72
ATTENTION
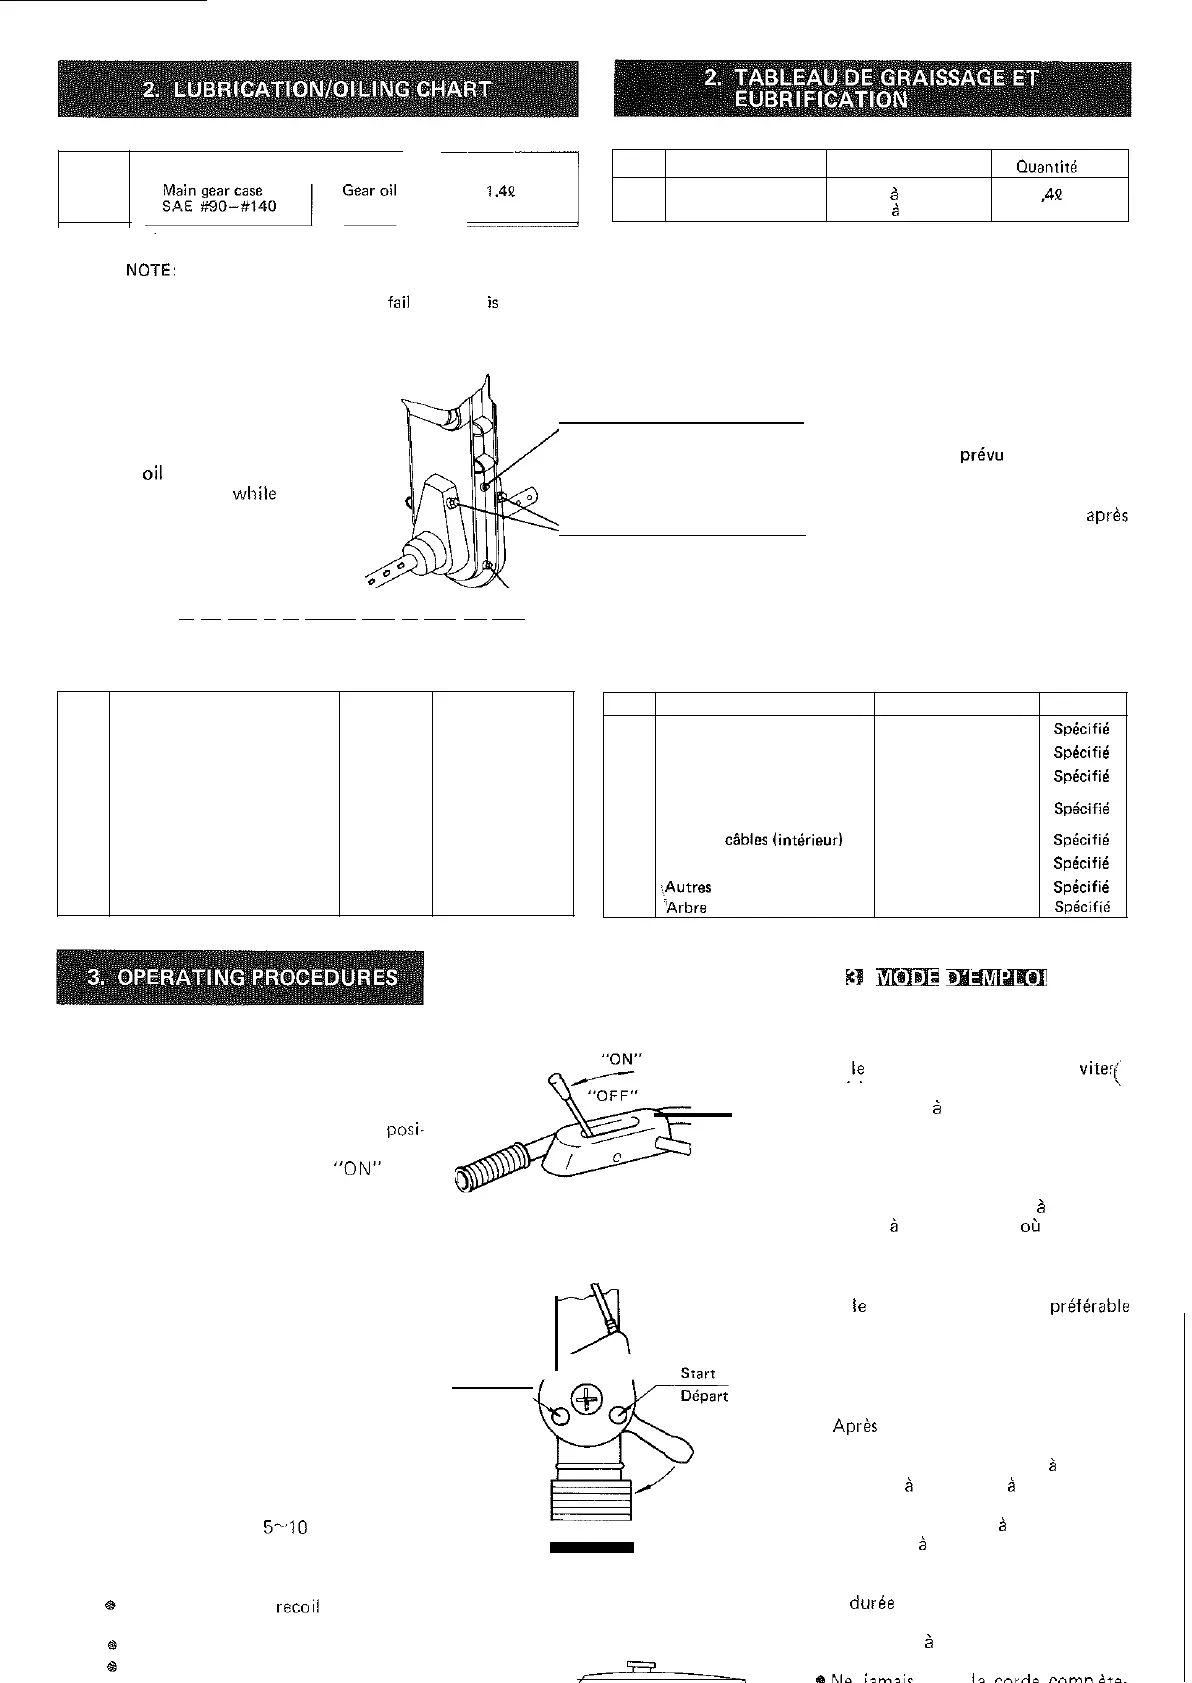
Feed gear oil
1#90-#140)
through
the
oiling
port
provided
at
the
upper
part
of
the
transmission
until
the
oil
overflows
through
the
oil level gauge
port,
while
support-
ing
the
tiller main
body
with
the
stand.
Oil
inspection
plug
Regard
du
niveau
d'huile
Side
clutch
pin
NOTE:
Don't
loosen
or
pullout
this side
clutch
pin
positively.
Cheville
d'embrayage
lateral
NOTE:
Ne
jamais'desserrer au
enlever
cette
cheville.
ATTENTION
Faire
I'appoint
d'huile
pour engre-
nages
1#90-#140)
par I'orifice
de graissage prevu sur
la
partie
superieure
de
la
boite
de
vitesses
jusqu'a
debordement
par I'orifice
de
la
jauge
d'huile,
et
ce apres
avoir immobilise
la
machine
sur
un
support.
Drain
plug
At
the
time
of
oil
change, drain
oil
from
this plug.
Bauchan
de vidange
Lors
de la vidange,
purger
l'huile
par
ce
bouchon.
(2)
Oiling
No.
1
Main
change
arm
Gear
oil
As
appropriate
2
Belt
tension
sliding
portion
Gear
oil
As
appropriate
3 Handle
rotator
lever
pin
Gear
oil
As
appropriate
4
Handle
rotator
sliding
Gear
oil
As
appropriate
portion
5 Every
wire
(inner) Gear
oil
As
appropriate
6 Wheel shaft & whee!
pipe
Grease
As
appropriate
7
All
other
sliding
portions
Gear
oil
As
appropriate
8
p.T.a.
shaft
spline Grease
As
appropriate
(2)
Lubrification
Endroits
Sorte
d'huile
Quantite
1
Bras
de
changement
principal
Huile
pour
automobile
Specifie
2
Tension
courroie
Huile
pour
automobile
Specifie
3
Goupile
de
guidon
Huile
pour
automobile
Specifie
4
Partie
frottante
et
Huile
pour
automobile
SpecHie
rotative
du
guidon
5
Tuos
les cables Onterieur)
Huile
pour
automobile
Specifie
6
Tuyaux
de
graissage
at
axes Graisse Specifie
7 \,Autras parties
frottantes
Huile
pour
automobile
Specifie
8
-'Arbre cannele de prise
deforce
Graisse Specifie
3.
MIDIZlE
lZl'EMPU01
3-1 Starting
the
engine
(1}
Disengage
the
main
clutch.
(Fig.
1)
(2}
Shift
the
change lever
in
the
"neutral"
position.
(3) Open the fuel cock.
(4)
Set
the
throttle
lever
to
the
"start"
posi-
tion.
IFig.
2)
(5}
Put
the
engine switch into
the
"ON"
posi-
tion.
(6)
Pull the recoil
starter
grip forcefully from
the
position where compression
is
felt.
NOTE:
1)
When the engine
is
cold, closed
choke
lever makes it
start
easier.
2)
In
case of
hot
climate,
or
restarting
the
engine after
warmed
up
once,
start
it with
the
choke
lever fully
open.
3) After
the
engine has
started,
gradually
open
the
choke
lever
with
due
re-
ference to
the
engine
conditions,
and
ensure to make it fully
open
at
the
end. (Fig.
3)
4)
When the engine
is
cold, warm it
up
at
idle speed for
5~10
minutes
after
starting (engine warming-up). Imme-
diate
work after
the
engine was
started
may
shorten
its life time.
5)
€It
Never release
the
recoil
starter
grip
with
the
rope
in
being pulled.
• Never pull the rope fully.
• Pull
the
rope strainghtly.
(Fig.1)
High
Haut
Choke
lever
Embrayage
Debrayage
(Fig.
2)
r---"5=?='------_~
3-1 Methode
de
demarrage
(1) Debrayer
Ie
clabot principal. (Fig. 1)
(2) Placer
.l~
levier de
changement
de
viter(
en
POSItion neutre.
(3) Ouvrir
Ie
robinet
a
carburant.
(4)
Tourner
la
manette
des gaz
en
position de
demarrage. (Fig. 2.)
(5) Placer
Ie
bouton
du
moteur
en position
ON.
(6) Tirer
Ie
bouton
de demarrage a recul
d'un
coup
sec a
la
position ou
Ie
piston
commence
sa
course
de
compression.
Note:
1)
Si
Ie
moteur
est froid,
il
est preferable
de
fermer
Ie
starter
pour
faciliter
Ie
demarrage.
2) En saison
chaude
ou
si
Ie
moteur
est
encore
chaud,
laisser
Ie
starter
ouvert
pour
Ie
demarrage.
3)
Apres
la
demarrage, ouvrir progressive-
ment
Ie
starter
selon
Ie
fonctionne-
ment
du
moteur
et
veiller ace
qu'
il
soit
tout
a
fait
ouvert
a
la
fin, (Fig. 3)
4) Si
Ie
moteur
est froid,
Ie
laisser
chauffer
pendant
5 a
10
minutes
en
tournant
a vide (rechauffage
du
moteur).
Ignorer
cette
recommanda-
tion
peut
abreger
considerablement
la
duree
de
vie du
mtoeur.
5) •
Ne
jamais relacher
la
poignee
du
demarreur
a recul lorsque
la
corde
est
tendue
.
.1\10'>
i::tnl::ti<.:
tirpr
b
('"rnp
(,"nln
I
"'TO'>_


 To Next Page
 Loading...