Do you have a question about the ITC Power DG12000XSE-T and is the answer not in the manual?
Perform visual checks and regular cleaning of all components for safety and maintenance.
Specifies the recommended temperature range for equipment operation.
Reminder for regular cleaning of the air filter.
Warning about carbon monoxide and need for ventilation.
Emphasizes that repairs must be done by qualified personnel.
Guidelines for storing the generator in a well-ventilated area.
Procedures affect warranty; improper use can cause damage.
Regularly check for loose screws and nuts due to vibration.
Importance of high-quality oil and fuel for equipment performance.
Long-term storage requires a dry, non-cold environment.
Reminder to ensure all filters are cleaned regularly.
Warning about hot exhaust and need for cool-down before moving.
Avoid ignition sources near fuel and equipment.
Generator must be kept horizontal to prevent fuel loss and damage.
Always check fluid levels and maintenance before use.
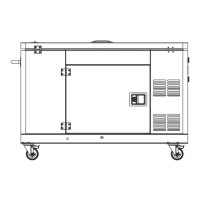
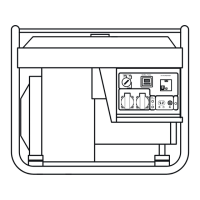
Description of the DC30 control panel.
Identification of the start key and door locker components.
Overview of breakers, sockets, and terminals.
Details on T-type connectors, ATS socket, and transfer switch.
Always check oil level before operation and add oil if needed.
Check oil level carefully after transport and add oil if necessary.
Illustrates the location of the filters within the generator.
Step 1 of the oil filling process.
Step 2 of the oil filling process, checking oil level.
Step 3 of the oil filling process, closing the cap.
Step 1 of connecting the battery cable.
Step 2 of connecting the battery cable (positive terminal).
Step 3 of connecting the battery cable (negative terminal).
Step 4 of connecting the battery cable (final check).
Step 1 of filling the fuel tank.
Step 2 of filling the fuel tank, checking fuel level.
Step 3 of filling the fuel tank, closing the cap.
Step 1 of filling the radiator.
Step 2 of filling the radiator with coolant.
Step 3 of filling the radiator, closing the cap.
Step 1 of starting the generator with a key.
Step 2 of starting the generator with a key (pressing start button).
Step 3 of starting the generator with a key (connecting plug).
Step 4 of starting the generator with a key (breaker).
Step 1 of starting the generator with ATS.
Step 2 of starting the generator with ATS (connecting plug).
Step 3 of starting the generator with ATS (connecting ATS cable).
Step 4 of starting the generator with ATS (plugging in).
Step 5 of starting the generator with ATS (checking oil).
Step 1 of stopping the generator (breaker).
Step 2 of stopping the generator (unplugging).
Step 3 of stopping the generator (cool down time).
Step 4 of stopping the generator (using stop button).
Step 5 of stopping the generator (emergency stop).
Step 1 of changing the oil (preparation).
Step 2 of changing the oil (draining old oil).
Step 3 of changing the oil (filling new oil).
Step 1 of cleaning or replacing the oil filter.
Step 2 of cleaning or replacing the oil filter (filter comparison).
Step 3 of cleaning or replacing the oil filter (installation).
Step 1 of inspecting or cleaning the air filter.
Step 2 of inspecting or cleaning the air filter (disassembly).
Step 3 of inspecting or cleaning the air filter (filter element).
Step 4 of inspecting or cleaning the air filter (reassembly).
Step 1 of replacing the fuel filter.
Step 2 of replacing the fuel filter (filter comparison).
Step 3 of replacing the fuel filter (installation).
Step 1 of checking or filling coolant.
Step 2 of checking or filling coolant (open/close valve).
Step 3 of checking or filling coolant (filling).
Technical data for the generator section.
Technical data for the engine section.
Technical data for the alternator section.
Logistical data such as weight.
Addresses issues like fuel shortage, air in circuit, and start lever position.
Covers checking oil level and injector cleanliness.
Addresses battery charging requirements.
Solution for injector malfunctions.
Addresses differential switch and plug contact problems.
Covers damaged AVR and replacement procedures.
Solution for bad plug contact affecting voltage.
Solution for damaged AVR affecting voltage output.
| Brand | ITC Power |
|---|---|
| Model | DG12000XSE-T |
| Category | Portable Generator |
| Language | English |