Do you have a question about the JAKO-O KIOSK and is the answer not in the manual?
Quantity 8 of screw type A, used for assembly.
Quantity 62 of screw type B, used for various assembly connections.
Quantity 5 of screw type C, for connecting parts.
Quantity 5 of screw type D, used in assembly.
Quantity 2 of screw type E, for specific assembly points.
Quantity 5 of screw type F, for assembly.
One Allen key of size SW3 for assembly.
One Allen key of size SW4 for assembly.
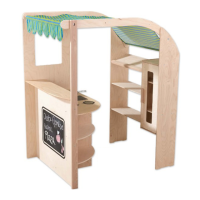
Assemble the initial frame structure using screws and an Allen key.
Attach the supports for the canopy using screws.
Fasten the canopy fabric to the frame using screws.
Mount the side panels to the structure.
Install the back panels onto the kiosk structure.
Construct the shelving unit for the kiosk interior.
Connect the side panel featuring shelves to the main structure.
Secure the back panel that includes shelves.
Install the counter panels onto the kiosk frame.
Fix the counter top to the assembled base.
Install drawer slides onto the designated parts.
Assemble the drawer components for the kiosk.
Attach the drawer front to the assembled drawer.
Slide the assembled drawer into its place.
Add decorative elements to the kiosk.
Complete the main structure assembly.
Install the canopy onto the top of the kiosk.
Fix the interior shelves into the main kiosk unit.
Perform final checks on the assembled kiosk.
Parts must be assembled by an adult; small parts pose a choking hazard.
Check fasteners regularly. Clean wooden parts with a damp cloth only.
Do not use disinfectants or hot water. For indoor use only.
| Brand | JAKO-O |
|---|---|
| Model | KIOSK |
| Category | Baby & Toddler Furniture |
| Language | English |