6
Regulateur (bâti) Version BL
Données techniques:
Courant max. 60 A
Courant adm. faible durée 390 A
Résistance interne 0,0012 Ohm
Domaine d’utilisation Voitures ou Trucks à l’échelle
Accus max. 2 LiPo éléments
Tension BEC 6,0 V
Courant BEC 3A
Types de moteurs Moteurs sans balais
Equipement de sécurité Protection contre la surchau e
arrêt du moteur par soustension
Dimensions ~ 48,5 x 38 x 32 mm
(avec ventilateur)
Poids ~ 90 g
(sans câble de branchements)
Programmable 5 étapes de programmation
(frein, basse tension, mode de
démarrage, etc.)
GB - Controller (installed) Version BL
Technical data:
Max. Current 60 A
Burst Current 390 A
Internal Resistance 0,0012 Ohm
For Use With Cars or Trucks scale
Battery packs max. 2 LiPo cells
BEC Voltage 6,0 V
BEC Current 3A
Motor Types Sensorless Brushless motors
Protective Circuits Temperature cut-o
Size ~ 48,5 x 38 x 32 mm (with fan)
Weight 90 g (without cable)
Programmable 5 Programming steps (Break,
Low Voltage, Start Mode etc.)
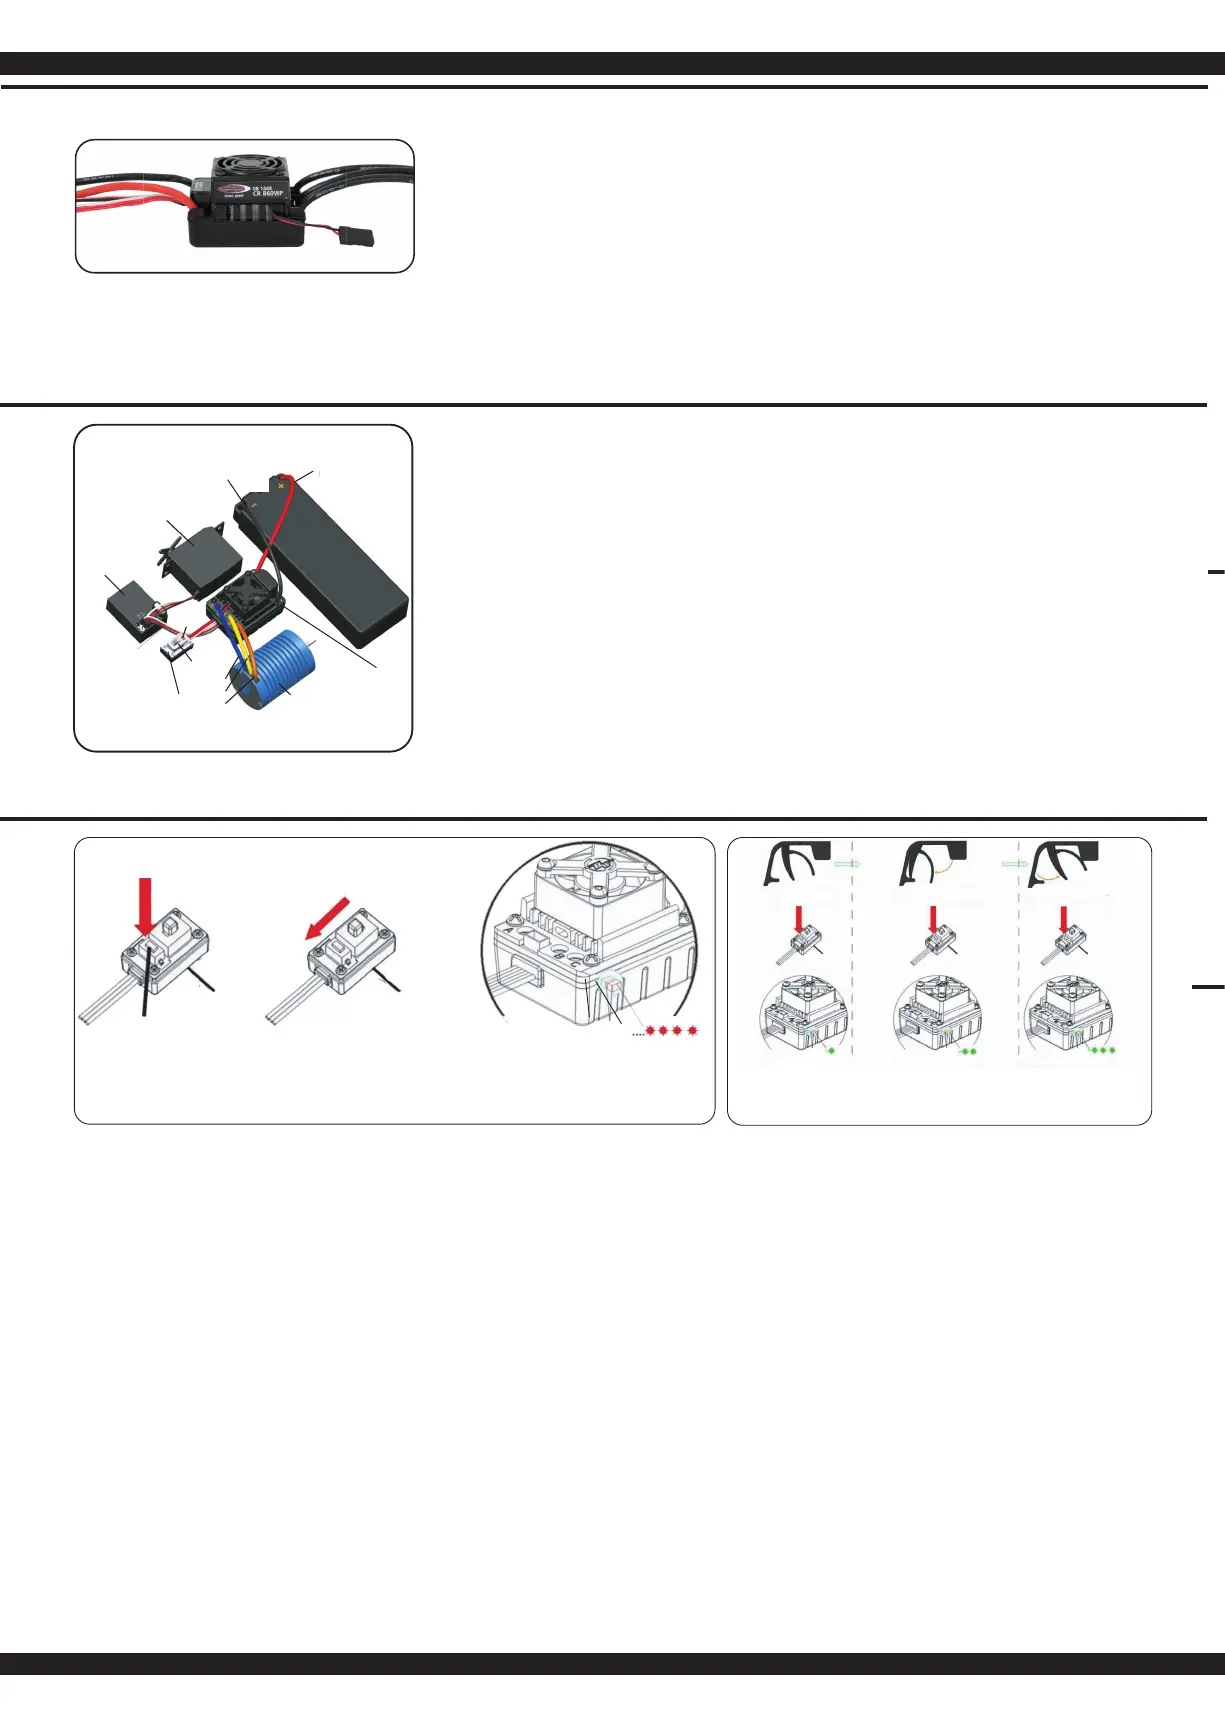
Motor
#A
#B
ESC
Channel 2
Switch
Receiver
Channel 1
Servo
Plus pole
red cable
Minus pole
black cable
Set
ON/OFF
FR - Utilisation du régulateur
Branchez le régulateur, le moteur, le récepteur, l’accu et servo
comme indiqué sur l’illustration ci-contre.
Veillez à respecter la bonne polarité de l’accu de propulsion.
Connectez le câble rouge avec la borne ’+’ et le câble noir ’-’ avec
la borne de l’accu. Les connecteurs ’#A’, ’#B’ et ’#C’ se branchent
sur le moteur. La touche ’SET’ sert à la programmation. Bran-
chez le câble de commande du régulateur sur la sortie „canal 2“
du récepteur. Respectez l’a ectation des canaux de votre radio-
commande. Le connecteurs (‘#A, ‘#B et ‘#C) se brancent sur le
moteur. Une a ectation spéci que n’est pas nécessaire. Après
avoir tout branché e ectuez un test de fonctionnement du mo-
teur. Si le moteur tourne dans le mauvais sens il suffi t d’inverser
deux des trois branchements au niveau du moteur.
Remarque:
Au travers de la fonction Revers de votre émetteur vous pouvez
inverser le sens de rotation du moteur. Veillez impérativement à
calibrer de nouveau le régulateur.
GB - Using Your ESC
Connecting the Receiver, Battery Pack and Motor
Connect the ESC, motor, receiver, battery and servo according
to the diagram.
Ensure that you observe the correct polarity of the battery pack.
The red cable should be connected to the ‘+‘ Plus Pole and the
black cable to the ‘-‘ Minus Pole. The ’#A’, ’#B’ and ’#C’ plugs
are connected to the motor. The ‘SET‘ button initiate the pro-
gramming mode.
The ESC should be plugged into the throttle channel of your re-
ceiver which is normally channel 2. If in doubt, check your Radio-
Control System’s instructions. The 3 Motor wires (#A’, ’#B’ und
’#C’) can now be connected, these connectors can be plugged in
any order, and if the motor rotates in the wrong direction any 2 of
the wires should be swapped.
Note:
You can use the servo reverse function of your transmitter to
reverse the motor direction but the ESC will have to be re-ca-
librated afterwards.
FR - Apprentissage de la course gaz/frein
Pour un fonctionnement optimal il est nécessaire de calibrer le régulateur. Pour cela il faut renseig-
ner trois positions avant, arrière et neutre.
Pour étalonner le système, procédez comme suit:
1. Mettez en marche l’émetteur. La course des servos doit être en position neutre. De plus il faut
éventuellement désactiver la fonction ABS sur votre émetteur.
2. Ensuite mettez en marche le récepteur. Appuyez en même temps sur la touche ’SET’, la LED
rouge commence à clignoter. Dès que cela est le cas vous pouvez relâcher la touche.
Si vous ne relâchez pas tout de suite la touche ’SET’ après, vous passez en mode program-
mation. Si vous ne souhaitez pas cela vous devez à nouveau éteindre le régulateur.
3. Vous pouvez con gurer trois paramètres:
Position de neutre, Fin de course de la marche avant, Fin de course de la marche arrière.
4. Placez la commande en position de neutre et appuyez sur la touche ’SET’, la LED verte
clignote et le moteur émet une sonorité.
Placez la commande en n de course pour désigner la marche avant et appuyez sur la touche
’SET’, la LED verte clignote deux fois et le moteur émet deux sonorités
Placez la commande en position arrière pour désigner la marche arrière et appuyez sur la
touche ’SET’, la LED verte clignote trois fois et le moteur émet trois sonorités.
Votre moteur est utilisable trois secondes après avoir terminé le processus.
GB - Throttle range calibration
To ensure that your ESC operates correctly it has to be calibrated. During this process the full
throttle, stop and brake positions will be set.
To calibrate the system, please proceed as follows:
1. Switch ON the transmitter. The throw should be set to neutral. If the transmitter is tted with an
ABS function this must be de-activated.
2. Press and hold down the ‘SET‘ button on the ESC and switch the receiver switch ON. The
LED will begin to blink. If you fail to release the
‘SET’ button the ESC will enter ‘Programming’ mode. If this
happens, you will have to switch the ESC o and start again to enter ‘Calibration’ mode.
3. Parameters can be set here:
Neutral point, Full throttle forwards, Full throttle reverse
4. Ensure that the throttle control is in the neutral position and press the ‘Set‘ button. The green
LED will ash once and the motor will omit a beep. Move the throttle control to the full throttle
(forwards) position and press the green ‘Set‘ button. The green LED will ash twice and the
motor will omit 2 bleeps. Move the throttle control to the full reverse position and press the
‘Set‘ button. The green LED will ash 3 times and the motor will omit 3 bleeps. 3 Seconds after
this procedure has been followed, the motor is ready for use.
Maintenez le bouton SET Commutateur de commutateur Relâchez le bouton SET,
lorsque les feux rouges LED starts
Hold the SET keep button Turn on the switch Release the SET button as soon
as the red LEDstarts to blink
ON/OFF
1
ON/OFF
Set
LED
Neutral point
rst click
second click
third click
Point of full throttle
Point of full brake
2
LED verte
clignote une fois
Green LED ashes
once
LED verte
clignote deux fois
Green LED
ashes twice
LED verte
clignote trois fois
Green LED
ashes thrice
Set
Set

 Loading...