9
PT
1. Combinação do gás, do desvio, do passo e da inclinação
Depois de aprender várias maneiras de controlar o modelo, pode agora tentar combinar
diferentes formas de controlo.
2. Modicação da perspectiva do voo
Umavezquevocêjáaprenderavoarapartirdo„traseiro“,podecaraoladooudafrentepara
o modelo e começar a praticar com esta posição. Nesta situação, tenha em mente que alguns
dos movimentos devem ser feitos „ao invés“.
SE | FI
1. Anslutning av gas och lutning
Efter man vet hur styr man den modellen då ska man kontrollera hur kopplar man olika
styrningssätt.
2. Förändring av ygsida
Eftermanvethurmanygerfrån„bakåt”,dåkanmanövaygnärmanståråtsidanellerframåt
modellen. I sådan situation ska man inte gissa att några styrningsmanöver ska man göra
”tvärtom”.
FI
1. Kaasun ja kallistuskomentojen yhdistäminen
Kun olet oppinut erilaisia ohjausliikkeitä, voit nyt yhdistää erilaisia ohjauskomentoja.
2. Lentoperspektiivin muutos
Kun olet oppinut ohjaamaan mallia ollessasi sen takapuolella, voit aloittaa harjoituksia mallin
sivu- tai etupuolelta. Tällöin huomioi, että ohjausliikkeitä suoritetaan käänteisesti.
DK
1. Om at kombinere gas, afvigelse, hældning til sider og hældning fremad/bagud
Efter at man har lært de forskellige måder at styre modellen på kan man forsøge at kombinere de
enkelte styringsmåder.
2. Ændring af yveperspektiv
Efter at man har lært at betjene modellen ”bagfra” kan man stille sig sidelæns el. med ansigtet
mod modellen og begynde at øve sig i at betjene modellen fra denne stilling. I så fald skal man
huske på, at visse styringsbevægelser skal foretages ”omvendt”.
forwardforward
A
B
FRONT
FRONT
FRONT
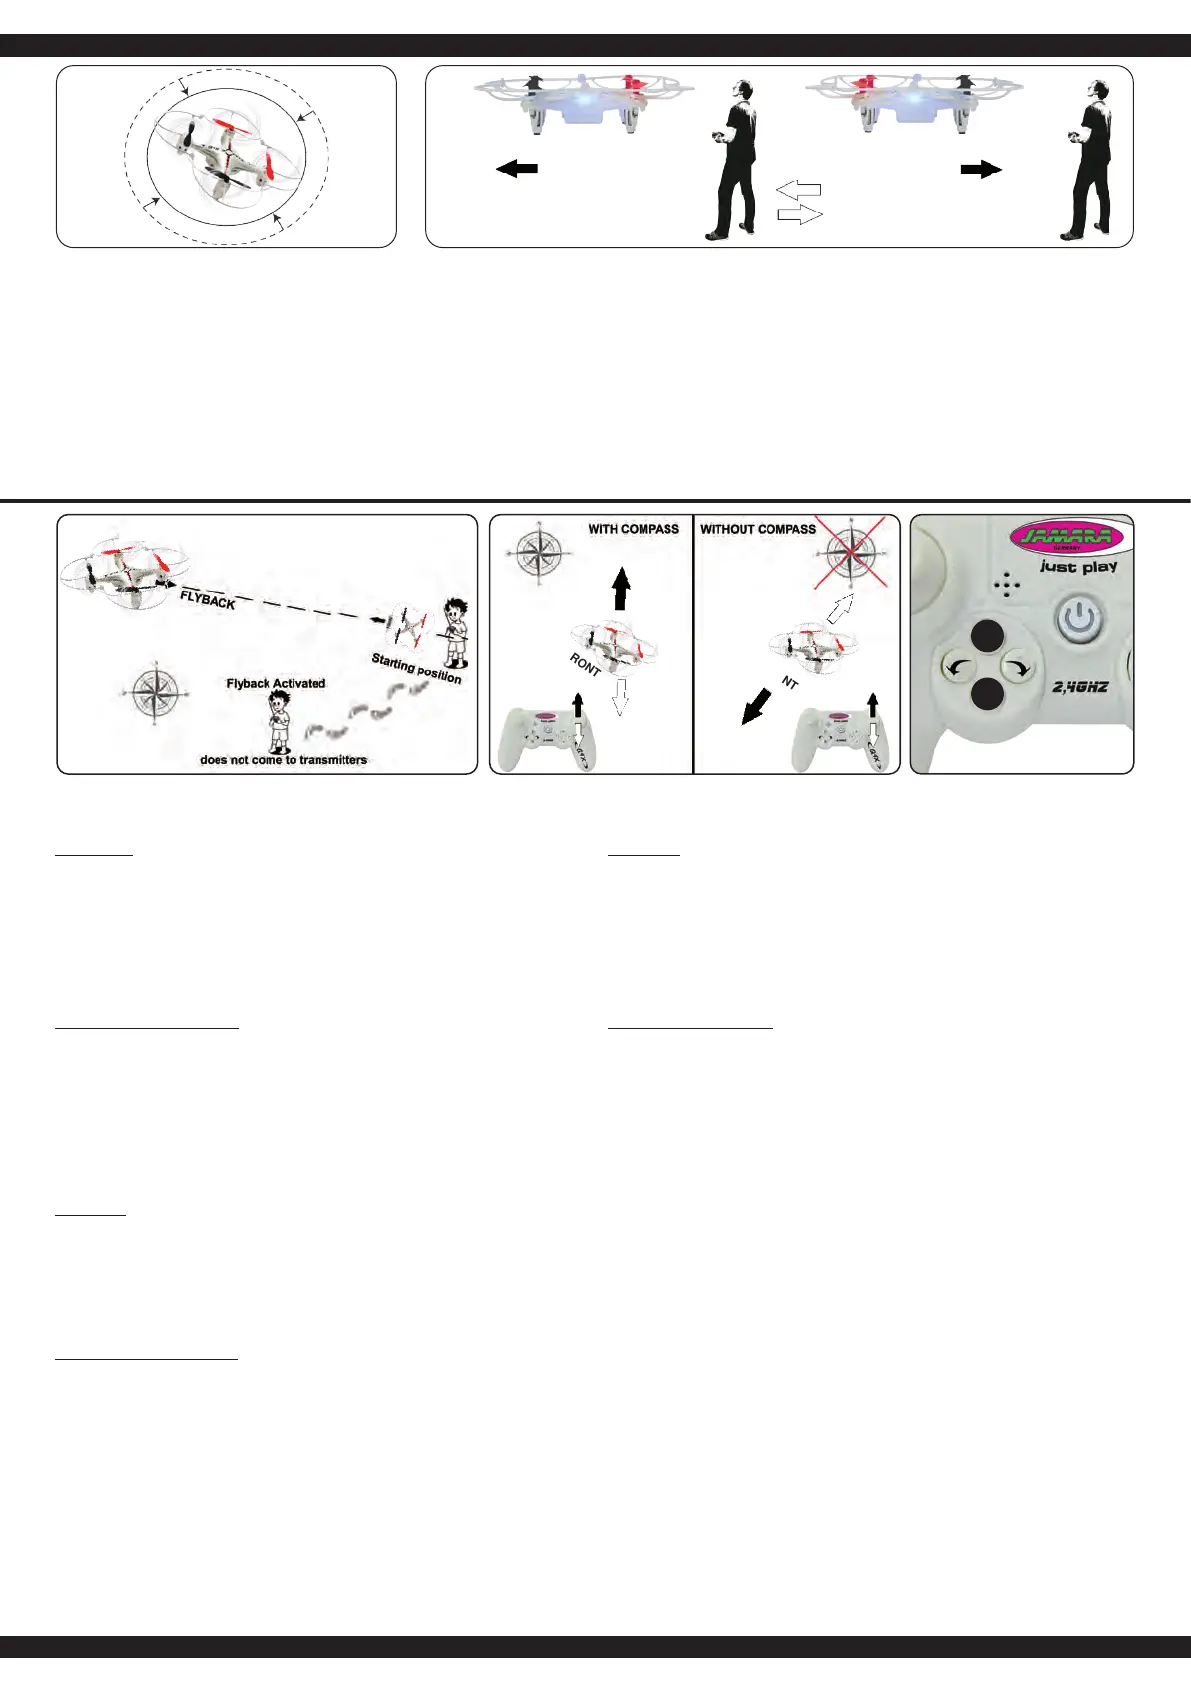
DE | AT | BE - Flyback- & Kompassfunktion:
Ihr Modell verfügt über eine Flyback- & Kompassfunktion. Das heißt es ist in der Lage trotz einer
Drehung (der Rumpf zeigt nicht mehr in Flugrichtung) in eine gewünschte Richtung (die ursprüngli-
cheFlugrichtung)zuiegenundhalbautomatischzuIhnenzurückzuiegen
Vorbereitung:
ZuerstsolltenSiesichGedankenmachenwelcheRichtungSieimKompassdesModelsabspei-
chern wollen. Diese Richtung wird beim aktivieren der Kompassfunktion automatisch zur abgespei-
chertenFlugrichtung.MöchtenSiealsoz.B.einenWegentlangiegenundwährenddessenden
Kompassmodus verwenden wählen Sie die Richtung in die der Weg führt als Grundrichtung für
den Kompass. Wenn Sie nun das Modell im Kompassmodus um die eigene Achse drehen lassen
müssen Sie sich keine Gedanken um die Flugrichtung an der Fernsteuerung machen. Wenn Sie
den rechten Steuerknüppel nach vorne drücken wird das Model in Richtung des Weges von ihnen
wegiegen.WennSiedenrechtenSteuerhebelzusichherziehenwirdsichdasModeldenWeg
entlang auf Sie zu bewegen.
Die Kompassfunktion kann im Flug durch langes drücken der Kompasstaste (A) aktiviert werden.
Durch eine zusätzliche rote LED am Sender signalisiert das Modell das es im Kompassmodus ist.
Einrichtung der Flybackfunktion
Die Richtung in die das Modell beim ersten Start gerichtet ist wird fest als Flybackrichtung abgespei-
chert. Die Flybackfunktion kann im Flug durch kurzes drücken der Flybacktaste (B) aktiviert werden.
Das Modell folgt in der Flybackfunktion unabhängig in welche Richtung der Rumpf des Models zeigt,
der vorher einprogrammierten Flybackrichtung zurück, bis Sie den rechten Steuerknüppel bewegen.
Während des Flyback- bzw. Kompassmodus müssen Sie weiterhin mit dem Gashebel die Höhe des
Modells kontrollieren.
ACHTUNG! Flyback funktioniert nur wenn Sie im Kompassmodus sind.
GB | IE | NI - Compass & Flyback function
YourmodelhasaCompass&Flybackfunction.Thismeansitisabletokeepthedesiredyback
directionevenifitturnsinanotherdirectionduringight(thefrontdoesnotfacetheightdirection
anymore)andiesbacktoyousemi-automatic.
Preparation:
First of all you should choose the direction that you want to save in the compass of the model. This
directionisusedbythecompassasthemainightdirection.Forexample,youyalongastraight
way and would like to use the compass mode; you have to choose the direction of the way as the
mainightdirection.Nowifyouareusingthecompassmodetofollowamovingobjectyoudonot
havetowasteathoughtontheyingdirectionofthemodel.Ifyoupushthesteeringsticktothefront
themodelwillyawayfromyou.Ifyoupullthesteeringsticktothebackthemodelwillybackto
you following the direction of the way. The Compass function can only be activated while the model
is in the air and by pressing long the compass button (A) on your remote control. An additional red
LED on the transmitter, the model indicates that it is in compass mode.
Setting up the Flyback function:
Thedirectioninwhichthemodelisfacingattherststartissavedpermanently asayback di-
rection.Theybackfunctioncanbeactivatedinightbypressingshorttheybackbutton(B).In
ybackmode,themodelindependentlyfollowsthedirectionpreviouslyprogrammednomatterin
whichdirectionthefuselageofthemodelshows.Youcanstopybackmodebymovingtheright
controlstick.Duringtheybackorcompassmodeyoustillhavetocontroltheheightofthemodel
with the throttle stick.
NOTE! Flyback works only when you are in compass mode.
FR | BE - Fonction boussole & yback
Votremodèleaunefonctionboussoleetyback.Ilpeutgardersadirectiondevolinitialemalgré
une rotation dans une direction souhaitée (le fuselage ne se trouve plus en direction du vol) dans
une direction souhaitée (la direction de vol d‘origine) pour voler et semi-automatique voler vers vous.
Préparation:
D’abordvous devriez rééchir à ladirectiondanslaquelle vous voulez sauvegarder la boussole
du modèle. Cette direction sera la nouvelle direction de vol automatiquement sauvegardée quand
vous activez la boussole. Si vous voulez voler le long de la route et au même moment prendre le
mode boussole, choisissez la direction dans laquelle mène la route comme direction de base pour
laboussole.Quandvoustournezlemodèleenmodeboussolesursonaxe,pourlmerunobjetqui
setrouveàcôtédevotremodèle,ilnefautpasrééchirsurladirectiondevolàlaradiocommande.
Si vous pressez le levier de commande droit an avant, le modèle va s’envoler de vous en direction
route. Quand vous rapprochez le levier de commande à vous le modèle va se bouger le long de
la route vers vous. Dirigez le modèle dans la direction souhaitée et appuyez longuement sur le
bouton compas (A). Un rouge à LED supplémentaire sur l‘émetteur, le modèle indique qu‘il est en
mode compas.
Installation du mode yback:
Dirigez le modèle dans la direction souhaitée et appuyez le bouton Flyback (B) courtement. De
modèle suit alors la direction compas installée en avance, indépendamment de la direction que
montre le fuselage et retourne lentement vers vous jusqu’à ce que vous bougez à nouveau le levier
droit.Enmodeboussoleouyback,vousdevezcontinuerparcontrôlerlahauteurduvolparlelevier
d’accélération.
ATTENTION! Flyback fonctionne seulement si vous êtes en mode boussole.
IT - Funzione Flyback- & Bussola:
Ilmodello hauna funzione Flyback-& Bussola.Questosignica cheéin gradononostanteuna
rotazione in una direzione desiderata (La fusoliera non è in direzione di volo) mantenere la direzione
originale del volo e semiautomatico volare di nuovo indietro verso di voi.
Preparazione:
Per primo deve aver una idea in quale direzione desidera memorizzare la bussola del modello.
Questa direzione quando attiva il modo bussola e automaticamente la nuova direzione di volo.
Quindi, se volete per esempio volare lungo il percorso e usare la modalità bussola scelga la dire-
zione in cui il percorso conduce come la direzione di base della bussola. Se ora deve far ruotare il
modello attorno al proprio asse in modalità bussola non ce bisogno di preoccuparsi per la direzione
di volo sulla radio. Se preme la leva di controllo destro in avanti il modello volerà in direzione dell
percorso via da voi. Se preme la leva di controllo destro verso di voi il modello volerà in direzione
della percorso verso di voi.
Installazione della Modalità Flyback- & Bussola:
La direzzione in cui il modello é diretto, viene memorizzatoa in modo permanente come Flyback
ossia direzione bussola. La funzione Flyback- & Bussola puo essere attivato durante il volo att-
raversopremendoilpulsantebussola(A)/yback(B).DallampeggiodelLEDesegnaleacustico
viene segnalato che il modello é in Flyback ossia modalità bussola. Il modello segue ora la direzi-
one indipendente, in cui la fusoliera del modello inica di come era stata programmata la direzione
bussolalentamenteindietroversodilei(Flyback)nchemuoveralalevadicontrollodestra.Dopo
aver spostato la leva dicontrollo destra il modello si trova automaticamente nella modalitá bussola.
Durante la modalità Flyback ossia bussola é necessario continuare a controllare l’altezza del mo-
dello attraverso la leva del gas.
ATTENZIONE! Il yback funziona solo quando sei in modalità bussola.


 To Next Page
 Loading...