y
r
e
w
t
q
u
A
i
o
!0
!1
!2
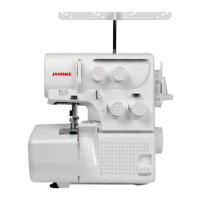
Threading the Machine
The left illustration shows the completed threading
conditions of four threads.
q
Lower looper thread
w
Upper looper thread
e
Right needle thread
r
Left needle thread
t
Thread guide
y
Thread guide plate
u
Threading chart
The machine is pre-threaded to make threading
easier. Tie the end of a new thread to one of the
pre-set threads, and pull it to draw the new thread
through the machine, following the steps below.
* Turn off the power switch before threading the
machine.
1. Pull the threads from the spools and draw them
through the thread guides, then tie the thread
ends together.
2. Raise the presser foot, draw the threads until
the knots are coming out from under the back
of the presser foot.
3. Stop drawing the needle threads when the
knots reach just before the needle eye. Cut the
knots and thread the needle eye.
4. Before you start sewing, clear the needle
threads from under the presser foot to make
sure they are not caught below the needle
plate. (Draw the needle threads in the direction
A) Then pull out the threads to the back
approximately 10 cm (4˝) away from the presser
foot. Lower the presser foot, and you are now
ready to sew.
i Thread guide
•Forre-threadingthemachineeasily,startfrom
the lower looper, upper looper, right needle and
left needle threads.
Make sure to clear the needle threads out from
below the needle plate and draw them to the
back and under the presser foot about 10 cm (4˝).
o Needle
!0 Needle thread
!1 Presser foot
!2 Needle plate
 Loading...