USER’S MANUAL
1. Unfolding the stroller
· Unfold the stroller by pulling the handle upwards and
holding the frame of chassis at the same time. (Picture 2)
· When the handle is in the right place, it is automatically
blocked in a snap-in mechanism. That action is assisted
by a characteristic, clearly audible “click”. Activation of
a safety lock prevents accidental folding of the stroller in
case the snap-in mechanism is not blocked.
Attention!
· Before you use the stroller make sure that the snap-in
mechanism is blocked. If it is not in the right position, it
is not safe to use the stroller.
2. Mounting and disassembling the wheels
·Take off the plastic protectors from the final parts of
the axles of the stroller. Keep the protectors in order to
protect the axles later on when you no longer use the
stroller.
In order to dismantle the 12” wheels push the springs of
the wheels as far as they will go and pull them towards
you until they slide off the axle. (Picture 3) If you want
to mount them again, push the button and insert the
wheels. Then release the button and pull them towards
you until they are blocked.
-Mount the front 10-inch wheel (Picture 4) with the fork
by putting the fork’s axle into the turntable until you hear
it click, which means that the wheel is blocked in the
right position. The front wheels may be locked to go only
forward by pushing the turntable’s lock. (Picture 5 B)
In order to dismantle the wheels push the spring of the
turntable as far as it will go and push the wheel with the
fork downwards. (Picture 5 A)
Attention!
There is grease on the wheels, which may make the
textiles dirty.
Risk of suffocation: make sure that the child does not
reach the plastic protectors of the axles
3. Starting of brakes up
· The stroller breaks by pressing the lateral brake pedal
(Picture 6), so that the ends of the brake lever block the
sprocket wheel.
· Releasing of the break is enabled by pulling the brake
pedal up.
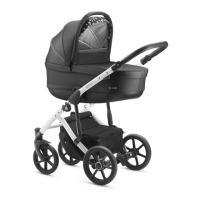
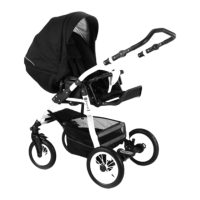
4. Installing and uninstalling of the carrycot:
Put the hood on the chassis by entering the bolts located
in its lower part into central plug mechanism of carrycot,
it will be closed automatically. (Picture 8, 9, 19, 20)
To remove the carrycot from the chassis, press the red
buttons to the stop, located at the bottom, central part of
the carrycot. (This operation does not have to be carried
out simultaneously on both sides of the carrycot). Next
lift the carrycot upwards.
5. Footcover installation
Put the footcover on the carrycot and fasten it with the
snaps located on the sides of hood and footcover.
6. Seat installation (travel insert):
Installing and uninstalling of the seat is the same as
carrycot.
The seat can be installed in two ways; the footboard can
be in the direction of travel or vice versa.
- Put the seat upholstery by pulling it to the seat frame,
and next fasten all the snaps.
Warning !
Before use check if the carrycot or the seat are properly
locked at the latches.
Warning ! Before using the stroller always check if the
backrest is locked properly.
7. Seat’s hood installing / uninstalling
The seat has got the separate hood.
In order to place it on the walking seat, one should insert
the black holders located on the bow ends into the
plastic hooks at both sides of the seat frame/chassis.
In order to remove the hood, one should press the black
button located in its lower part and pull it up, repeat on
the other side (Picture 9)
8. Barrier installation/uninstallation
- Place the protective barrier on the frame of the seat by
inserting it into plastic holders.
In order to remove the barrier, press the red button
located in its lower part and pull it up, repeat on the other
side (Picture 10).
9. Installing of the foot muff
Stretch the covering on the seat and pin it with a snap.
10. Folding the stroller
- In order to fold the frame dismantle the gondola
(Point 4) and dismantle or unlock the front wheels.
After that fold the chassis by pulling upwards the plastic
handles for folding the stroller located at the handgrip
(Picture 11). The chassis will be locked. Pull the safety
lock located in the place where the gondola is fixed
and complete folding the frame. If you need to further
decrease the size of the stroller, you also may dismantle
the wheels.
In order to release the adapters, push the button located
at the side of the child seat. Repeat the same action at the
other side.
11. Adjusting the height of the guide rail
Simultaneously press the two black buttons located on
the guide rail, on its both sides, from inside, and moving
the guide rail properly, increase or decrease its height
(Picture 12).
12. Setting of the footboard position
The footboard can be adjusted at three positions. Low
position (lowered): the footboard located at the horizontal
position must be pulled forward by ratchet handle
(Picture 13) and carefully let down.
Horizontal position: the footboard should be lifted from
the lowered position to the level, this blockade automati-
cally locks by itself.
 Loading...